No-Bake Strawberry Shortcake Bars – So Light & Creamy!

WANT TO SAVE THIS RECIPE?

Introduction

As the warm summer months approach, the allure of no-bake desserts becomes even more irresistible. These delightful treats not only save you from heating up the kitchen but also provide a refreshing sweetness that perfectly complements the season. Among the myriad of no-bake options, No-Bake Strawberry Shortcake Bars stand out as a quintessential summer delight. With their light and creamy texture, these bars are a harmonious blend of flavors and textures that will leave your taste buds dancing.

Imagine biting into a luscious layer of creamy filling, surrounded by fresh, sweet strawberries, all resting on a perfectly buttery crust. This combination not only satisfies your sweet tooth but also brings the essence of summer right to your plate. Whether you’re hosting a backyard barbecue, a picnic in the park, or simply indulging in a sweet treat at home, these no-bake strawberry shortcake bars are sure to impress.

Understanding the Components of Strawberry Shortcake Bars

To fully appreciate the beauty of these no-bake strawberry shortcake bars, it’s essential to understand the significance of each layer in the recipe. Each component plays a crucial role in creating that perfect balance of flavors and textures that make this dessert so memorable.

The Crust: Importance of a Firm Base

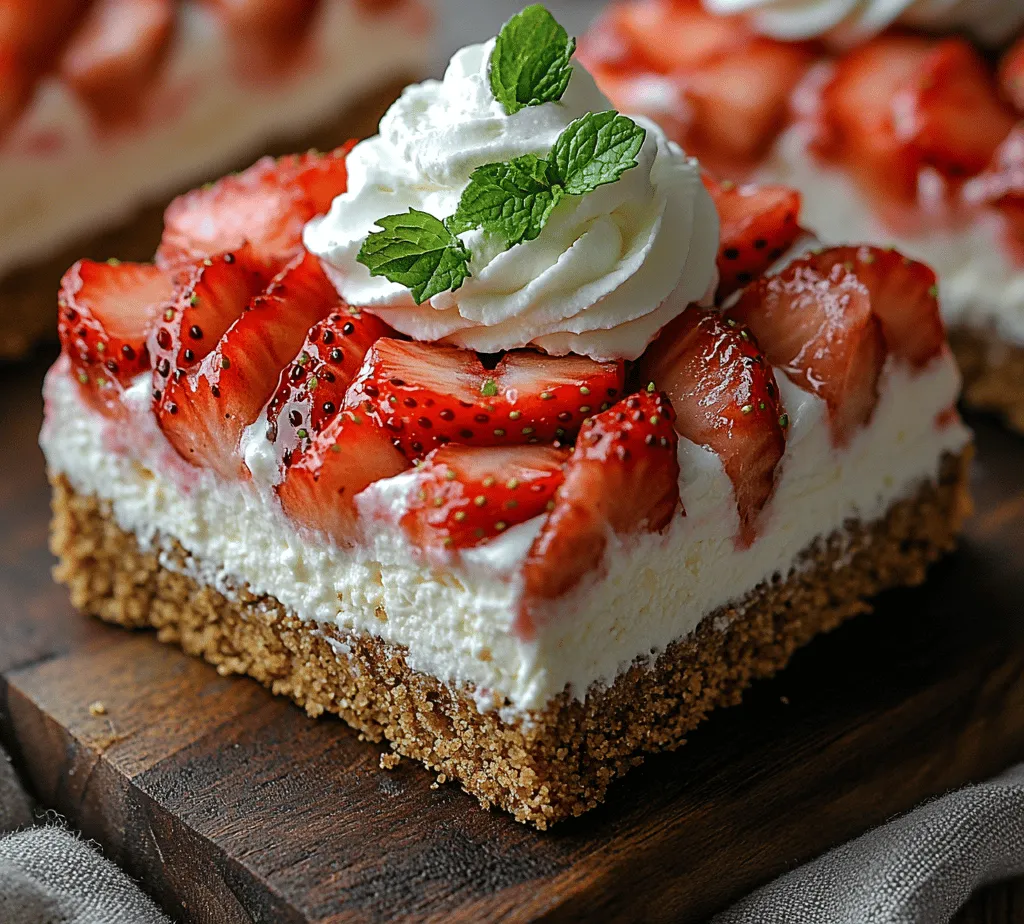
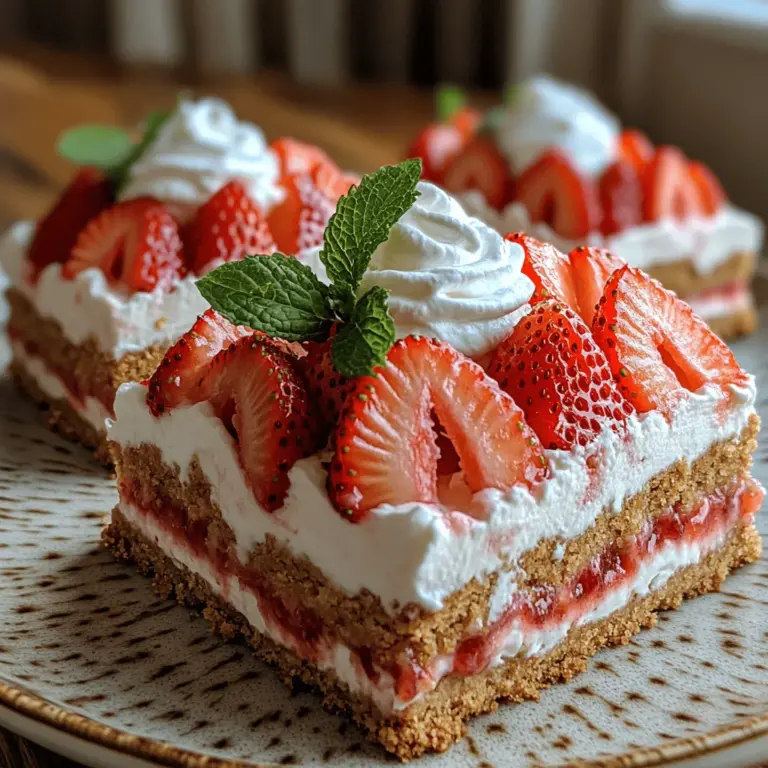
The crust serves as the foundation of the strawberry shortcake bars, providing structure and support for the creamy filling and fruity topping. Typically made from graham cracker crumbs, the crust must be firm enough to hold the layers together while also being tender enough to melt in your mouth. The combination of graham cracker crumbs and melted unsalted butter not only binds the crust but also adds a rich, buttery flavor that complements the sweetness of the strawberries.

The Cream Filling: Creamy Texture and Flavor Profile

Next, we have the cream filling, which is the heart of the dessert. This layer is where the magic happens, combining heavy whipping cream and cream cheese to create a light, airy texture. The heavy whipping cream is whipped to soft peaks, adding volume and an ethereal quality to the filling. Cream cheese contributes a delightful tanginess, balancing the sweetness of the other elements while providing that signature creamy consistency.

The Strawberry Topping: Fresh Flavors and Sweetness

Finally, we arrive at the strawberry topping, the pièce de résistance of this dessert. Fresh strawberries not only provide a burst of color but also infuse the bars with vibrant, natural sweetness. When in season, these berries are at their peak flavor, making them the perfect addition to your no-bake strawberry shortcake bars. The combination of the sweet strawberries with the rich cream filling and buttery crust creates a delightful flavor explosion that is irresistible.

Ingredients Breakdown

Before diving into the preparation, let’s take a closer look at the ingredients that make up these scrumptious no-bake strawberry shortcake bars. Understanding the role of each component will help you appreciate the final product even more.

Graham Cracker Crumbs: Flavor and Texture

Graham cracker crumbs are the star of the crust, providing a sweet and slightly nutty flavor that pairs beautifully with the other ingredients. They offer a delightful crunch that contrasts with the creamy filling, making each bite a textural delight. For best results, opt for finely crushed graham crackers to ensure a smooth, even base.

Unsalted Butter: Binding Agent and Richness

Unsalted butter is essential for binding the graham cracker crumbs together, creating a sturdy but tender crust. The richness of the butter enhances the overall flavor of the bars, contributing to their decadent taste. It’s important to use unsalted butter to maintain control over the sweetness of the dessert, allowing you to adjust the flavors as needed.

Heavy Whipping Cream: Providing Lightness and Volume

Heavy whipping cream is a crucial ingredient in the cream filling, responsible for its light and airy texture. When whipped, it adds volume and a luxurious mouthfeel that elevates the dessert. The key is to whip the cream to soft peaks, ensuring it maintains its structure without becoming grainy.

Cream Cheese: Creamy Consistency and Tanginess

Cream cheese is another vital component of the filling, contributing to its creamy consistency and a subtle tang that cuts through the sweetness. This balance is essential for creating a well-rounded dessert that is not overly sweet. Be sure to use softened cream cheese for easy mixing and a smooth filling.

Fresh Strawberries: Key Flavor Component

Fresh strawberries are the highlight of this dessert, offering a burst of flavor and brightness. Their natural sweetness complements the creamy filling while providing a refreshing contrast to the rich crust. When selecting strawberries, look for ripe, vibrant berries that are in season for the best taste. For an extra touch, you can macerate the strawberries with a bit of sugar to enhance their sweetness and create a syrupy glaze.

Adjustments for Sweetness: Importance of Balancing Flavors

When making no-bake strawberry shortcake bars, it’s essential to strike the right balance of sweetness. Depending on your personal preference and the sweetness of the strawberries, you may need to adjust the amount of sugar in the filling. Tasting as you go will help ensure that the final product is perfectly balanced and delicious.

Step-by-Step Instructions for Preparation

Now that we’ve covered the components and ingredients, let’s move on to the preparation. Making these no-bake strawberry shortcake bars is a straightforward process that requires minimal effort and time. Follow these step-by-step instructions for a deliciously easy dessert.

Preparing the Crust

1. Crush the Graham Crackers: Start by crushing the graham crackers into fine crumbs. You can do this by placing them in a resealable plastic bag and using a rolling pin or by pulsing them in a food processor until you achieve a fine texture.

2. Mix with Butter: In a mixing bowl, combine the crushed graham cracker crumbs with melted unsalted butter. Stir until the mixture is evenly coated and resembles wet sand. This will ensure that the crust holds together when pressed into the pan.

3. Press into the Pan: Line an 8×8-inch baking dish with parchment paper for easy removal, then pour the graham cracker mixture into the dish. Use the back of a measuring cup or your fingers to firmly press the mixture into an even layer on the bottom of the dish. Make sure to pack it down well to create a sturdy base.

4. Chill the Crust: Place the crust in the refrigerator to set while you prepare the cream filling. This will help it firm up and provide the necessary structure for the layers that follow.

Making the Cream Filling

1. Whip the Cream: In a large mixing bowl, pour in the heavy whipping cream and begin whipping it using an electric mixer on medium speed. Continue whipping until soft peaks form. Be careful not to overbeat, as this can lead to a grainy texture.

2. Prepare the Cream Cheese Mixture: In a separate bowl, beat the softened cream cheese with sugar and vanilla extract until smooth and creamy. This step is crucial for ensuring that the cream cheese incorporates evenly into the whipped cream.

3. Combine the Mixtures: Gently fold the whipped cream into the cream cheese mixture using a spatula. Start with a small amount of the whipped cream to lighten the cream cheese, then carefully fold in the rest until well combined. This technique helps preserve the airy texture of the whipped cream.

4. Spread the Filling: Once the cream filling is ready, remove the crust from the refrigerator and spread the filling evenly over the crust using a spatula. Smooth the top to create an even layer.

5. Chill Again: Place the filled dish back into the refrigerator for at least two hours, or until the filling is set. This chilling time allows the flavors to meld and the filling to firm up for slicing.

By following these steps, you’ll be well on your way to creating a delightful batch of no-bake strawberry shortcake bars that are sure to impress friends and family alike. Set the stage for a refreshing summer treat, and get ready to enjoy the delicious combination of creamy filling, sweet strawberries, and a buttery crust. In the next part of the article, we will cover the final touches, including the strawberry topping and some helpful tips for achieving the best results.

As the warm summer months approach, the allure of no-bake desserts becomes even more irresistible. These delightful treats not only save you from heating up the kitchen but also provide a refreshing sweetness that perfectly complements the season. Among the myriad of no-bake options, <strong>No-Bake Strawberry Shortcake Bars</strong> stand out as a quintessential summer delight. With their light and creamy texture, these bars are a harmonious blend of flavors and textures that will leave your taste buds dancing.” /></p>
</p>
<h3>Step-by-Step Guide to Ensuring Perfect Whipped Cream and Cream Cheese Blend</h3>
</p>
<p>Creating the ideal filling for your No-Bake Strawberry Shortcake Bars starts with properly whipping the cream and blending it with cream cheese. Follow these steps for a light and creamy texture:</p>
</p>
<p>1. <strong>Chill Your Tools</strong>: Before beginning, place your mixing bowl and whisk or beaters in the refrigerator for about 10-15 minutes. This helps the cream whip up faster and increases its volume.</p>
</p>
<p>2. <strong>Choose the Right Cream</strong>: Use heavy whipping cream (at least 36% fat content) for the best results. The higher fat content allows for better aeration and stability.</p>
</p>
<p>3. <strong>Whip to Stiff Peaks</strong>: Start whipping the cold cream at medium speed. Once it begins to thicken, gradually add in powdered sugar (about 1-2 tablespoons per cup of cream) and continue whipping until you reach stiff peaks. This means the cream should stand tall when you lift the whisk.</p>
</p>
<p>4. <strong>Blend the Cream Cheese</strong>: In a separate bowl, beat softened cream cheese until smooth. This step is crucial; if the cream cheese is lumpy, it will affect the overall texture of your filling.</p>
</p>
<p>5. <strong>Combine Carefully</strong>: Gently fold in about one-third of the whipped cream into the cream cheese mixture using a spatula. This lightens the cream cheese and makes it easier to incorporate the rest without deflating the whipped cream.</p>
</p>
<h3>Importance of Folding Technique to Maintain Lightness</h3>
</p>
<p>Folding is a gentle technique that combines ingredients without losing air. Here’s how to do it right:</p>
</p>
<p>– <strong>Use a Spatula</strong>: A rubber spatula is ideal for folding. It allows you to scrape the sides of the bowl and lift the mixture from the bottom.</p>
</p>
<p>– <strong>Cut and Turn</strong>: Start from the bottom and cut through the mixture to the top, then turn the bowl slightly and repeat. This method ensures that the whipped cream is evenly distributed without losing its airy texture.</p>
</p>
<h3>Assembling the Bars</h3>
</p>
<p>Now that you have your light and creamy filling, it’s time to assemble the No-Bake Strawberry Shortcake Bars.</p>
</p>
<p>1. <strong>Prepare the Base</strong>: Once your crust has cooled completely, it’s ready for the filling. If you used parchment paper, lift the crust out of the pan for easier assembly.</p>
</p>
<p>2. <strong>Spread the Filling</strong>: Use an offset spatula to spread the cream cheese and whipped cream mixture evenly over the crust. Start from the center and gently push towards the edges to maintain an even layer.</p>
</p>
<p>3. <strong>Use a Light Touch</strong>: When spreading, be careful not to disturb the crust. A gentle hand will help keep the layers distinct.</p>
</p>
<h3>Tips for Spreading the Filling Evenly</h3>
</p>
<p>– <strong>Work Quickly</strong>: The filling can start to set as it warms up, so spread it immediately after mixing.</p>
</p>
<p>– <strong>Smooth the Top</strong>: After spreading the filling, smooth the top with the spatula for an aesthetically pleasing finish. You can create a wave or swirl pattern for added flair.</p>
</p>
<h3>Importance of Chilling Times for Setting</h3>
</p>
<p>Chill your assembled bars in the refrigerator for at least 4 hours, or ideally overnight. This is crucial for several reasons:</p>
</p>
<p>– <strong>Setting the Filling</strong>: The filling needs time to firm up, allowing the bars to hold their shape when cut.</p>
</p>
<p>– <strong>Flavor Development</strong>: Chilling allows the flavors to meld, enhancing the overall taste of the dessert.</p>
</p>
<h3>Preparing the Strawberry Topping</h3>
</p>
<p>While your bars chill, it’s time to prepare the fresh strawberry topping.</p>
</p>
<h4>Explanation of Macerating Strawberries: Benefits for Flavor and Texture</h4>
</p>
<p>Macerating strawberries involves sprinkling them with sugar and letting them sit for a while. This process draws out their juices and enhances their flavor. Here’s how to do it:</p>
</p>
<p>1. <strong>Slice the Strawberries</strong>: Cut your fresh strawberries into quarters or slices, depending on your preference.</p>
</p>
<p>2. <strong>Add Sugar</strong>: Mix the sliced strawberries with a tablespoon of sugar. This will help draw out the natural juices and create a syrup.</p>
</p>
<p>3. <strong>Let it Rest</strong>: Allow the strawberries to sit for about 15-30 minutes. You’ll notice the sugar will dissolve, creating a delicious syrup that will elevate the topping.</p>
</p>
<h4>How to Enhance Natural Sweetness with Lemon Juice</h4>
</p>
<p>To add a zesty twist to your macerated strawberries, squeeze a bit of fresh lemon juice over them. The acidity of lemon juice balances the sweetness and enhances the overall flavor profile.</p>
</p>
<h3>Final Assembly and Chill</h3>
</p>
<p>Once your bars have chilled and the strawberry topping is ready, it’s time for the final assembly.</p>
</p>
<p>1. <strong>Layer the Strawberries</strong>: After the bars have set, remove them from the refrigerator. Top the filling with the macerated strawberries, spreading them evenly across the surface.</p>
</p>
<p>2. <strong>Final Chill</strong>: Return the bars to the refrigerator for an additional 30 minutes to allow the flavors to meld.</p>
</p>
<h3>Importance of Chilling for Flavor Melding and Easy Slicing</h3>
</p>
<p>Chilling for the final 30 minutes not only enhances the flavors but also allows for easier slicing. When the bars are properly chilled, they will cut into perfect squares or rectangles without losing their shape.</p>
</p>
<h3>Tips for Serving and Presentation</h3>
</p>
<p>When it’s time to serve your No-Bake Strawberry Shortcake Bars, consider these presentation tips:</p>
</p>
<p>– <strong>Use a Sharp Knife</strong>: For clean cuts, use a sharp knife and wipe it clean between slices.</p>
</p>
<p>– <strong>Serve on Chilled Plates</strong>: If possible, chill your serving plates in the refrigerator before serving. This keeps the bars cool and refreshing.</p>
</p>
<p>– <strong>Garnish</strong>: Add a dollop of whipped cream on top of each bar and a few fresh mint leaves for a pop of color and added freshness.</p>
</p>
<h2>Flavor Pairings and Serving Suggestions</h2>
</p>
<p>To elevate your dessert experience, consider these flavor pairings and serving suggestions:</p>
</p>
<h3>Garnish Options: Whipped Cream and Fresh Mint</h3>
</p>
<p>A dollop of whipped cream and a sprig of fresh mint not only enhance the aesthetic appeal of your bars but also add a refreshing contrast to the sweetness of the strawberries.</p>
</p>
<h3>Alternative Toppings for Variety: Other Fruits or Flavored Sauces</h3>
</p>
<p>Don’t hesitate to experiment with different toppings! Consider using other fruits such as blueberries, raspberries, or peaches. You can also drizzle flavored sauces like chocolate or caramel for a decadent twist.</p>
</p>
<h3>Suggestions for Pairing with Beverages: Ideal Drinks to Complement the Bars</h3>
</p>
<p>Pair your No-Bake Strawberry Shortcake Bars with a refreshing beverage. Ideal options include:</p>
</p>
<p>– <strong>Iced Tea</strong>: A light, unsweetened iced tea complements the sweetness of the bars perfectly.</p>
</p>
<p>– <strong>Sparkling Water</strong>: A splash of lemon or lime in sparkling water offers a refreshing contrast.</p>
</p>
<p>– <strong>White Wine Spritzer</strong>: For an adult twist, a white wine spritzer pairs beautifully with the fruity flavors of the dessert.</p>
</p>
<h2>Nutritional Information</h2>
</p>
<p>Understanding the nutritional aspects of your No-Bake Strawberry Shortcake Bars can help you make informed choices.</p>
</p>
<h3>Overview of the Nutritional Aspects of the Ingredients Used</h3>
</p>
<p>The main ingredients in this recipe include cream cheese, heavy cream, sugar, and fresh strawberries. Here’s a quick breakdown:</p>
</p>
<p>– <strong>Cream Cheese</strong>: Provides a rich flavor and creamy texture while contributing protein and calcium.</p>
<p>– <strong>Heavy Cream</strong>: Adds richness and contributes to the overall mouthfeel of the dessert.</p>
<p>– <strong>Sugar</strong>: While it sweetens the bars, consider adjusting the amount to suit your taste.</p>
<p>– <strong>Strawberries</strong>: Low in calories and high in vitamin C, they add freshness and flavor.</p>
</p>
<h3>Discussion on Caloric Content and Serving Sizes</h3>
</p>
<p>On average, one serving of these No-Bake Strawberry Shortcake Bars can contain around 200-250 calories, depending on the portion size and specific ingredients used. For a lighter version, consider reducing the amount of cream cheese or sugar.</p>
</p>
<h3>Potential Adjustments for Dietary Preferences (e.g., Gluten-Free Options)</h3>
</p>
<p>For gluten-free options, ensure that the graham cracker crust is made from gluten-free crackers or consider using almond flour as a base. This dessert can easily be adapted to accommodate various dietary preferences while maintaining its delicious flavor.</p>
</p>
<h2>Conclusion</h2>
</p>
<p>The No-Bake Strawberry Shortcake Bars are a delightful dessert that effortlessly combines lightness and creaminess, making them an ideal treat for any occasion. With a straightforward preparation process, these bars highlight the natural sweetness of strawberries, enhanced by a creamy filling that melts in your mouth.</p>
</p>
<p>Encouragingly versatile, this recipe is perfect for summer gatherings, birthdays, or simply as a sweet indulgence at home. The beauty of homemade desserts lies not only in their flavors but also in the joy of sharing them with loved ones.</p>
</p>
<p>So gather your ingredients and try this simple yet elegant recipe. You’ll find that the delightful taste of No-Bake Strawberry Shortcake Bars is not only a treat for your palate but also a wonderful way to create lasting memories with family and friends. Enjoy the process and the delicious results!</p>
</div>

As the warm summer months approach, the allure of no-bake desserts becomes even more irresistible. These delightful treats not only save you from heating up the kitchen but also provide a refreshing sweetness that perfectly complements the season. Among the myriad of no-bake options, No-Bake Strawberry Shortcake Bars stand out as a quintessential summer delight. With their light and creamy texture, these bars are a harmonious blend of flavors and textures that will leave your taste buds dancing.

No-Bake Strawberry Shortcake Bars – So Light & Creamy!

Discover the ultimate summer treat with No-Bake Strawberry Shortcake Bars! These delightful bars feature a buttery graham cracker crust, a light and creamy filling made from whipped cream and cream cheese, all topped with fresh, juicy strawberries. Perfect for picnics or backyard gatherings, this no-bake dessert is easy to make and even easier to enjoy. Indulge in the refreshing taste of summer while impressing your friends and family with this luscious, guilt-free dessert!

Ingredients
  

For the Crust:

1 ½ cups graham cracker crumbs

½ cup unsalted butter, melted

2 tablespoons granulated sugar

1 teaspoon vanilla extract

For the Cream Filling:

1 cup heavy whipping cream

8 oz cream cheese, softened

½ cup powdered sugar

1 teaspoon vanilla extract

1 tablespoon lemon juice

For the Strawberry Topping:

2 cups fresh strawberries, hulled and sliced

¼ cup granulated sugar (adjust based on sweetness of strawberries)

1 teaspoon lemon juice (to enhance flavor)

For Garnish (optional):

Whipped cream

Fresh mint leaves

--

Instructions
 

Prepare the Crust:

    - In a medium mixing bowl, combine the graham cracker crumbs, melted butter, granulated sugar, and vanilla extract. Mix until all ingredients are well incorporated and resemble wet sand.

      Form the Crust:

        - Press the graham cracker mixture firmly into the bottom of a lined 8x8-inch baking pan, using the back of a measuring cup or your fingers to create an even layer. Place in the refrigerator to set while you prepare the filling.

          Make the Cream Filling:

            - In a large bowl, beat the heavy whipping cream until it forms stiff peaks. In a separate bowl, beat the softened cream cheese until smooth. Gradually add the powdered sugar, vanilla extract, and lemon juice, mixing until fully combined and creamy.

              - Gently fold the whipped cream into the cream cheese mixture until no streaks remain. Be careful not to deflate the whipped cream.

                Assemble the Bars:

                  - Remove the crust from the refrigerator. Spread the cream filling evenly over the crust, smoothing the top with a spatula. Return to the refrigerator to set for about 30 minutes.

                    Prepare the Strawberry Topping:

                      - In a mixing bowl, toss the sliced strawberries with granulated sugar and lemon juice. Let them sit for about 10-15 minutes to macerate, which will draw out their natural juices.

                        Top the Bars:

                          - Once the cream filling has set, evenly distribute the macerated strawberries over the top of the cream filling. Use a spatula to gently spread the strawberries and their juices, creating a beautiful topping.

                            Chill and Serve:

                              - Chill the entire dish for at least 1 hour before slicing into bars. For clean cuts, run a sharp knife under hot water and wipe dry before slicing.

                                Garnish (optional):

                                  - Serve chilled with a dollop of whipped cream and a sprig of fresh mint for a beautiful presentation.

                                    ---

                                      Prep Time: 20 minutes | Total Time: 1 hour 50 minutes | Servings: 9 bars

                                        WANT TO SAVE THIS RECIPE?

                                        Leave a Comment

                                        Recipe Rating