Introduction
In the world of desserts, few things are as delightful as a chilled cheesecake, especially when it’s adorned with a vibrant layer of fresh berries. No-bake cheesecake recipes have surged in popularity, capturing the hearts of dessert enthusiasts everywhere. These recipes offer a straightforward approach to creating delicious treats without the need for an oven, making them ideal for warm days or for those who prefer a hassle-free cooking experience.
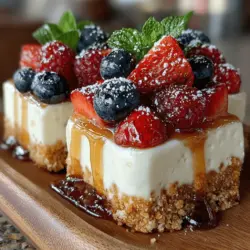
Today, we are excited to delve into the creation of No-Bake Berry Bliss Cheesecake Bars—a refreshing dessert that is perfect for any occasion, from summer picnics to special celebrations. These cheesecake bars not only showcase the lusciousness of cream cheese but also highlight the natural sweetness and tartness of mixed berries, creating an irresistible combination that is both creamy and fruity. This detailed guide will walk you through the ingredients, preparation techniques, and assembly of these decadent bars, ensuring you achieve the perfect balance of flavors and textures.
Understanding the No-Bake Cheesecake Concept
Defining No-Bake Cheesecake
No-bake cheesecake is a popular variant of traditional cheesecake that skips the baking process, relying instead on chilling to set the filling. This method typically involves combining cream cheese with whipped cream or other stabilizers to achieve a thick, creamy texture without the need for heat. The absence of baking makes this dessert not only simpler to prepare but also allows the fresh flavors of the ingredients to shine through.
Examining the Benefits of No-Bake Desserts
One of the most significant advantages of no-bake desserts is their simplicity. With minimal preparation and no need for an oven, they can be quickly assembled, making them perfect for last-minute gatherings or when you want to whip up something special without spending hours in the kitchen. Additionally, no-bake desserts are often lighter, which is particularly appealing during warmer months. They can be made in advance and stored in the refrigerator, allowing you to enjoy a delicious treat without the stress of last-minute baking.
The Appeal of Cheesecakes in Dessert Culture
Cheesecake has long been a beloved dessert around the world, celebrated for its rich, creamy texture and versatility. From classic New York-style cheesecakes to innovative fruit-topped versions, the appeal of cheesecake lies in its ability to cater to various tastes and preferences. Whether enjoyed plain or adorned with toppings, cheesecake offers a luxurious indulgence that satisfies the sweet tooth. No-bake cheesecakes, in particular, have gained a following for their ease of preparation and delightful flavor combinations, making them a staple in many households.
Ingredients Breakdown
To create the No-Bake Berry Bliss Cheesecake Bars, we will need to gather a few key ingredients for both the crust and the cheesecake filling. Understanding each component’s role will help you achieve the best results in flavor and texture.
Overview of the Crust Components
The crust of our cheesecake bars serves as the foundation, providing a crunchy contrast to the creamy filling. Here’s what you’ll need:
– Graham Cracker Crumbs: Choosing the right brand of graham cracker crumbs is essential for optimal flavor. Look for varieties that are made with whole grains or natural ingredients to enhance both taste and texture. You can also make your own crumbs by crushing whole graham crackers in a food processor.
– Unsalted Butter: Using unsalted butter is important for controlling the saltiness of your crust. It allows you to manage the overall flavor of the dessert, ensuring that the sweetness of the cheesecake is not overshadowed by salt.
– Granulated Sugar: Sugar contributes not only to sweetness but also to the texture of the crust. It helps bind the crumbs together, creating a firm base that holds up well when sliced.
Exploring the Cheesecake Filling Ingredients
The filling is where the magic happens, and each ingredient plays a crucial role in achieving a silky, smooth texture:
– Cream Cheese: The star of the show, cream cheese provides the rich, creamy base for our cheesecake. Be sure to use full-fat cream cheese for the best results, as it offers the necessary richness and consistency.
– Powdered Sugar: While granulated sugar can be used, powdered sugar is preferred in no-bake cheesecake recipes. Its fine texture allows it to incorporate smoothly into the cream cheese, preventing any graininess and ensuring a velvety filling.
– Vanilla Extract: A splash of high-quality vanilla extract enhances the overall flavor of the cheesecake. Opt for pure vanilla extract rather than imitation for a more authentic taste.
– Heavy Whipping Cream: This ingredient is the secret to achieving a light and airy cheesecake filling. The whipped cream adds volume and a delicate texture, making each bite feel indulgent and fluffy.
Delving into the Berry Topping
The berry topping brings freshness and vibrant color to the cheesecake bars. Here’s what to consider:
– Berry Selection: Choosing the best mixed berries is vital for flavor. A combination of strawberries, blueberries, raspberries, and blackberries works beautifully, offering a balance of sweetness and tartness. Make sure to select ripe, fresh berries for optimal taste.
– Sweeteners: Depending on your preference, you can use honey or maple syrup to sweeten the berry topping. Both options add a natural sweetness that complements the tartness of the berries.
– The Role of Lemon Juice: A splash of lemon juice adds brightness to the berry topping, balancing out the sweetness and enhancing the overall flavor profile of the dish.
Step-by-Step Preparation
Now that we have a thorough understanding of the ingredients, let’s dive into the preparation process, starting with crafting the perfect crust.
Crafting the Perfect Crust
1. Combine Ingredients: In a mixing bowl, combine the graham cracker crumbs, granulated sugar, and melted unsalted butter. Stir until the mixture resembles wet sand and all the crumbs are evenly coated.
2. Press the Crust Firmly into the Pan: Transfer the crumb mixture to a lined 9×9-inch baking pan. Using the back of a measuring cup or your fingers, press the mixture firmly into the bottom of the pan to create an even layer. Ensure that the crust is tightly packed—this will help it hold together once set.
3. Chill the Crust: Place the crust in the refrigerator for about 10-15 minutes to firm up while you prepare the cheesecake filling. This step is crucial for achieving a sturdy base that can withstand the weight of the filling and toppings.
Creating the Cheesecake Filling
1. Beat the Cream Cheese: In a large mixing bowl, beat the softened cream cheese with an electric mixer on medium speed until smooth and creamy. Be sure to scrape down the sides of the bowl to ensure even mixing.
2. Add the Powdered Sugar and Vanilla: Gradually add the powdered sugar and vanilla extract to the cream cheese, mixing until fully incorporated. The mixture should be smooth and free of lumps.
3. Whip the Heavy Cream: In a separate bowl, whip the heavy cream until stiff peaks form. This step is essential for creating a light and airy texture in the cheesecake filling.
4. Fold in the Whipped Cream: Gently fold the whipped cream into the cream cheese mixture in batches, being careful not to deflate the whipped cream. The goal is to maintain the lightness while ensuring everything is well combined.
Now, you are well on your way to creating the No-Bake Berry Bliss Cheesecake Bars. With the crust chilling and the filling prepared, the next steps will involve assembling these delightful bars and adding the finishing touches with the berry topping. Stay tuned for the next part of this guide, where we will complete this delicious dessert!

Tips for Achieving the Right Texture with Cream Cheese
When it comes to creating the perfect no-bake cheesecake, the texture of the cream cheese is paramount. Start by ensuring your cream cheese is at room temperature before mixing. This step is crucial as it allows for smoother blending and prevents lumps in the filling. To achieve this, take the cream cheese out of the refrigerator at least an hour before you plan to start preparing the cheesecake. If you’re pressed for time, you can cut the cream cheese into smaller chunks to speed up the softening process.
Additionally, when mixing the cream cheese, use a hand mixer or stand mixer on medium speed to whip it until it’s creamy and smooth. Avoid over-mixing, as this can incorporate too much air, leading to a fluffier texture that may cause your cheesecake to be less dense than desired.
Importance of Folding Whipped Cream Gently
Once your cream cheese is perfectly blended, the next step involves incorporating whipped cream for that airy, creamy texture. The key here is to fold the whipped cream into the cream cheese mixture gently. This technique is essential because vigorous stirring can deflate the whipped cream, resulting in a denser filling.
To properly fold, use a spatula to scoop from the bottom of the bowl and lift the mixture while rotating the bowl. Repeat this motion until the whipped cream is just incorporated. You want to see a marbled effect rather than a fully homogenous mixture. This method will ensure your cheesecake bars remain light and indulgent.
Visual Cues for Knowing When the Filling is Ready
As you prepare the filling, certain visual cues can indicate when it’s ready to be poured into the crust. A properly mixed cheesecake filling should appear smooth and glossy, without any visible lumps of cream cheese. Additionally, it should hold its shape slightly when you lift the spatula out of the bowl. If you find that the mixture is too runny, it may require a bit more mixing; however, be cautious not to overdo it, as mentioned earlier.
Assembling the Cheesecake Bars
Techniques for Pouring and Smoothing the Filling
Once your filling is ready, it’s time to assemble the cheesecake bars. Carefully pour the cream cheese mixture over the prepared crust. To ensure an even distribution, start by pouring the mixture in a single line across the center of the crust and then spread it outward using a spatula. This technique helps in minimizing air pockets and allows for a smoother finish.
After pouring, use an offset spatula or the back of a spoon to gently smooth the top of the filling. Take your time with this step to achieve a perfectly flat surface, which is not only visually appealing but also makes it easier for the topping to adhere later.
Ensuring Even Distribution to Avoid Air Bubbles
To avoid air bubbles in your cheesecake bars, consider tapping the pan lightly on the counter a few times after smoothing the filling. This action will help dislodge any trapped air bubbles that may have formed during mixing. If you notice any bubbles on the surface, you can use a toothpick to pop them gently before placing the cheesecake in the refrigerator.
Preparing the Berry Topping
Proper Washing and Drying of Berries
The berry topping is what elevates these cheesecake bars to blissful heights. Begin by selecting a mix of your favorite berries, such as strawberries, blueberries, raspberries, and blackberries. Wash the berries gently under cool running water, taking care not to bruise them. After washing, lay them out on a clean kitchen towel or paper towels to dry completely.
Proper drying is essential because excess moisture can dilute the flavor and texture of your topping, making it runny. For delicate berries like raspberries, pat them gently rather than rubbing to avoid crushing them.
How to Enhance the Berry Mixture with Sweeteners and Lemon Juice
To enhance the natural sweetness of the berries, consider adding a touch of sweetness and acidity. In a mixing bowl, combine the washed berries with a tablespoon of granulated sugar or honey, depending on your preference. A teaspoon of freshly squeezed lemon juice will not only brighten the flavors but also add a delightful tang that complements the creamy cheesecake filling.
Gently toss the berries with the sugar and lemon juice, taking care not to crush them. Allow the mixture to sit for about 10-15 minutes; this resting period will help macerate the berries, drawing out their juices and creating a beautiful syrup.
Setting and Serving the Cheesecake Bars
Chilling the Bars: Importance of Refrigeration Time
After assembling your cheesecake bars, it’s crucial to let them chill in the refrigerator. Proper refrigeration is essential for allowing the filling to set correctly. Ideally, you should let the bars chill for at least 4 to 6 hours, although overnight is even better. The longer they chill, the firmer and more flavorful they will become.
Ideal Chilling Duration for Optimal Texture
The ideal chilling duration contributes significantly to the overall texture of your cheesecake bars. After 4 to 6 hours, the filling should be firm but still creamy, allowing it to hold its shape when cut. If the cheesecake feels too soft upon removal from the refrigerator, it may need additional time to set.
Signs That the Cheesecake is Set and Ready to Serve
To check if your cheesecake bars are ready, gently press the middle with a fingertip; it should spring back slightly. Additionally, the edges should be firm while the center may still have a slight jiggle. If these signs are present, your cheesecake is set and ready to be sliced and enjoyed.
Cutting and Serving Suggestions
Techniques for Cutting Clean, Even Squares
For the perfect presentation, cutting your cheesecake bars requires a bit of technique. Use a sharp knife and dip it in warm water before slicing; this will help create clean cuts without dragging the filling. Wipe the knife with a clean cloth between cuts to ensure each piece remains pristine.
To achieve even squares, consider marking the top of the cheesecake with light scores before cutting, ensuring that each piece is uniform in size.
Creative Presentation Ideas for Serving
When it comes to serving your no-bake cheesecake bars, presentation is key. Consider placing each square on a decorative dessert plate and topping it with a dollop of whipped cream and a few extra berries for garnish. A light dusting of powdered sugar can also add an elegant touch. For a more sophisticated look, serve the bars with a drizzle of berry sauce made from the macerated juices and a splash of water, reducing it on the stovetop until thickened.
Flavor Profiles and Pairing Suggestions
Analyzing the Flavor Balance of the Cheesecake and Berries
The flavor balance between the creamy cheesecake and the tart, vibrant berries is what makes these bars so irresistible. The rich, smooth creaminess of the cheesecake filling contrasts beautifully with the fresh, tangy burst from the berries, creating a harmonious blend that delights the palate.
Suggestions for Beverage Pairings that Complement the Dessert
To enhance your dessert experience, consider pairing your cheesecake bars with beverages that complement their flavors. A chilled glass of sparkling rosé or a fruity white wine, such as Riesling or Moscato, can elevate the sweet and tangy notes. If you prefer non-alcoholic options, a refreshing iced tea with lemon or a simple berry-infused lemonade can be delightful accompaniments.
Nutritional Insights
A Glance at the Nutritional Content of the Cheesecake Bars
When indulging in dessert, it’s always good to be mindful of nutritional content. A serving of these no-bake cheesecake bars typically contains around 250-300 calories, depending on the specific ingredients used. This estimate considers a standard serving size of one bar, which is a satisfying treat without being overly indulgent.
Discussing Calorie Count and Serving Size
While the bars are a delicious option, being aware of the calorie count can help you enjoy them mindfully. The use of fresh berries contributes not only flavor but also essential vitamins and antioxidants, making these bars a more nutritious dessert choice compared to many others.
Benefits of Incorporating Berries into Desserts
Berries are packed with nutrients, including vitamins C and K, fiber, and antioxidants. Incorporating them into your desserts not only enhances flavor but also contributes to a healthier lifestyle. By using berries in your no-bake cheesecake bars, you’re adding a layer of health benefits to your indulgent treat.
Conclusion
No-Bake Berry Bliss Cheesecake Bars offer a perfect blend of creamy cheesecake and fresh, fruity toppings, making them ideal for any gathering. This recipe is not only easy to follow but also adaptable to include your favorite berries or sweeteners. Whether you’re hosting a summer barbecue or simply indulging in a sweet treat at home, these cheesecake bars are sure to impress and satisfy your cravings. With their light, refreshing taste and appealing presentation, they are the ultimate dessert that combines simplicity with elegance. So go ahead and gather your ingredients, and let the deliciousness of these cheesecake bars bring joy to your next occasion!