Baked Cheesy Garlic Breadsticks: A Comforting Delight

WANT TO SAVE THIS RECIPE?

Introduction

There’s something undeniably comforting about the aroma of freshly baked bread wafting through your home. Homemade breadsticks, in particular, evoke a sense of warmth and nostalgia, making them a cherished addition to family meals and gatherings. Among the myriad of options available, baked cheesy garlic breadsticks stand out for their delightful combination of flavors and textures. Picture this: golden-brown sticks of bread, infused with the robust essence of garlic, generously topped with melted cheese, and sprinkled with fragrant herbs. These breadsticks are not just a side dish; they are an experience that enhances any meal.

The appeal of baked cheesy garlic breadsticks extends beyond their delicious flavor profile. Easy to prepare and incredibly satisfying, they serve as a perfect accompaniment to pasta dishes, soups, and salads, or even as a standalone snack. Their versatility makes them a go-to option for casual family dinners, festive gatherings, or even cozy movie nights. In this article, we’ll delve into the allure of these delightful breadsticks, explore the essential ingredients that contribute to their unique taste, and guide you through the step-by-step process of making them in your own kitchen.

The Allure of Baked Cheesy Garlic Breadsticks

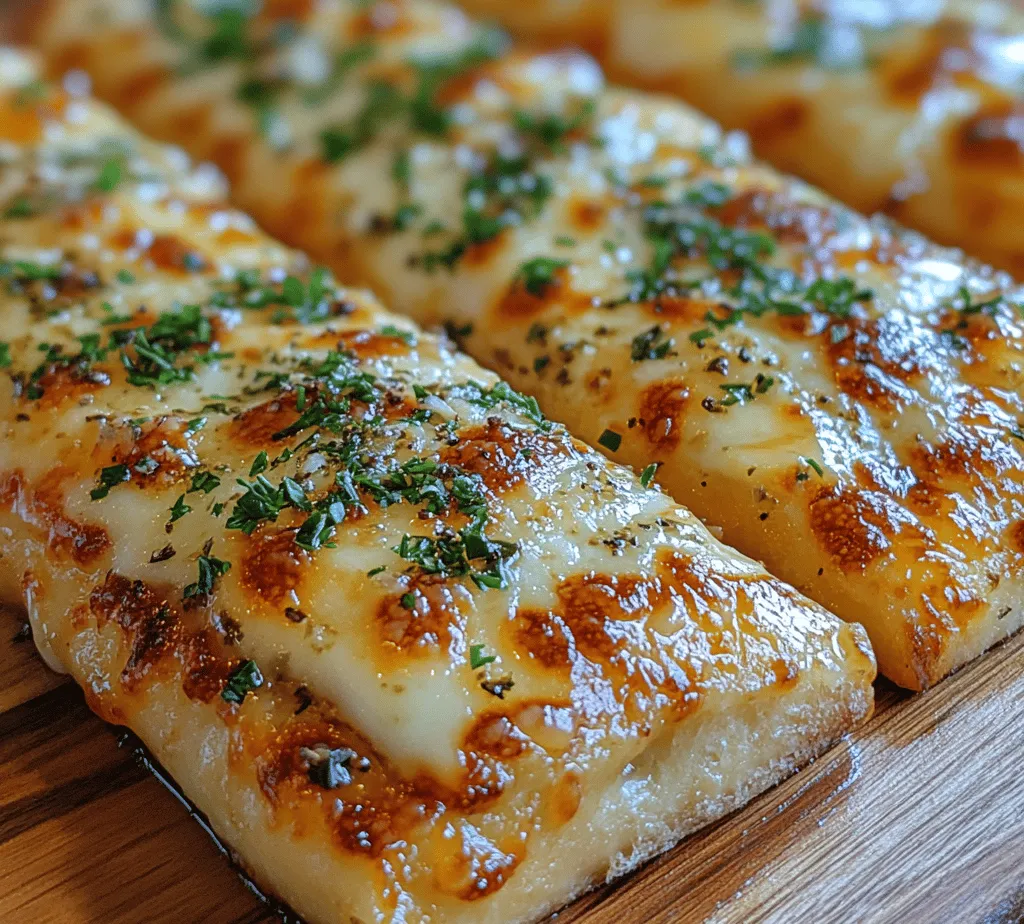
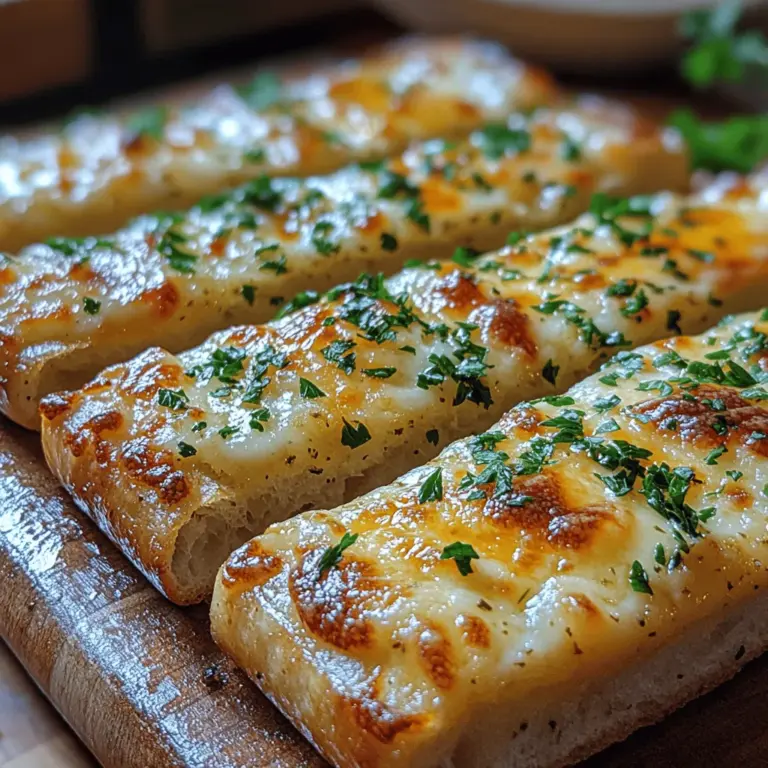
Imagine biting into a warm, soft breadstick that’s slightly crispy on the outside yet pillowy on the inside. The first taste reveals a burst of savory garlic, followed by the rich creaminess of melted cheese, and finished with the aromatic hint of dried herbs. This combination creates a sensory experience that elevates even the simplest meals. Baked cheesy garlic breadsticks are not just food; they are comfort, nostalgia, and a touch of indulgence wrapped in one delightful bite.

Breadsticks have a cultural significance that spans across various cuisines. From the classic Italian grissini to the soft, buttery breadsticks often served in American Italian restaurants, these delightful treats have found their way into hearts and homes around the world. They are a symbol of hospitality, often served at the start of a meal, inviting guests to relax and enjoy the forthcoming feast. Cheesy garlic breadsticks, with their universal appeal, embody this spirit perfectly, making them an irresistible choice for any occasion.

As a versatile side dish or appetizer, baked cheesy garlic breadsticks can complement a wide range of main courses. They pair beautifully with marinara sauce for dipping, adding an extra layer of flavor that enhances the entire dining experience. Whether you’re serving them alongside a hearty lasagna, a fresh salad, or simply enjoying them on their own, these breadsticks are sure to impress and satisfy.

Understanding the Ingredients

Creating the perfect baked cheesy garlic breadsticks starts with understanding the key ingredients that work together to deliver their signature flavor and texture. Here’s a detailed breakdown of each component used in this recipe:

1. All-Purpose Flour: This is the foundation of our breadsticks, providing the necessary structure and texture. All-purpose flour strikes a balance, offering enough protein to create gluten, which gives bread its chewiness without being too dense.

2. Instant Yeast: Unlike active dry yeast, instant yeast can be mixed directly with the dry ingredients, making it a convenient choice for quick recipes. Instant yeast has a finer texture and works faster, allowing the dough to rise quickly and consistently.

3. Sugar: This ingredient serves a dual purpose. Not only does sugar enhance the overall flavor of the breadsticks, but it also acts as food for the yeast, aiding in the fermentation process and helping the dough rise.

4. Salt: Salt is crucial in baking as it enhances the flavors of all the ingredients, balancing sweetness and adding depth. It also strengthens gluten structure, which is essential for the texture of the breadsticks.

5. Warm Water: The science behind activating yeast lies in warm water. It helps dissolve the yeast and sugar, creating an optimal environment for fermentation. The ideal temperature is typically between 100°F to 110°F (37°C to 43°C), as temperatures above this can kill the yeast.

6. Olive Oil: Olive oil not only adds richness and moisture to the dough but also contributes to the flavor. It creates a tender crumb, making the breadsticks soft and enjoyable to eat.

7. Garlic Powder and Dried Italian Herbs: These components are responsible for the signature flavor profile of cheesy garlic breadsticks. Garlic powder delivers a potent garlic taste without the moisture of fresh garlic, which can alter the dough’s consistency. Dried Italian herbs, such as oregano and basil, complement the garlic, adding aromatic notes that enhance the overall flavor.

8. Cheese Varieties: For this recipe, mozzarella and Parmesan are excellent choices. Mozzarella provides that gooey, melty texture we all adore, while Parmesan adds a sharp, salty kick. Together, they create a harmonious blend of flavors that makes each bite irresistible.

9. Fresh Parsley: Fresh parsley is not just a garnish; it adds a burst of color and a fresh, herbal note to the breadsticks. It enhances the visual appeal and provides a contrast to the richness of the cheese.

10. Melted Butter: Brushing the breadsticks with melted butter before serving elevates their flavor and adds a glossy sheen. It enhances richness and complements the garlic and herbs beautifully.

Step-by-Step Guide to Making Baked Cheesy Garlic Breadsticks

Now that we’ve explored the flavors and importance of each ingredient, let’s dive into the step-by-step process of making these delectable baked cheesy garlic breadsticks. The journey begins with preparing the dough.

Preparing the Dough

To create the perfect breadstick dough, begin by combining your dry ingredients. This step is crucial as it ensures that the salt and sugar are evenly distributed throughout the flour, which contributes to a uniform flavor and texture.

1. Mix Dry Ingredients: In a large mixing bowl, whisk together the all-purpose flour, instant yeast, sugar, and salt. This step is essential to ensure that the yeast is evenly incorporated into the flour, allowing for smooth and consistent rising.

2. Combine Wet Ingredients: In a separate bowl, combine the warm water and olive oil. Make sure the water is warm but not too hot, as extreme temperatures can kill the yeast. Pour this mixture into the bowl with the dry ingredients.

3. Stir to Form a Dough: Using a wooden spoon or your hands, mix the ingredients until a shaggy dough begins to form. At this stage, it’s important to avoid overmixing; you want just enough moisture combined with the flour to create a cohesive mass.

4. Adjust Consistency: If the dough is too sticky, you can sprinkle in a little extra flour, one tablespoon at a time, until you achieve the desired consistency. Conversely, if the dough seems too dry, add a bit more warm water. The goal is to have a soft, slightly tacky dough that holds its shape.

Kneading the Dough

Once your dough comes together, it’s time to knead. Kneading is a fundamental step in bread-making that develops gluten, giving the bread its structure and chewiness.

1. Transfer to a Floured Surface: Lightly flour a clean work surface and turn the dough out onto it. Using your hands, gently flatten the dough into a rectangle.

2. Knead: Fold the dough over on itself, then push it down and away from you with the heel of your hand. Rotate the dough a quarter turn and repeat this motion. Continue kneading for about 5-7 minutes, or until the dough is smooth and elastic.

3. Signs of Well-Kneaded Dough: You’ll know your dough is ready when it becomes smooth and elastic to the touch. If you poke it lightly, it should spring back. Additionally, you can perform the “windowpane test”: stretch a small piece of dough between your fingers; if it forms a thin, translucent membrane without tearing, you’ve achieved the right gluten development.

With the dough prepared and kneaded to perfection, you’re well on your way to crafting delicious baked cheesy garlic breadsticks that will captivate your family and friends. The next steps will involve letting the dough rise, shaping the breadsticks, and baking them to golden perfection. Stay tuned for the continuation of this mouthwatering recipe!

There’s something undeniably comforting about the aroma of freshly baked bread wafting through your home. Homemade breadsticks, in particular, evoke a sense of warmth and nostalgia, making them a cherished addition to family meals and gatherings. Among the myriad of options available, <strong>baked cheesy garlic breadsticks</strong> stand out for their delightful combination of flavors and textures. Picture this: golden-brown sticks of bread, infused with the robust essence of garlic, generously topped with melted cheese, and sprinkled with fragrant herbs. These breadsticks are not just a side dish; they are an experience that enhances any meal.” /></p>
</p>
<h3>First Rise: The Importance of Proofing</h3>
</p>
<p>Proofing, or allowing your dough to rise, is a critical step in the bread-making process. This phase is where yeast fermentation occurs, transforming simple ingredients into a fluffy, flavorful dough. When yeast consumes sugars, it produces carbon dioxide and alcohol, causing the dough to expand. This leavening process not only contributes to the texture of the breadsticks but also enhances their flavor profile.</p>
</p>
<p>For optimal results, creating ideal conditions for your dough to rise is essential. A warm, draft-free environment is perfect for proofing. Depending on your kitchen’s temperature, you can place the dough in a slightly warm oven (turned off) or near a radiator. Cover the bowl with a damp cloth or plastic wrap to retain moisture. Allow the dough to rise until it doubles in size—usually about 1 to 2 hours.</p>
</p>
<h3>Shaping the Breadsticks</h3>
</p>
<p>Once your dough has risen, it’s time to shape your breadsticks. Start by turning the dough out onto a lightly floured surface. Gently press down to deflate it slightly, but be careful not to overwork the dough. Using a rolling pin, roll the dough into a rectangle, about ½ inch thick. If you prefer thicker breadsticks, you can roll it to about ¾ inch thick.</p>
</p>
<p>To cut the dough evenly, use a sharp knife or a pizza cutter to slice it into strips of your desired width—typically about 1 inch wide. For a fun twist, you can create different shapes, such as twisting each strip or cutting them into shorter lengths for bite-sized pieces.</p>
</p>
<h3>Preheating the Oven: Why Temperature Matters</h3>
</p>
<p>Preheating your oven is a crucial step that should not be overlooked. The temperature at which you bake your breadsticks affects their texture and overall quality. For cheesy garlic breadsticks, preheating your oven to 400°F (200°C) is ideal. This temperature ensures that the exterior of the breadsticks bakes to a beautiful golden brown while keeping the interior soft and chewy.</p>
</p>
<p>While the oven is preheating, take advantage of this time to prepare your seasonings and toppings, ensuring everything is ready when the dough is shaped and ready to bake.</p>
</p>
<h3>Seasoning and Topping</h3>
</p>
<p>Creating the perfect garlic and herb mixture is key to elevating your cheesy garlic breadsticks. In a small bowl, combine softened butter with minced garlic, dried oregano, dried basil, and a pinch of salt. This mixture will not only infuse flavor into the breadsticks but will also create a delicious aromatic experience as they bake.</p>
</p>
<p>When it comes to cheese, shredded mozzarella is a classic choice due to its melting qualities. For an extra flavor punch, consider mixing in some grated Parmesan. To ensure an even distribution, sprinkle the cheese liberally over the butter-garlic mixture before rolling the dough strips. This method guarantees that every bite is loaded with flavor.</p>
</p>
<h3>Baking Process: Achieving Golden Perfection</h3>
</p>
<p>Baking times can vary depending on your oven, so it’s essential to keep an eye on your breadsticks as they bake. Typically, they will need about 12-15 minutes in the preheated oven. You’ll know they’re done when they turn a beautiful golden brown and the cheese is bubbling. If your oven tends to bake unevenly, consider rotating the baking sheet halfway through the baking time for uniform results.</p>
</p>
<p>If you prefer a crispier texture, leave them in the oven for an additional minute or two, but be cautious not to overbake them, as they can become dry.</p>
</p>
<h3>Garnishing for Presentation</h3>
</p>
<p>Presentation is vital when serving food, and garnishing can elevate the visual appeal of your breadsticks. Once out of the oven, brush them lightly with any remaining garlic-butter mixture for added flavor and shine. A sprinkle of freshly chopped parsley not only adds a pop of color but also enhances the flavor profile.</p>
</p>
<p>Consider other garnishing options, such as a light dusting of chili flakes for those who enjoy a bit of heat or a drizzle of balsamic glaze for a touch of sweetness and acidity.</p>
</p>
<h3>Serving Suggestions and Pairing Options</h3>
</p>
<p>Baked cheesy garlic breadsticks are incredibly versatile and can be served in various ways. They make an excellent appetizer, a side dish for pasta, or a standalone snack. For the best experience, serve them warm, straight from the oven.</p>
</p>
<p>Pair your breadsticks with a variety of dips to enhance the flavor. Classic marinara sauce is a favorite, but you can also offer pesto, which adds a fresh basil flavor, or a creamy ranch dressing for a tangy contrast. For a fun twist, serve them alongside a warm cheese dip or a zesty salsa.</p>
</p>
<p>These breadsticks are perfect for gatherings and parties. Consider arranging them on a platter with an assortment of dips, allowing guests to indulge in a flavorful experience. You can also serve them alongside a fresh salad or as part of a charcuterie board.</p>
</p>
<h3>Nutritional Insights</h3>
</p>
<p>When indulging in cheesy garlic breadsticks, it’s helpful to be aware of their nutritional profile. Typically, each breadstick contains a blend of carbohydrates, fats, and proteins, depending on the ingredients used. A standard serving of two breadsticks provides a source of energy, making them a satisfying addition to any meal.</p>
</p>
<p>For those mindful of portion sizes, consider serving just one or two alongside a balanced meal to avoid overindulgence. If you’re looking to modify the recipe for dietary restrictions, gluten-free flour can be substituted for regular flour, and vegan cheese can replace dairy cheese to cater to vegan diets.</p>
</p>
<h3>Conclusion</h3>
</p>
<p>Homemade cheesy garlic breadsticks are the epitome of comfort food, bringing warmth and joy to your kitchen. The process of making them—from mixing the dough to shaping, baking, and serving—is an enjoyable experience that can create lasting memories with family and friends.</p>
</p>
<p>Encouraging you to try this recipe at home, it’s not just about the delicious outcome but also the joy of sharing freshly baked goods with loved ones. Baking is a way to show care, and these cheesy garlic breadsticks are perfect for any occasion, whether it’s a cozy family dinner, a festive gathering, or simply a treat for yourself. Enjoy the process, embrace your creativity, and savor the delightful results of your efforts.</p>
</div>

There’s something undeniably comforting about the aroma of freshly baked bread wafting through your home. Homemade breadsticks, in particular, evoke a sense of warmth and nostalgia, making them a cherished addition to family meals and gatherings. Among the myriad of options available, baked cheesy garlic breadsticks stand out for their delightful combination of flavors and textures. Picture this: golden-brown sticks of bread, infused with the robust essence of garlic, generously topped with melted cheese, and sprinkled with fragrant herbs. These breadsticks are not just a side dish; they are an experience that enhances any meal.

Baked Cheesy Garlic Breadsticks

Experience the comforting aroma of homemade baked cheesy garlic breadsticks that elevate every meal. These golden-brown delights combine savory garlic and gooey melted cheese, making them a perfect side for pasta, soups, or a standalone snack. Easy to make and irresistible, these breadsticks are great for family dinners, movie nights, or festive gatherings. Uncover the joy of baking and share these delicious treats with loved ones for an unforgettable culinary experience.

Ingredients
  

2 cups all-purpose flour

1 teaspoon instant yeast

1 tablespoon sugar

1 teaspoon salt

3/4 cup warm water (about 110°F)

2 tablespoons olive oil

1 teaspoon garlic powder

1 teaspoon dried Italian herbs (oregano, basil, thyme)

1 cup shredded mozzarella cheese

1/4 cup grated Parmesan cheese

Fresh parsley, chopped (for garnish)

Melted butter (for brushing)

Instructions
 

Prepare the Dough:

    In a large mixing bowl, combine the flour, instant yeast, sugar, and salt. Slowly add warm water and olive oil. Mix until a dough forms.

      Knead the Dough:

        Transfer the dough to a floured surface and knead for about 5-7 minutes until smooth and elastic. If it's sticky, add a little more flour as needed.

          First Rise:

            Place the dough in a greased bowl, cover it with a kitchen towel, and let it rise in a warm place for about 1 hour, or until doubled in size.

              Shape the Breadsticks:

                Once the dough has risen, punch it down and roll it out into a rectangle about 1/2 inch thick. Cut the dough into 1-inch wide strips for breadsticks.

                  Preheat the Oven:

                    Preheat your oven to 425°F (220°C).

                      Season and Top:

                        Place the breadsticks on a parchment-lined baking sheet. In a small bowl, combine the garlic powder, dried herbs, and melted butter. Brush this mixture generously over each breadstick.

                          Cheesy Goodness:

                            Sprinkle shredded mozzarella and grated Parmesan cheese all over the top of the breadsticks.

                              Bake:

                                Bake in the preheated oven for about 12-15 minutes or until the cheese is bubbly and the breadsticks are golden brown.

                                  Garnish:

                                    Remove from the oven and sprinkle with fresh parsley for an added pop of color and flavor.

                                      Serve:

                                        Allow to cool slightly before serving. These cheesy garlic breadsticks are best enjoyed warm, paired with marinara sauce or your favorite dip!

                                          Prep Time: 15 minutes | Total Time: 1 hour 30 minutes | Servings: 12 breadsticks

                                            WANT TO SAVE THIS RECIPE?

                                            Leave a Comment

                                            Recipe Rating