Quick and Easy Asian Orange Chicken
 Save
Save
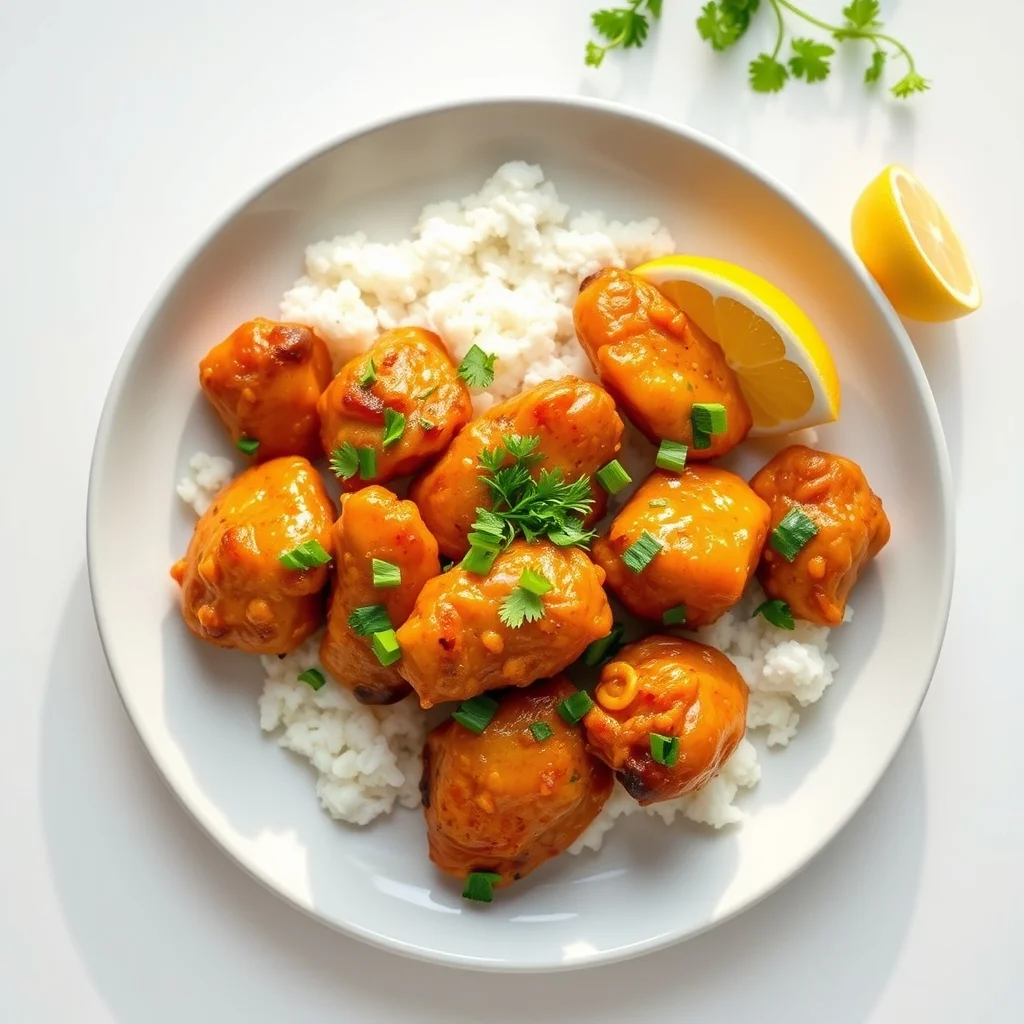
Craving that restaurant‑style orange chicken without the long wait or pricey takeout? This Quick and Easy Asian Orange Chicken delivers the perfect balance of sweet, tangy, and savory in under thirty minutes, making it ideal for busy evenings.
What sets this version apart is the use of a simple cornstarch coating that creates a light, crispy crust, while a bright orange‑soy glaze provides a glossy finish that clings to every bite.
Family members, friends, or anyone who loves bold Asian flavors will adore this dish, whether it’s served for a casual weeknight dinner or as the star of a weekend gathering.
The process is straightforward: coat bite‑size chicken pieces, give them a quick fry, then toss everything in a simmering orange sauce that finishes with a splash of fresh zest. The result is a dish that looks as impressive as it tastes.
Why You'll Love This Recipe
Bold, Balanced Flavor: The sweet orange juice, salty soy, and a hint of ginger create a harmonious profile that satisfies both sweet‑tooth cravings and savory appetites.
Speedy Weeknight Solution: With a total time of just 35 minutes, you can have a restaurant‑quality meal on the table before the kids finish their homework.
Crispy Yet Tender: The cornstarch coating gives each piece a light crunch while keeping the chicken juicy, delivering texture contrast in every bite.
Customizable & Friendly: Whether you serve it over rice, noodles, or cauliflower rice, the sauce adapts beautifully, making it suitable for any dietary preference.
Tips & Tricks
Perfecting the Recipe
Dry the Chicken Thoroughly: Moisture interferes with browning; pat the pieces dry before coating for a crispier crust.
Use a Hot, Lightly Oiled Pan: A hot surface creates an immediate sear that locks in juices while the light oil prevents sticking.
Don’t Crowd the Pan: Fry in small batches; overcrowding drops the temperature and yields soggy pieces instead of crisp.
Flavor Enhancements
Add a splash of freshly squeezed lime juice right before serving for extra brightness. A teaspoon of toasted ginger paste deepens the aromatic profile, and a drizzle of chili oil introduces a subtle, lingering heat.
Common Mistakes to Avoid
Skipping the cornstarch coating results in a soggy texture; the starch is essential for that light crunch. Also, adding the sauce too early—before the chicken is browned—prevents the formation of the desirable caramelized crust.
Pro Tips
Prep All Ingredients First: Having sauce components ready before you start frying keeps the workflow smooth and prevents overcooking.
Use a Meat Thermometer: Aim for an internal temperature of 165 °F (74 °C) to guarantee safety without drying the meat.
Finish with a Butter Glaze: Swirl in a small pat of butter at the end for a silkier sauce and richer mouthfeel.
Rest Before Serving: Let the chicken rest for 3‑4 minutes after tossing with sauce; this allows the glaze to set and the juices to redistribute.
Variations
Ingredient Swaps
Replace chicken with pork tenderloin, shrimp, or firm tofu for a different protein profile. For veggies, toss in sliced bell peppers, snap peas, or baby carrots during the final simmer; they add crunch and color without altering the core flavor.
Dietary Adjustments
Use gluten‑free tamari instead of soy sauce for a wheat‑free version. Substitute honey with maple syrup or a low‑calorie sweetener for a vegan-friendly glaze. To keep carbs low, serve over cauliflower rice or shirataki noodles.
Serving Suggestions
Classic pairing is steamed jasmine rice, which soaks up the sauce beautifully. For a fresh contrast, serve alongside a cucumber‑sesame salad. If you want a hearty meal, accompany with garlic‑fried noodles or a side of stir‑fried bok choy.
Storage Info
Leftover Storage
Cool the chicken and sauce to room temperature, then transfer to an airtight container. Refrigerate for up to 4 days. For longer keeping, portion into freezer‑safe bags, remove excess air, and freeze for up to 3 months. Thaw overnight in the fridge before reheating.
Reheating Instructions
Reheat gently in a skillet over medium heat, adding a splash of water or extra orange sauce to revive the glaze. Stir frequently for 4‑5 minutes until heated through. Alternatively, microwave covered for 2‑3 minutes, stirring halfway, and finish with a quick toss in a hot pan for crispness.
Frequently Asked Questions
Can I make this recipe ahead of time?
What if I don’t have fresh oranges?
How do I keep the chicken from becoming soggy when reheated?
This Quick and Easy Asian Orange Chicken delivers restaurant‑level flavor with minimal effort, thanks to a crisp coating, a bright glaze, and smart shortcuts. By following the detailed steps, using the suggested tips, and customizing the dish to your taste, you’ll create a crowd‑pleasing centerpiece any night of the week. Feel free to experiment with proteins, sauces, or sides—cooking is your playground. Enjoy every juicy, tangy bite!
Quick and Easy Asian Orange Chicken
Delicious Quick and Easy Asian Orange Chicken
Ingredients
Main Ingredients
- 1 lb boneless, skinless chicken thighs, cut into 1‑inch pieces
- ½ cup cornstarch
- 2 tablespoons vegetable oil (for frying)
Sauce Components
- ¾ cup fresh orange juice (about 2 medium oranges)
- ¼ cup low‑sodium soy sauce
- 2 tablespoons honey
- 1 tablespoon rice vinegar
- 1 teaspoon grated fresh ginger
- 2 cloves garlic, minced
- 1 teaspoon cornstarch mixed with 1 tablespoon water (slurry)
Seasonings & Garnish
- ½ teaspoon red‑pepper flakes (optional)
- 2 green onions, sliced thin
- 1 tablespoon toasted sesame seeds
- Salt and freshly ground black pepper, to taste
Instructions
Cooking & Finishing
- Heat the Oil. Warm a large skillet or wok over medium‑high heat for 2 minutes. Add the 2 tablespoons vegetable oil and swirl to coat the surface. The oil should shimmer but not smoke, indicating the ideal temperature for a quick fry.
- Fry the Chicken. Working in batches, add a handful of coated chicken pieces. Fry for 3‑4 minutes, turning once, until each piece is golden brown and cooked through. Transfer to a paper‑towel‑lined plate; repeat with remaining pieces. This staged frying keeps the temperature steady and ensures crispness.
- Combine with Sauce. Return all fried chicken to the skillet. Pour the prepared orange glaze over the meat, tossing gently to coat every piece. Let the mixture simmer for another 2 minutes so the sauce adheres and the chicken absorbs the citrus notes.
- Garnish & Serve. Remove from heat, sprinkle sliced green onions and toasted sesame seeds across the top. Serve immediately over steamed jasmine rice, quinoa, or cauliflower rice for a low‑carb option. The dish is best enjoyed hot, when the glaze is still glossy.
Similar Recipes
 Dinner
Spaghetti Carbonara: 7 genussvolle Geheimnisse für Perfektion
Learn how to make delicious Spaghetti Carbonara: 7 genussvolle Geheimnisse für Perfektion. Easy recipe with step-by-step…
 Dinner
Oven-Baked Garlic Butter Pork Chops: A Deliciously Simple Recipe
Delicious Oven-Baked Garlic Butter Pork Chops: A Deliciously Simple Recipe
 Dinner
New Year Reset Quinoa Bowls with Roasted Root Vegetables
Learn how to make delicious New Year Reset Quinoa Bowls with Roasted Root Vegetables. Easy recipe…
 Dinner
Tuna Tacos with Strawberry Slaw
Delicious Tuna Tacos with Strawberry Slaw
 Dinner
New Year’s Day Slow Cooker Glazed Pork with Apples
Learn how to make delicious New Year's Day Slow Cooker Glazed Pork with Apples. Easy recipe…
 Dinner
Creamy Chicken Alfredo Lasagna Rolls: A Comfort Food Delight
Delicious Creamy Chicken Alfredo Lasagna Rolls: A Comfort Food Delight
 Dinner
The Ultimate Guide to Making Homemade Classic Lasagna
Delicious The Ultimate Guide to Making Homemade Classic Lasagna
 Dinner
budget friendly one pot beef and cabbage stew for cold january nights
Learn how to make delicious budget friendly one pot beef and cabbage stew for cold january…

Eva
I cook these recipes at home before they ever land here — simple ingredients, clear steps.