Delightful Frozen Raspberry Yogurt Bites: A Healthy Treat for Any Occasion
As the health and wellness trend continues to sweep across the culinary landscape, the demand for nutritious snacks and desserts is at an all-time high. People are becoming increasingly aware of what they eat, seeking options that not only satisfy their cravings but also contribute positively to their overall health. In this light, Frozen Raspberry Yogurt Bites emerge as a delicious and refreshing treat that fits perfectly into a balanced diet. These bite-sized delights are not only simple and quick to prepare, but they also cater to the needs of both health-conscious individuals and families on the lookout for easy, wholesome snacks.
The appeal of Frozen Raspberry Yogurt Bites lies in their versatility and the straightforward process involved in making them. With just a handful of ingredients, you can create a snack that is not only visually appealing but also packed with flavor and nutrients. Whether you are enjoying them on a hot summer day or offering them as a healthy option at a gathering, these yogurt bites are bound to impress.
Understanding the Ingredients
Before diving into the preparation of these delightful treats, it is important to understand the ingredients that make up Frozen Raspberry Yogurt Bites. Each component plays a significant role in the flavor, texture, and nutritional profile of the final product.
Fresh vs. Frozen Raspberries
Raspberries are the star of this recipe, bringing vibrant color and a burst of flavor. Whether you opt for fresh or frozen raspberries, both have their advantages. Fresh raspberries, available during the peak of the growing season, offer a juicy sweetness and a satisfying crunch. On the other hand, frozen raspberries are a convenient alternative, readily available year-round. They are typically harvested at their peak ripeness and then frozen, which preserves their nutrients.
Nutritionally, raspberries are a powerhouse. They are rich in antioxidants, vitamins C and K, and dietary fiber, making them an excellent choice for enhancing overall health. Additionally, their natural sweetness means they require less added sugar in recipes. Both fresh and thawed frozen raspberries can be used interchangeably in this recipe, so choose based on availability or personal preference.
Greek Yogurt: The Healthy Base
Another key ingredient in Frozen Raspberry Yogurt Bites is Greek yogurt. Known for its creamy texture and tangy flavor, Greek yogurt is a nutritious base that elevates these bites to a new level. It is packed with protein, which aids in muscle repair and keeps you feeling full longer. The presence of probiotics in Greek yogurt also supports gut health, making it a smart choice for a healthy snack.
When selecting Greek yogurt, you have the option of plain or flavored varieties. Plain Greek yogurt is a versatile choice that allows you to control the sweetness and flavor profile of the bites. Flavored options, while convenient, may contain added sugars and artificial ingredients, so it’s essential to read labels carefully if you choose this route.
Sweeteners: Honey vs. Maple Syrup
To enhance the natural sweetness of the raspberries and yogurt, a sweetener is often added. Two popular choices are honey and maple syrup, both of which are natural sweeteners with their own unique benefits. Honey is known for its antibacterial properties and can add a floral note to the yogurt mixture. On the other hand, maple syrup has a distinct caramel-like flavor and is rich in antioxidants.
When using either sweetener, it’s important to adjust the quantity based on your personal taste preferences. Start with a small amount and gradually increase until you reach the desired level of sweetness. This flexibility allows you to cater the recipe to your liking while keeping it healthy.
The Role of Vanilla Extract and Salt
A splash of vanilla extract can elevate the flavor profile of your Frozen Raspberry Yogurt Bites significantly. Vanilla brings a warm, aromatic sweetness that complements the tartness of the raspberries, creating a harmonious balance. Additionally, a pinch of salt is crucial in enhancing the overall sweetness of the bites, bringing out the flavors of all the ingredients. Don’t underestimate the power of this tiny addition; it can make a world of difference in taste.
Granola: Optional Crunch Factor
For those looking to add a bit of texture to their Frozen Raspberry Yogurt Bites, granola is an excellent optional ingredient. Not only does it provide a satisfying crunch, but it also adds extra nutrients, such as fiber and healthy fats. When selecting granola, look for options that are low in added sugars and made with wholesome ingredients. Alternatively, you can make your own granola at home to ensure it meets your dietary preferences.
Step-by-Step Guide to Making Frozen Raspberry Yogurt Bites
Now that you have a clear understanding of the ingredients, let’s dive into the step-by-step process of creating your Frozen Raspberry Yogurt Bites.
Preparation of Raspberries
1. Rinsing Fresh Raspberries: If you choose to use fresh raspberries, start by gently rinsing them under cold water. It’s important to handle them with care to avoid crushing the delicate berries. After rinsing, pat them dry with a paper towel to remove excess moisture.
2. Thawing Frozen Raspberries: If you opt for frozen raspberries, the process begins by removing them from the freezer and allowing them to thaw. Place the frozen raspberries in a bowl and let them sit at room temperature for about 30 minutes, or until they are soft. After thawing, drain any excess liquid that may have accumulated in the bowl. This step is crucial to ensure your yogurt mixture doesn’t become watery.
Creating the Yogurt Mixture
3. Mixing Ingredients: In a large mixing bowl, combine your Greek yogurt, sweetener (honey or maple syrup), a splash of vanilla extract, and a pinch of salt. Use a whisk or spatula to mix everything together until smooth. The goal is to achieve a creamy, homogenous mixture that is easy to scoop and spread.
4. Adjusting Sweetness: Before proceeding, take a moment to taste the yogurt mixture. Adjust the sweetness by adding more honey or maple syrup if desired. Remember, the raspberries will also contribute a degree of sweetness, so balance is key.
5. Incorporating Raspberries: Gently fold in the prepared raspberries into the yogurt mixture. Be careful not to over-mix; you want to keep some of the berry pieces intact for texture and visual appeal.
The next steps will guide you through the final assembly and freezing process of your Frozen Raspberry Yogurt Bites, ensuring you end up with a delightful and healthy treat that everyone can enjoy.

Folding in Raspberries
To achieve the perfect consistency and flavor balance in your Frozen Raspberry Yogurt Bites, gentle folding techniques are essential. Begin by adding your fresh raspberries into the yogurt mixture. Using a spatula or a wooden spoon, carefully fold the raspberries into the yogurt. The goal here is to incorporate the raspberries without crushing them.
Techniques for Gentle Folding
1. Use a Spatula: A rubber spatula is ideal for this task as it allows for delicate movements. Start from the bottom of the bowl and lift the yogurt over the raspberries, turning the mixture gently. Avoid vigorous stirring, as this can break down the fruit.
2. Visual Cues: When folding, look for a marbled effect where the yogurt is still predominantly white with flecks of raspberry visible. This indicates that the raspberries are evenly distributed but still intact, providing bursts of flavor in every bite.
Scooping into Molds
Once your mixture is well combined, it’s time to transfer it into molds. Choosing the right mold can make a difference in the texture and ease of serving.
Recommendations for Mold Types
– Silicone Molds: These are the best option for frozen yogurt bites since they allow for easy release and come in various shapes and sizes. Look for molds specifically designed for freezing to ensure they hold up in the freezer.
– Mini Cupcake Liners: If you don’t have silicone molds, mini cupcake liners are a great alternative. They provide individual portions and can be placed in a muffin tin for support.
Best Practices for Filling Molds
– Ensure that each mold is filled evenly to create uniformly sized yogurt bites. Using a small ice cream scoop can help you achieve consistent portions.
– Leave a little space at the top of each mold to prevent overflow during freezing.
Adding Granola for Texture
Granola adds a delightful crunch to your yogurt bites, enhancing the overall texture and making them even more satisfying.
Suggestions for How Much Granola to Use
Aim for about 1 tablespoon of granola per yogurt bite. This amount provides a good crunch without overpowering the yogurt flavor.
Distribution Tips
– Sprinkle the granola on top of the yogurt mixture after filling the molds and gently press it down with a spoon. This ensures that each bite has a nice layer of granola.
– Alternatively, you can mix the granola into the yogurt before scooping it into molds for an even distribution throughout.
Freezing Process
After filling your molds, it’s crucial to freeze them correctly for optimal texture and taste.
Explanation of Freezing Time
For the best results, freeze the yogurt bites for at least 4 to 6 hours, or until completely solid. If you can, leave them overnight for a firmer texture.
Tips for Stabilizing Molds During Freezing
– If using silicone molds, place them on a flat surface in your freezer to prevent spills.
– For mini cupcake liners, use a muffin tin to provide support so they don’t tip over while freezing.
Removing from Molds
Once your yogurt bites are frozen solid, it’s time to remove them for serving.
Techniques for Easy Release from Silicone Molds
– Gently pull on the edges of the silicone mold to loosen the yogurt bites. If they are still sticking, you can run warm water over the outside of the mold for a few seconds to help release them.
Visual Indicators for Removal
Your yogurt bites are ready to be removed when they appear firm and solid throughout. They should have a smooth, icy surface without any soft spots.
Serving Suggestions and Storage
Ideal Serving Ideas
Frozen Raspberry Yogurt Bites can be enjoyed in various creative ways:
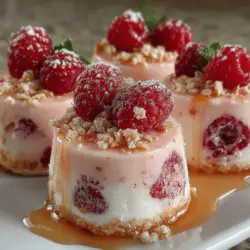
– Presentation: Arrange the bites on a decorative platter for gatherings or family snacks. You can drizzle some honey or a berry sauce over them for an elegant touch.
– Pairing Ideas: Serve them alongside fresh fruit, such as sliced strawberries or blueberries, for an appealing color contrast. Alternatively, consider pairing them with a yogurt dip or dark chocolate sauce for added indulgence.
Storage Guidelines
To keep your yogurt bites fresh and ready for snacking:
– Best Practices for Storing: Place the bites in an airtight container with parchment paper between layers to prevent sticking. This also helps maintain their texture.
– How to Keep the Bites Fresh: These frozen treats can last in the freezer for up to two weeks. After this period, they may lose some of their flavor and texture.
Nutritional Benefits of Frozen Raspberry Yogurt Bites
These yogurt bites are not just delicious but also packed with health benefits.
Detailed Analysis of Health Benefits
– Raspberries: Rich in antioxidants, fiber, and vitamin C, raspberries support heart health and boost the immune system. They are low in calories, making them an excellent addition to a healthy diet.
– Yogurt: Provides a good source of calcium and probiotics, which are beneficial for gut health. Opt for Greek yogurt for added protein, which helps keep you feeling full longer.
Discussion of Dietary Lifestyles
Frozen Raspberry Yogurt Bites fit perfectly into various dietary lifestyles:
– Low-Calorie: With minimal added sugars and wholesome ingredients, these bites are a guilt-free treat.
– Gluten-Free and Vegetarian: Made without any gluten-containing ingredients, they are suitable for those with gluten sensitivities. Additionally, the recipe adheres to vegetarian diets.
Conclusion
Making Frozen Raspberry Yogurt Bites is not only easy but also a nutritious alternative to traditional snacks and desserts. With their vibrant flavor, delightful texture, and health benefits, these bites can be a fantastic addition to your snack repertoire.
We encourage you to try this recipe as a refreshing treat that the whole family will enjoy. The joy of creating simple yet satisfying foods is unparalleled, and with this recipe, you can indulge in a delicious snack that promotes a healthy lifestyle. Enjoy the process of making these delightful bites, and savor every moment of this refreshing treat!