Introduction
In recent years, the movement towards healthier snacking has gained significant momentum, with more people seeking out alternatives to traditional fried snacks. One standout in this growing trend is the crispy baked pickle chip, a delightful and guilt-free option that satisfies cravings for crunch without the excess oil. These baked pickle chips offer not only a tantalizing taste but also a variety of textures, marrying the tartness of dill pickles with a satisfying crispy coating that leaves you wanting more.
The popularity of baked snacks like these pickle chips stems from a desire for indulgent flavors paired with a healthier lifestyle. They present an excellent solution for those who love the savory crunch of chips but want to avoid the calories and unhealthy fats associated with frying. Whether you are at a party, enjoying a game day, or simply in need of a delicious snack, crispy baked pickle chips are versatile enough to fit any occasion.
The Allure of Crispy Baked Pickle Chips
What makes crispy baked pickle chips so enticing? The answer lies in the unique taste of dill pickles. Known for their tangy flavor and satisfying crunch, dill pickles offer a distinct taste that is both refreshing and addictive. When baked to perfection, these pickles transform into a crispy snack that retains their signature flavor while introducing a whole new level of texture.
Baked snacks are increasingly favored over their fried counterparts for several reasons. First, they generally contain less fat, making them a more heart-healthy alternative. Additionally, baked snacks are easier to prepare, often requiring less hands-on time and cleaner cooking methods. This convenience makes crispy baked pickle chips an appealing choice for busy lifestyles, allowing you to whip up a batch of these treats in no time.
Moreover, their versatility cannot be overstated. Crispy baked pickle chips can be served as an appetizer at gatherings, enjoyed as a game-day snack, or even paired with sandwiches for a delightful crunch. The ability to create a flavorful and healthier alternative to traditional chips ensures that these pickle chips will be a hit on any occasion.
Ingredients Breakdown
To create the perfect crispy baked pickle chips, understanding the role of each ingredient is essential. Here’s a closer look at what you will need for this recipe:
– Dill Pickles: As the star ingredient, dill pickles provide that classic tangy flavor that makes these chips irresistible. Their natural acidity pairs wonderfully with the crispy coating, resulting in a snack that is both zesty and satisfying.
– All-Purpose Flour: This ingredient serves as the initial coating for the pickle chips, helping to create a base layer that adheres to the pickles and contributes to the overall crispiness. It creates a barrier that locks in moisture while allowing the cooking process to work its magic.
– Eggs: Acting as a binding agent, eggs help the breadcrumb coating stick to the pickles. This crucial step ensures that the crispy layer remains intact during baking, delivering that satisfying crunch in every bite.
– Panko Breadcrumbs: The secret to achieving an extra crunchy texture lies in the use of panko breadcrumbs. These Japanese-style breadcrumbs are coarser than traditional breadcrumbs, resulting in a light and crispy finish that elevates the overall snack experience.
– Spices: A blend of garlic powder, onion powder, and smoked paprika enhances the flavor profile of the pickle chips, adding depth and aroma that complement the dill pickles beautifully. These spices can be adjusted according to personal preference, allowing for a customized taste experience.
When it comes to baking, the quality of your ingredients matters immensely. Using fresh dill pickles and high-quality spices will not only improve the flavor but also ensure that your crispy baked pickle chips turn out perfectly every time.
Step-by-Step Instructions for Perfectly Crispy Pickle Chips
Preheating the Oven
The first step in making crispy baked pickle chips is preheating your oven. Setting the correct temperature is crucial for achieving that desirable crunch. Preheat your oven to 425°F (220°C). This high heat will help to crisp up the coating while ensuring the pickles are heated through without becoming soggy.
To make cleanup easier, consider lining your baking sheet with parchment paper. This not only prevents the pickle chips from sticking but also allows for even baking, ensuring that all sides of your chips become perfectly crispy.
Preparing the Pickles
Before you begin coating your pickles, it’s essential to prepare them properly to achieve optimal crispiness. Start by draining the dill pickles thoroughly. Excess moisture can lead to soggy chips, so use a paper towel to pat them dry gently. This step is crucial; the drier the pickles, the better the final texture will be.
Next, slice the pickles into even chips. Aim for uniform thickness—about 1/4 inch works well—to ensure even cooking. Thicker slices may not become as crispy, while thinner ones could burn quickly. Using a sharp knife or a mandoline can help achieve consistent slices, ensuring that each chip bakes evenly.
By carefully preparing your ingredients and following these initial steps, you’re well on your way to creating delicious, crispy baked pickle chips that are sure to impress.
Setting Up the Breading Station
Preparing crispy baked pickle chips begins with an organized and efficient breading station. This is crucial for ensuring that each pickle chip is coated evenly, leading to that perfect crunch we all crave. Here’s how to set up your breading station effectively.
Step-by-Step Guide to Preparing the Coating Stations
1. Gather Your Ingredients: You’ll need three main components for the breading process:
– Flour (all-purpose or gluten-free)
– Eggs (2-3 large eggs)
– Breadcrumbs (Panko is preferred for extra crunch, but regular breadcrumbs will work too)
– Optional: Seasonings like garlic powder, onion powder, paprika, or cayenne pepper for added flavor.
2. Create Three Separate Bowls: Arrange your ingredients in three shallow bowls:
– Bowl One: Fill with flour mixed with your chosen seasonings. This initial coating helps the egg adhere better to the pickles.
– Bowl Two: Beat the eggs in this bowl. You can add a splash of water or milk for a thinner consistency, which helps the breadcrumbs stick.
– Bowl Three: Pour in the breadcrumbs. You can season them with additional spices to enhance the flavor.
3. Arrange the Bowls: Set the bowls in the following order: flour, eggs, and then breadcrumbs. This left-to-right setup allows for a smooth, efficient process as you move the pickles from one bowl to the next.
Significance of Each Step in the Breading Process
Understanding the role of each component in the breading process is essential for achieving the best results:
– Flour Coating: The flour helps to dry the pickle surface, allowing the egg to stick more effectively.
– Egg Wash: The egg acts as a binder, ensuring that the breadcrumbs adhere well to the pickles.
– Breadcrumb Coating: This layer creates the crunchy exterior that makes baked pickle chips irresistible. Panko breadcrumbs are especially effective, providing a light, airy texture.
Coating the Pickles
Now that your station is set up, it’s time to coat the pickle chips. This step is crucial for ensuring an even and crispy texture.
Detailed Instructions for the Dipping Process
1. Begin with the Pickles: Take your sliced pickles (make sure they are well-drained and patted dry) and dip them into the flour mixture. Ensure each slice is fully coated, shaking off any excess flour.
2. Move to the Egg Wash: Next, transfer the floured pickle slice to the egg wash. Coat it thoroughly, allowing any excess egg to drip back into the bowl.
3. Finish with Breadcrumbs: Finally, place the egg-coated pickle into the breadcrumb bowl. Press down gently to ensure an even coating, then shake off any excess breadcrumbs.
Tips on Avoiding Clumping and Ensuring Even Distribution of Crumbs
To achieve the perfect coating:
– Use one hand for the dry ingredients (flour and breadcrumbs) and the other for the wet (egg). This keeps the process clean and prevents clumping.
– If you notice clumps in your breadcrumbs, break them apart with your fingers before coating. This ensures a more consistent coverage on each pickle.
– For extra crunch, you can double-coat your pickle chips by repeating the dipping process once more in the egg and then back into the breadcrumbs.
Arranging on the Baking Sheet
Once your pickle chips are coated, the next step is to arrange them on a baking sheet.
Best Practices for Spacing Pickle Chips for Even Cooking
– Use a Baking Sheet Lined with Parchment Paper: This prevents the chips from sticking and makes cleanup easier.
– Leave Space Between Each Chip: Arrange the coated pickle chips in a single layer, spacing them a few centimeters apart. This allows hot air to circulate, ensuring that each chip cooks evenly and becomes crispy.
Importance of Using Cooking Spray or Olive Oil for Enhancing Crispiness
Before placing the baking sheet in the oven, lightly spray the coated pickle chips with cooking spray or drizzle with olive oil. This step is crucial as it helps achieve that golden-brown color and added crunch. The oil also aids in even cooking, so don’t skip this important step!
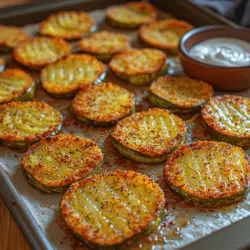
Baking the Chips
Now comes the exciting part—baking your crispy pickle chips to perfection.
Timing Tips and How to Monitor for Doneness
1. Preheat Your Oven: Set your oven to 425°F (220°C) to prepare for baking. A hot oven is essential for achieving that crispy finish.
2. Bake the Chips: Place the baking sheet in the oven and bake for about 15-20 minutes. Keep an eye on them, as ovens can vary in temperature.
3. Flipping the Chips: Halfway through the baking time (around 10 minutes), carefully flip each pickle chip using tongs or a spatula. This ensures even browning and helps achieve that perfect crispiness on both sides.
Explanation of Flipping the Chips for Even Browning
Flipping is essential for achieving that consistent golden color on both sides. The heat from the oven will brown the chips, but if they remain on one side for too long, they may not cook evenly. By flipping them, you allow the heat to reach all surfaces, maximizing the crunch factor.
Serving Suggestions
Once your crispy baked pickle chips are out of the oven, it’s time to serve them up deliciously!
Ideas for Dipping Sauces that Complement Baked Pickle Chips
– Spicy Ranch: A classic choice, combine ranch dressing with a bit of hot sauce for a creamy, spicy dip.
– Honey Mustard: The sweetness of honey combined with the tang of mustard pairs perfectly with the salty crunch of the chips.
– Garlic Aioli: A rich garlic aioli adds a gourmet touch to your snack. Simply mix mayonnaise with minced garlic, lemon juice, and a pinch of salt.
– Sriracha Mayo: For those who love heat, mix mayonnaise with sriracha for a zesty kick.
Presentation Tips for Serving at Gatherings or Casual Snacking
– Use a Fun Platter: Serve the pickle chips on a colorful platter or in a rustic basket lined with parchment paper for a casual feel.
– Garnish: Add fresh herbs like parsley or dill to enhance visual appeal and flavor.
– Accompanying Items: Consider serving alongside other snacks or appetizers, such as veggie platters, cheese boards, or wings, for a complete snacking experience.
Nutritional Information
Baked snacks like these crispy pickle chips are a healthier alternative to their fried counterparts, allowing for guilt-free indulgence.
Overview of the Health Benefits of Baked Snacks Versus Fried
– Lower in Calories: Baking significantly reduces the number of calories compared to frying, as you use less oil.
– Less Fat: Baked snacks typically contain less fat, making them a healthier choice for everyday snacking.
– Retained Nutrients: Baking at a moderate temperature helps preserve the nutritional value of the pickles, including vitamins and minerals.
Nutritional Breakdown per Serving
– Calories: Approximately 150-180 calories per serving (about 10 chips)
– Fat: 5-8 grams (depending on the amount of oil used)
– Protein: 3-4 grams
– Carbohydrates: 25 grams
Discussion on Portion Control and Enjoying Snacks Mindfully
Even healthy snacks can contribute to weight gain if consumed in large quantities. Aim for moderation by serving yourself a reasonable portion and enjoying each bite mindfully. Pairing with fresh veggies or another healthy option can also help satisfy cravings without overindulging.
Conclusion
Making crispy baked pickle chips is not only a delightful culinary experience but also a healthier alternative to traditional fried snacks. With their satisfying crunch and endless versatility, these pickle chips can elevate any gathering or casual snack time. As you explore baking techniques, you’ll find that many of your favorite snacks can be reimagined in a healthier way.
Encourage your friends and family to join in the fun of baking, as it opens up a world of delicious possibilities. The versatility of pickle chips allows them to fit seamlessly into modern snacking culture, whether served at a party, as a game-day treat, or simply enjoyed at home. So grab your pickles, preheat that oven, and enjoy the deliciousness of crispy baked pickle chips today!