Introduction
Lasagna is much more than a dish; it is a beloved comfort food that evokes feelings of warmth, family, and tradition. This classic Italian recipe has found its way into homes around the world, becoming a staple at family gatherings, potlucks, and special occasions. Whether served during a festive winter holiday or a casual Sunday dinner, lasagna holds a special place in the hearts of many, transcending regional boundaries and cultural differences.
The cultural significance of lasagna is rooted deeply in its Italian origins, where it is celebrated as a culinary masterpiece. Traditional lasagna, often layered with rich meats, savory sauces, and creamy cheeses, has inspired countless variations, adapting to local ingredients and preferences. From vegetarian versions bursting with garden-fresh vegetables to innovative twists that incorporate fusion flavors, lasagna has evolved significantly over the years while maintaining its core essence.
Homemade lasagna, in particular, stands out as the ultimate comfort dish. The process of creating it—from simmering the sauce to layering the ingredients—offers a rewarding experience that connects cooks to their culinary heritage. This recipe invites you to embrace the art of making classic lasagna in your kitchen, ensuring that each bite delivers that authentic taste of love and tradition.
Understanding the Basics of Lasagna
At its core, lasagna is a layered pasta dish that features a combination of ingredients, each contributing to its delightful complexity. Originating from ancient Greece and later embraced by the Italians, lasagna has transformed into a dish that showcases regional ingredients and cooking techniques. Traditional Italian lasagna, such as the renowned Lasagna alla Bolognese, is characterized by its use of béchamel sauce, ragù, and Parmigiano-Reggiano cheese, creating a rich and savory flavor.
In contrast, modern variations of lasagna allow for a broader interpretation of the dish. Cooks have embraced creativity by incorporating alternatives like gluten-free noodles or plant-based proteins, appealing to diverse dietary needs and preferences. Despite these variations, the essence of lasagna remains intact, with its signature layers promising a satisfying experience.
Key ingredients that define a classic lasagna include lasagna noodles, meat, cheese, marinara sauce, and an array of herbs and spices. Each component plays a crucial role in achieving the perfect balance of flavors and textures, making it essential for cooks to choose high-quality ingredients.
Essential Ingredients for Classic Lasagna
To create a delicious classic lasagna, you will need the following essential ingredients:
Lasagna Noodles
The foundation of any lasagna is the noodles themselves. Lasagna noodles come in several varieties, including traditional dried sheets and fresh pasta. When selecting the best noodles for your dish, consider the following:
– Dried Lasagna Noodles: These are widely available and often require pre-cooking before assembly, although some brands offer no-boil options.
– Fresh Lasagna Noodles: These can elevate your dish’s flavor and texture, providing a tender bite. Fresh noodles usually do not require boiling, making the assembly process simpler.
Meat Options
The meat used in lasagna typically varies based on personal preference and regional traditions. Common options include:
– Ground Beef: A classic choice that adds rich, savory flavors to the dish.
– Ground Pork: Often used in combination with beef for added depth.
– Ground Turkey: A lighter alternative that still delivers excellent flavor.
– Vegetarian Alternatives: Options like lentils, mushrooms, or plant-based meat substitutes are perfect for those seeking a meatless version without sacrificing taste.
Cheese Selection
Cheese is a defining characteristic of lasagna, offering creaminess and flavor. The most popular cheeses include:
– Ricotta: This creamy cheese forms the base of the cheese layer, contributing moisture and richness.
– Mozzarella: Often used for its melting qualities and mild flavor, mozzarella brings gooeyness to the dish.
– Parmesan: Aged and nutty, Parmesan adds a sharpness that enhances the overall flavor profile.
Marinara Sauce
The sauce is crucial to lasagna, providing moisture and flavor. You can choose between homemade or store-bought options:
– Homemade Marinara Sauce: Making your own sauce allows for customization and freshness. A simple recipe typically involves sautéing garlic and onions, adding crushed tomatoes, and seasoning with herbs and spices.
– Store-Bought Sauce: If you’re short on time, select a high-quality marinara sauce. Look for options that use natural ingredients and minimal preservatives for the best taste.
Herbs and Spices
To elevate the flavor of your lasagna, use a combination of herbs and spices. Common choices include:
– Basil: Sweet and aromatic, basil is a staple herb in Italian cuisine.
– Oregano: This robust herb adds earthiness and depth to the sauce.
– Garlic: Fresh or dried garlic can enhance the flavor of both the sauce and the meat mixture.
Preparing the Ingredients
To ensure a successful lasagna, preparation is key. Follow these steps to get your ingredients ready:
Step 1: Cooking the Meat
Start by cooking your chosen meat in a large skillet over medium heat. Break the meat apart with a wooden spoon as it cooks to ensure even browning. Cook until the meat is no longer pink and has developed a nice brown color, about 7-10 minutes. If using ground beef or pork, you may want to drain excess fat for a leaner result.
Step 2: Browning Ground Meat
Browning the meat not only enhances its flavor but also adds texture to the lasagna. Make sure to season the meat with salt, pepper, and any desired herbs during cooking. This will infuse flavor right from the start.
Step 3: Preparing the Cheese Mixture
While the meat is cooking, prepare the cheese mixture. In a mixing bowl, combine ricotta cheese, an egg, and a pinch of salt and pepper. For added flavor, mix in fresh herbs such as basil or parsley. This mixture will add creaminess to the lasagna and help bind the layers together.
Step 4: Making Homemade Marinara Sauce
If you opt for homemade marinara sauce, now is the time to prepare it. In a saucepan, heat olive oil over medium heat and sauté minced garlic and diced onions until softened. Add crushed tomatoes and season with salt, pepper, basil, and oregano. Let the sauce simmer for at least 20-30 minutes, allowing the flavors to meld.
Step 5: Using Store-Bought Sauce
If you choose to use store-bought marinara sauce, simply warm it in a saucepan before assembling your lasagna. This will help integrate it into the dish more smoothly.
With your ingredients prepped and ready, you’re well on your way to assembling a mouthwatering classic lasagna that will impress your family and friends. Keep the excitement going as you move on to the next steps of layering and baking, ensuring that each bite is a delightful experience filled with rich flavors and comforting textures.
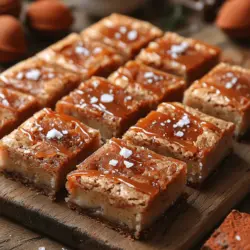
Overloading Layers
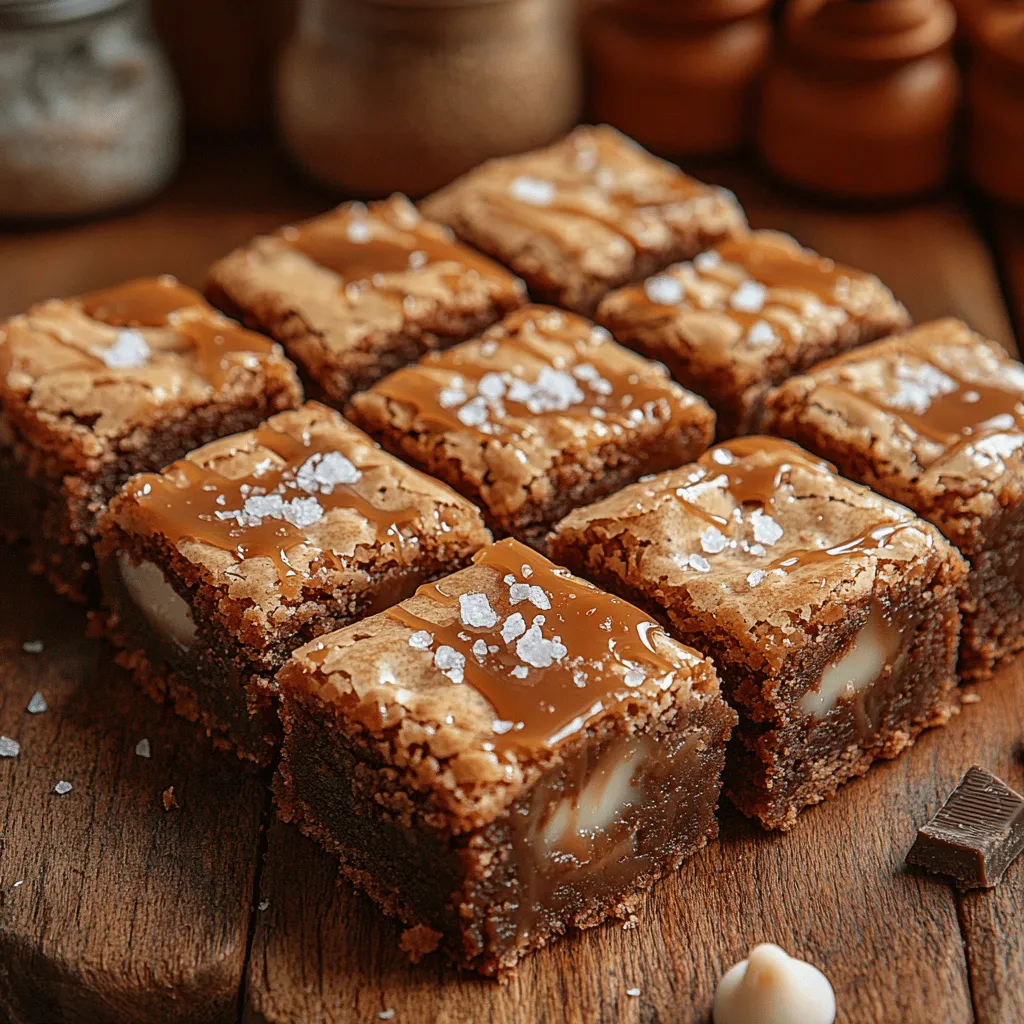
When it comes to constructing your decadent salted caramel blondies, it’s essential to strike the right balance. While it may be tempting to overload your blondies with layers of caramel, chocolate chunks, or nuts, doing so can lead to uneven baking. Each layer should complement the others without overwhelming the base. Aim for a harmonious blend of flavors, ensuring that the rich, buttery blondie base shines through. A well-structured blondie should have just the right amount of caramel swirl to achieve that perfect gooeyness without turning the entire dessert into a sticky mess.
Skipping Critical Ingredients
In baking, every ingredient plays a crucial role in texture and flavor. Skipping or substituting key components can drastically change the outcome of your blondies. For instance, using unsalted butter instead of salted can impact the overall taste. Similarly, flour type matters; all-purpose flour is ideal for achieving that perfect chewy consistency. If you’re looking to enhance flavors, consider adding a pinch of sea salt to elevate the caramel’s richness. Always ensure you have the necessary ingredients on hand before starting, as improvising mid-recipe can lead to disappointing results.
Baking the Blondies
Ideal Baking Temperatures and Times for Optimal Results
To create the perfect salted caramel blondies, preheat your oven to 350°F (175°C). This temperature ensures that your blondies bake evenly, allowing for a golden-brown crust with a soft, chewy interior. Bake for approximately 25-30 minutes, but keep an eye on them as ovens can vary. The blondies are done when the edges are set, but the center still has a slight jiggle. This slight underbaking is crucial for achieving that perfect fudgy texture.
Covering vs. Uncovering During Baking
Deciding whether to cover your blondies while baking can affect texture. If you notice that the tops are browning too quickly, you can cover them loosely with aluminum foil during the last 10 minutes of baking. This technique helps prevent over-browning while allowing the blondies to continue baking through. If you prefer a slightly firmer top, bake them uncovered the entire time.
How to Know When Your Blondies Are Done
To check if your blondies are baked to perfection, insert a toothpick into the center. If it comes out with a few moist crumbs, your blondies are ready. If the toothpick is clean, they may be overbaked, leading to a dry texture. Remember, they will continue to cook slightly after being removed from the oven, so it’s better to err on the side of slight underbaking.
Visual Cues and Internal Temperature Checks
Visual cues are your best friend when baking blondies. Look for a golden-brown crust around the edges, while the center should appear slightly puffed and set. The internal temperature should reach about 190°F (88°C) for perfectly baked blondies. If you prefer a softer texture, pull them out at around 185°F (85°C). This ensures that they remain chewy and delicious.
Letting It Rest
Importance of Resting the Blondies Before Serving
Once your blondies are out of the oven, resist the urge to dive in immediately. Letting them rest for at least 30 minutes is crucial. This resting period allows the caramel to set, making it easier to cut into neat squares. Additionally, resting enhances the flavor, allowing the rich ingredients to meld together.
How Resting Affects the Texture and Flavor
When you allow your blondies to cool, the texture transforms from soft and gooey to a perfectly chewy consistency. Resting also intensifies the flavors, as the residual heat continues to meld the salted caramel with the blondie base. This step is vital for achieving that satisfying bite that makes these blondies unforgettable.
Serving Suggestions
Ideal Side Dishes to Accompany Blondies
While blondies are a treat on their own, pairing them with complementary flavors can elevate your dessert experience. Consider serving them with a scoop of vanilla ice cream, which provides a creamy contrast to the rich, buttery blondies. A drizzle of extra salted caramel sauce on top can enhance the flavor profile, making each bite even more indulgent.
Salad Options: Simple Greens or Caesar Salad
If you’re looking to balance the sweetness of the blondies with something savory, a simple green salad or a classic Caesar salad can be an excellent accompaniment. The crispness of fresh greens or the richness of Caesar dressing contrasts nicely with the dessert’s sweetness, creating a well-rounded meal.
Bread Choices: Garlic Bread or Focaccia
For a more substantial pairing, consider serving garlic bread or focaccia as an appetizer. The savory flavors of garlic and herbs complement the sweet and salty notes of the blondies. This combination can be particularly delightful if you’re serving the blondies as part of a larger meal.
Presentation Tips for Serving Blondies
Presentation is key when serving your decadent blondies. Cut them into uniform squares for a professional look. Place them on a decorative plate, and consider garnishing with a sprinkle of flaky sea salt and a drizzle of caramel for an eye-catching finish. Adding fresh berries or mint leaves can also provide a pop of color and freshness.
Cutting and Plating Techniques for a Beautiful Presentation
To achieve clean cuts, use a sharp knife and wipe it with a damp cloth between cuts. This prevents the caramel from sticking to the blade, allowing for beautiful, tidy squares. When plating, stack a couple of blondies and drizzle with caramel, placing a scoop of ice cream on the side for an inviting presentation.
Storing and Reheating Blondies
Best Practices for Storing Leftover Blondies
If you have any blondies left after your gathering, store them properly to maintain their freshness. Allow them to cool completely before transferring them to an airtight container. They can be kept at room temperature for up to three days or refrigerated for up to a week. To keep them from drying out, consider layering parchment paper between the blondies.
Refrigeration and Freezing Tips
For longer storage, these blondies freeze exceptionally well. Wrap each blondie individually in plastic wrap and then place them in a freezer-safe container or bag. They can be frozen for up to three months. When you’re ready to indulge again, simply thaw them in the refrigerator overnight.
How to Properly Reheat Blondies Without Losing Quality
To enjoy your blondies warm, reheat them gently. The best method is to use the oven. Preheat your oven to 350°F (175°C), and place the blondies on a baking sheet. Cover them loosely with aluminum foil to prevent over-browning, and warm for about 10-15 minutes. Alternatively, you can use a microwave; just heat them in 10-second intervals to avoid overheating.
Oven vs. Microwave Methods
While the microwave is a quick option, it can sometimes lead to a less desirable texture. The oven method maintains the blondies’ chewy quality and crisp edges. If you opt for the microwave, enjoy them immediately after reheating, as they can become chewy if left to sit.
Exploring Variations of Classic Blondies
Vegetarian Blondies: Ingredients and Preparation Methods
For a vegetarian twist on your blondies, consider adding nuts, dried fruits, or even chocolate chips. These additions provide extra texture and flavor, making the blondies even more decadent. You can also experiment with different types of sugars, like brown sugar or coconut sugar, to give your blondies a unique taste.
Gluten-Free Alternatives: Noodles and Sauces
If you need a gluten-free option, substitute regular flour with a gluten-free blend or almond flour. Ensure that your baking powder is also gluten-free. This allows those with dietary restrictions to enjoy the same delightful flavors and textures without compromising on the experience.
Regional Variations: Blondies Bolognese, Seafood Blondies, and More
While classic blondies are delightful, don’t hesitate to explore regional variations. Consider creating a blondie with Mediterranean flavors by incorporating olive oil, lemon zest, and herbs. The blend of sweet and savory can create a captivating dessert experience.
Creative Twists: Adding Unique Ingredients Like Spinach or Pesto
For an adventurous twist, experiment with unexpected ingredients. Adding a handful of spinach can introduce a vibrant green hue and boost nutritional value. Alternatively, a swirl of pesto can provide a fragrant, herby note that pairs surprisingly well with the caramel.
Conclusion
Making decadent salted caramel blondies from scratch is not only a rewarding culinary endeavor but also a delightful experience that brings joy to any occasion. The combination of buttery blondie texture with rich caramel and a touch of salt creates a dessert that is both comforting and indulgent. Whether served at a family gathering, a casual get-together, or as a special treat for yourself, these blondies are sure to become a favorite in your dessert repertoire.
As you experiment with this recipe, don’t hesitate to make it your own. Play with flavors, textures, and presentation to create a version that reflects your tastes. Embrace the joy of baking and share these delicious treats with friends and family, making memories that will last a lifetime.