Oreo Icebox Cake: Quick No-Bake Delight for All Gatherings
 Save
Save
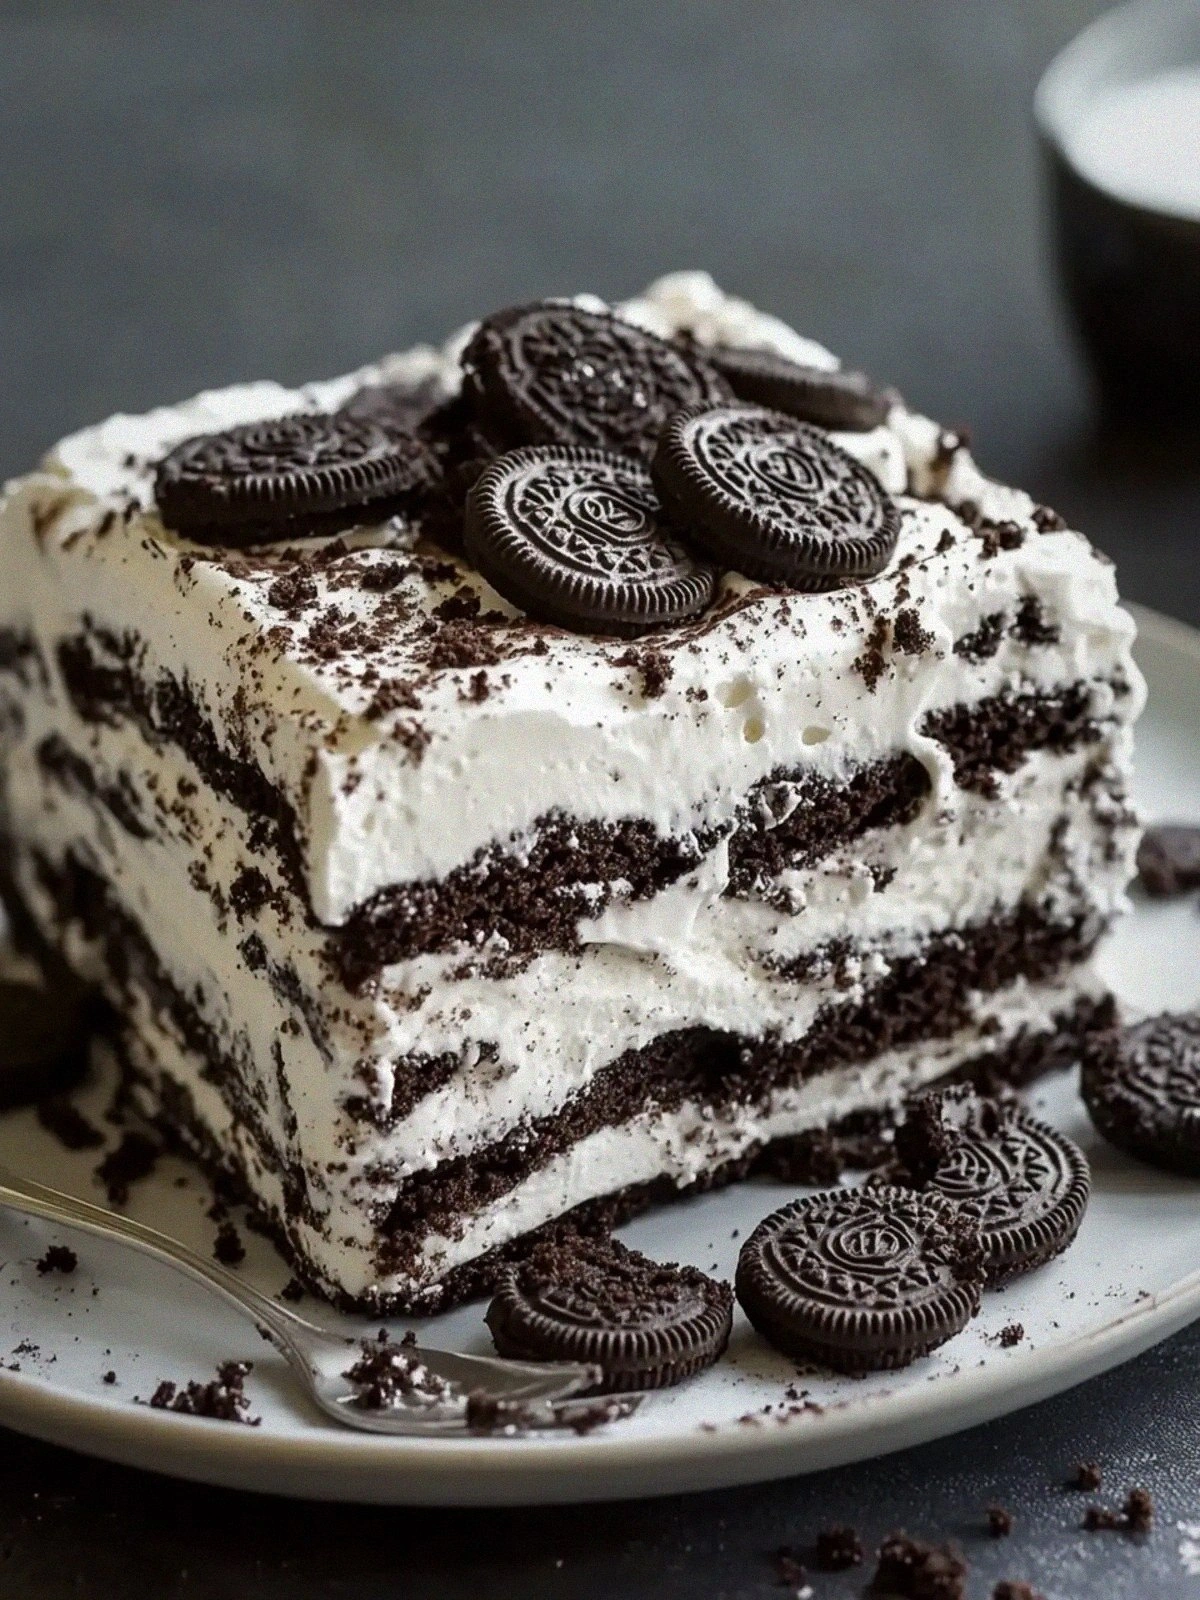
It was a sweltering July afternoon, the kind of day when the air feels like warm honey and every family member is searching for a sweet escape from the heat. I was in the backyard, the grill still humming from a recent barbecue, when my niece tugged at my sleeve and asked, “Auntie, can we have something cold and creamy?” The moment she said that, I remembered the old family tradition of pulling out the icebox cake—no oven, no fuss, just a few pantry staples and a little patience. The scent of fresh milk mingling with the chocolatey aroma of Oreo cookies is something that instantly transports me back to my grandmother’s kitchen, where the simple act of layering cookies and whipped cream felt like a secret ritual.
Imagine the scene: you gently press a layer of cookies onto a glossy, velvety sea of whipped topping, then repeat the process until the dish looks like a towering, indulgent parfait. As you press the final layer, a faint, sweet perfume rises, promising a dessert that is both airy and decadently rich. The best part? There’s no baking, no mess, and the whole thing sets itself in the refrigerator, turning into a silky slice of heaven while you continue to enjoy the party. I’ve watched friends stare in awe as they cut into the cake, the layers holding together perfectly, each bite delivering a crunchy‑soft contrast that feels like a hug for your taste buds.
What makes this recipe truly special is its versatility. Whether you’re hosting a casual brunch, a sophisticated cocktail hour, or a kid‑friendly birthday bash, this Oreo Icebox Cake fits the bill like a glove. It’s quick enough to whip up between errands, yet impressive enough to earn compliments from even the most discerning dessert lovers. And because it’s a no‑bake wonder, you can make it in any kitchen, even one without a working oven. But wait—there’s a secret technique in step four that will transform your cake from good to unforgettable, and I’m saving that reveal for later.
Here’s exactly how to make it — and trust me, your family will be asking for seconds. The process is straightforward, the ingredients are pantry‑friendly, and the result is a dessert that feels luxurious without the labor. So roll up your sleeves, grab a glass of cold milk, and let’s dive into the world of quick, no‑bake delight that will become the star of every gathering.
🌟 Why This Recipe Works
- Flavor Depth: The combination of chocolatey Oreo cookies and sweet, creamy Cool Whip creates a layered flavor profile that’s both nostalgic and sophisticated. Each bite delivers a burst of cocoa followed by a mellow, buttery finish that keeps you reaching for more.
- Texture Harmony: The crispness of the cookies softens as they absorb the milk, while the airy whipped topping adds a light, cloud‑like contrast. This interplay of soft and crunchy textures makes every forkful a delightful surprise.
- Ease of Preparation: With only three ingredients and no oven required, this cake can be assembled in under fifteen minutes, making it perfect for last‑minute gatherings or spontaneous cravings.
- Time Efficiency: While the assembly is swift, the chilling time allows the flavors to meld and the cookies to become perfectly tender, turning a quick effort into a gourmet experience.
- Versatility: The base recipe is a blank canvas that welcomes additions like fresh berries, chocolate shavings, or a drizzle of caramel, letting you tailor the dessert to any theme or season.
- Ingredient Quality: Using premium Oreo cookies and a high‑quality whipped topping ensures a rich, authentic taste that feels indulgent without being overly sweet.
- Crowd‑Pleasing Factor: The familiar flavors of Oreo and vanilla whipped cream are universally loved, making this cake a safe bet for both kids and adults alike.
🥗 Ingredients Breakdown
The Foundation: Cookies & Cream
The star of this dessert is, without doubt, the Oreo cookie. Its iconic black‑and‑white design isn’t just for show; the chocolate wafer provides a deep cocoa flavor while the creamy filling adds a subtle vanilla sweetness. When the cookies sit in milk, they soften just enough to lose their crunch without becoming mush, creating a perfect “cake” texture. If you ever find yourself without the classic Oreo, you can substitute with chocolate wafer cookies or even chocolate graham crackers for a slightly different but still delightful base.
Cool Whip, the airy, ready‑to‑use whipped topping, brings a light, fluffy texture that balances the dense cookies. Its sweet vanilla flavor complements the chocolate without overwhelming it, and because it’s already stabilized, you won’t have to worry about it deflating during the chilling process. For a richer taste, you could replace it with homemade whipped cream, adding a tablespoon of powdered sugar and a dash of vanilla extract.
The Liquid Gold: Milk
Milk is the silent hero in this recipe, acting as the bridge that transforms hard cookies into a soft, cake‑like layer. The dairy’s natural sugars help to dissolve the cookie’s chocolate coating, while its fat content ensures a smooth, cohesive texture. If you prefer a richer mouthfeel, opt for whole milk; for a lighter version, 2% works just fine. For dairy‑free diners, almond milk or oat milk can be used, but keep in mind the flavor will shift slightly toward a nutty note.
When measuring the milk, make sure to use a liquid measuring cup and pour it slowly over the cookie layer. This gradual approach prevents the cookies from becoming overly soggy too quickly, giving you more control over the final texture. A pro tip: warm the milk just a touch (no more than 110°F) to help it mingle more evenly with the whipped topping, creating a silkier consistency.
The Secret Weapons: Flavor Boosters
While the core recipe is wonderfully simple, a few optional ingredients can elevate the cake from ordinary to extraordinary. A pinch of sea salt enhances the chocolate’s depth, while a splash of espresso intensifies the cocoa notes without adding a coffee flavor. Fresh berries, such as strawberries or raspberries, add a burst of acidity that cuts through the sweetness, making each bite feel balanced.
If you’re feeling adventurous, fold in a tablespoon of melted dark chocolate into the Cool Whip for a richer, more decadent version. Alternatively, a drizzle of caramel sauce over the top just before serving adds a glossy finish and a caramelized crunch that pairs beautifully with the cookie layers. These tweaks are optional but highly recommended for those who love to experiment.
Finishing Touches
The final garnish is where you can truly make the cake your own. A dusting of cocoa powder adds a sophisticated matte look, while chocolate shavings provide an elegant, slightly bitter contrast. For a festive vibe, sprinkle colorful sprinkles or edible glitter on top. Remember, the visual appeal is just as important as the flavor—it tells your guests that you’ve put thought and love into every slice.
With your ingredients prepped and ready, let's get cooking. Here's where the fun really begins...
🍳 Step-by-Step Instructions
🔐 Expert Tips for Perfect Results
The Taste Test Trick
Before you seal the final layer of whipped topping, take a tiny spoonful of the mixture and taste it. If it feels a little flat, add a pinch of extra sugar or a dash of vanilla extract. This tiny adjustment can make the entire cake taste brighter, especially if your Cool Whip is on the less sweet side. Trust me, a quick taste test saves you from a bland finish.
Why Resting Time Matters More Than You Think
The 2‑hour chilling period isn’t just about firming up the whipped topping; it’s also when the cookies fully absorb the milk, turning from crunchy to cake‑like. Skipping this step or cutting the time short will leave you with a texture that’s too firm in the middle. I once served a half‑chilled version at a potluck, and the feedback was clear: “It’s good, but the middle is a bit dry.” That lesson taught me to respect the resting time, especially for larger pans.
The Seasoning Secret Pros Won’t Tell You
A pinch of sea salt, added to the whipped topping, can dramatically enhance the chocolate flavor of the Oreos. The salt acts like a flavor amplifier, making the sweet notes pop without adding any bitterness. I discovered this trick while watching a pastry chef on a cooking show, and it’s become my go‑to secret for any chocolate‑based dessert.
Layer Alignment Mastery
When stacking the cookie layers, use the back of a ruler or a flat spatula to press down gently, ensuring each tier is perfectly level. Uneven layers can cause the cake to tilt when sliced, leading to uneven portions. The result is a professional‑looking dessert that looks as good as it tastes.
The Cool Whip Swap
If you’re aiming for a richer, more indulgent version, replace the Cool Whip with a homemade whipped cream made from heavy cream, powdered sugar, and vanilla. The homemade version holds more body and adds a buttery depth that store‑bought toppings lack. I’ve tried both, and the homemade version earns extra applause at dinner parties.
Garnish Like a Pro
A final garnish of shaved dark chocolate or a drizzle of caramel not only adds visual appeal but also introduces a contrasting flavor note. The slight bitterness of dark chocolate balances the sweetness, while caramel adds a buttery richness. The best part? These garnishes can be prepared in advance, letting you focus on the assembly.
🌈 Delicious Variations to Try
One of my favorite things about this recipe is how versatile it is. Here are some twists I've tried and loved:
Berry Bliss
Add a layer of fresh strawberries or raspberries between the cookie and whipped topping layers. The tartness of the berries cuts through the richness, creating a refreshing contrast that’s perfect for summer gatherings. The berries also add a pop of color that makes the cake look even more inviting.
Chocolate Overload
Fold 2 tablespoons of melted dark chocolate into the Cool Whip before spreading it. This intensifies the chocolate flavor and gives the cake a richer, more decadent mouthfeel. Top with chocolate shavings for an extra visual and textural boost.
Caramel Swirl
Drizzle a generous amount of caramel sauce over the final whipped topping layer, then use a toothpick to create a marbled swirl. The caramel adds a buttery, slightly burnt sugar note that pairs beautifully with the Oreo’s chocolate base.
Nutty Crunch
Sprinkle toasted chopped hazelnuts or almonds between the layers for a crunchy surprise. The nuts add a pleasant textural contrast and a nutty aroma that elevates the overall flavor profile. Just be sure to toast them lightly to bring out their natural oils.
Coffee Infusion
Add a teaspoon of instant espresso powder to the milk before drizzling it over the cookies. The coffee deepens the chocolate flavor without making the cake taste like coffee, perfect for adult gatherings or a sophisticated brunch.
White Chocolate Dream
Replace half of the Cool Whip with melted white chocolate, then fold together. This creates a creamy, sweet layer that pairs wonderfully with the dark chocolate of the Oreo. Garnish with white chocolate curls for a striking visual effect.
📦 Storage & Reheating Tips
Refrigerator Storage
Cover the cake tightly with plastic wrap or store it in an airtight container. It will stay fresh for up to 4 days in the fridge, though the texture is best within the first 48 hours. When storing, keep the cake on a flat shelf to prevent any sliding that could disturb the layers.
Freezing Instructions
If you need to make the cake ahead of time, you can freeze it for up to 2 months. First, wrap the entire dish in a double layer of cling film, then place it in a freezer‑safe container. To thaw, transfer the cake to the refrigerator overnight; this gradual thaw preserves the creamy texture.
Reheating Methods
While this cake is best served cold, you can enjoy a warm variation by microwaving a single slice for 10‑15 seconds. To prevent drying, place a tiny splash of milk on the slice before heating. The trick to reheating without drying it out? A splash of milk and a short, gentle burst of heat restores the silky mouthfeel.
❓ Frequently Asked Questions
Can I use a different cookie instead of Oreos?
Do I have to use Cool Whip, or can I make my own whipped cream?
How long should I chill the cake?
Can I add fruit without making the cake soggy?
Is this cake gluten‑free?
What if I don’t have milk? Can I use another liquid?
Can I make this cake in a different shape?
How many servings does this recipe yield?
Similar Recipes
 Desserts
Heavenly Apple Fritter Donuts Recipe
Delicious Heavenly Apple Fritter Donuts Recipe
 Desserts
Crispy Neapolitan Cake Tacos: A Delightful Dessert Adventure
Delicious Crispy Neapolitan Cake Tacos: A Delightful Dessert Adventure
 Desserts
Ultimate Creamy Strawberry Pretzel Salad Recipe Easy Homemade Dessert
Learn how to make delicious Ultimate Creamy Strawberry Pretzel Salad Recipe Easy Homemade Dessert. Easy recipe…
 Desserts
Pumpkin Cinnamon Bread Pudding
Discover how to make a creamy pumpkin cinnamon bread pudding with sweet spices, perfect for cozy…
 Desserts
Indulge in Blueberry Bliss Cheesecake Rolls
Delicious Indulge in Blueberry Bliss Cheesecake Rolls
 Desserts
Citrus Bliss: Frozen Yogurt Dipped Orange Slices
Delicious Citrus Bliss: Frozen Yogurt Dipped Orange Slices
 Desserts
White Chocolate Raspberry Tiramisu: An Incredible Ultimate Recipe
Learn how to make delicious White Chocolate Raspberry Tiramisu: An Incredible Ultimate Recipe. Easy recipe with…
 Desserts
Pecan Pie Balls Delight: A Delectable No-Bake Treat
Delicious Pecan Pie Balls Delight: A Delectable No-Bake Treat

Eva
I cook these recipes at home before they ever land here — simple ingredients, clear steps.
Other Reader Favorites
 Desserts
Crunchy Apple Oat Bites: A Healthy Snack Recipe
Delicious Crunchy Apple Oat Bites: A Healthy Snack Recipe
 Dinner
Comforting Smothered Chicken Breast: A Heartwarming Recipe
Delicious Comforting Smothered Chicken Breast: A Heartwarming Recipe
 Desserts
No-Bake Orange Creamsicle Cheesecake Recipe
Delicious No-Bake Orange Creamsicle Cheesecake Recipe
 Appetizers
Romige rode aardappelsalade met kruiden in slechts 35 minuten
Learn how to make delicious Romige rode aardappelsalade met kruiden in slechts 35 minuten. Easy recipe…