Introduction
Cheesecakes have long been a beloved dessert, captivating dessert lovers with their creamy texture and rich flavors. From classic New York-style cheesecakes to fruity variations, the versatility of this dessert allows it to adapt to countless tastes and occasions. Among the many delightful interpretations, mini cheesecakes stand out as a fun and convenient option, perfect for parties, potlucks, or simply satisfying a sweet craving without the guilt of a full-sized slice.
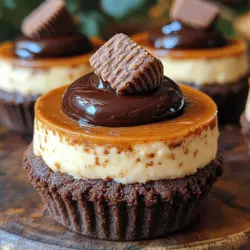
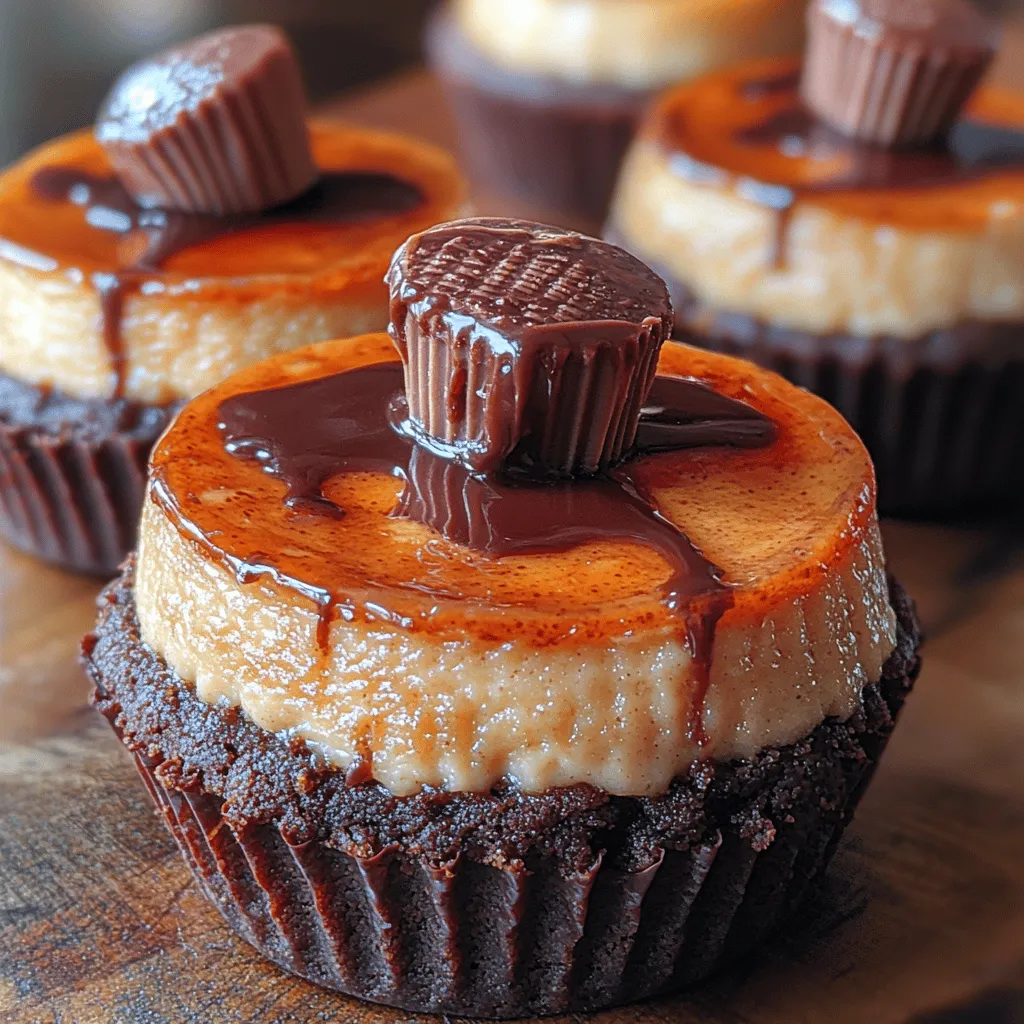
What truly sets this Mini Peanut Butter Cup Cheesecake apart is its irresistible combination of flavors. The creamy richness of cheesecake married with the iconic duo of peanut butter and chocolate creates an indulgent treat that is hard to resist. This recipe delivers all the decadence of traditional cheesecakes but in a bite-sized format that makes them perfect for sharing—or for keeping all to yourself!
One of the best features of this mini cheesecake recipe is its simplicity. With a quick preparation time and minimal ingredients, even novice bakers can whip up these delightful treats with ease. Whether you’re hosting a gathering or simply want to treat yourself, these mini peanut butter cup cheesecakes are sure to impress and satisfy.
Understanding the Ingredients
To create the perfect Mini Peanut Butter Cup Cheesecakes, it’s essential to understand the role of each ingredient in this delectable dessert. The foundation of any cheesecake is its crust, and in this recipe, we use chocolate cookies to craft a rich and flavorful base. The chocolate cookies provide a delightful contrast to the creamy filling, with their slight crunch enhancing the overall texture of the cheesecake. Opting for high-quality chocolate cookies will elevate the flavor and ensure a satisfying bite.
Next, we have the star of the show: the filling. High-quality cream cheese is crucial for achieving a smooth and creamy cheesecake. The cream cheese should be softened to room temperature, making it easier to blend into a velvety filling without any lumps. Pairing the cream cheese with creamy peanut butter creates a luscious flavor profile that is both rich and comforting. When selecting peanut butter, look for a natural variety with minimal added ingredients for the best taste and texture.
Powdered sugar is another essential component in this recipe. It serves two primary purposes: sweetness and texture. Unlike granulated sugar, powdered sugar dissolves quickly and easily into the filling, ensuring a smooth and creamy consistency. The sweetness level can be adjusted according to your preference, but the powdered sugar also contributes to the overall lightness of the cheesecake filling.
For an extra touch of fluffiness, we incorporate whipped topping into the filling. This ingredient enhances the texture, making the cheesecake light and airy, perfect for a mini dessert. The whipped topping balances the richness of the cream cheese and peanut butter, ensuring that each bite is indulgent yet not overwhelming.
Lastly, we can’t forget the optional garnishes. Mini peanut butter cups and a drizzle of chocolate sauce can elevate your cheesecakes from delicious to downright irresistible. These toppings not only add visual appeal but also enhance the flavor experience, making each mini cheesecake even more enjoyable.
Step-by-Step Preparation Process
Now that we’ve covered the essential ingredients, it’s time to dive into the step-by-step process of preparing our Mini Peanut Butter Cup Cheesecakes.
Preparing the Crust
1. Preheat the Oven: Start by preheating your oven to 325°F (163°C). Preheating is vital to ensure that your cheesecakes bake evenly and set properly.
2. Choose the Right Cookies: For the crust, you have a couple of delicious options: chocolate sandwich cookies or chocolate graham crackers. If you’re looking for a more intense chocolate flavor, chocolate sandwich cookies are the way to go. Crush the cookies into fine crumbs using a food processor or by placing them in a sealed plastic bag and using a rolling pin.
3. Create the Crust Mixture: In a mixing bowl, combine the cookie crumbs with melted butter. The butter is essential as it helps bind the crumbs together and adds richness. Mix until the crumbs resemble wet sand.
4. Line the Muffin Tin: Prepare a standard muffin tin by lining it with cupcake liners. This step not only makes for easy removal but also adds a fun touch to your presentation.
5. Fill the Muffin Tin: Spoon the crust mixture into each cupcake liner, filling them about halfway. Press down firmly with a measuring cup or your fingers to create an even layer. The texture should be compact but not overly packed, allowing for a slight crunch after baking.
6. Bake the Crust: Place the muffin tin in the preheated oven and bake for about 8-10 minutes, or until the crust is set. This step is crucial as it helps develop a solid base for the cheesecake filling.
Crafting the Cheesecake Filling
1. Prepare the Cream Cheese: While the crust is baking, take your cream cheese out of the refrigerator and allow it to soften. Room temperature cream cheese is essential for mixing smoothly into the filling.
2. Mix the Filling: In a large mixing bowl, beat the softened cream cheese with a hand mixer or stand mixer until smooth and creamy. This step ensures there are no lumps in your filling, resulting in a silky texture.
3. Incorporate Peanut Butter: Gradually add the creamy peanut butter to the cream cheese mixture. Continue to mix until fully combined, creating a deliciously rich filling. This combination should be smooth and slightly thick.
4. Add Powdered Sugar: Slowly sift in the powdered sugar while mixing on low speed. This method helps prevent a powdered sugar cloud and ensures an even distribution of sweetness throughout the filling.
5. Fold in Whipped Topping: Finally, gently fold in the whipped topping using a spatula. This step is crucial for maintaining the light and airy texture of the cheesecake filling. Be careful not to overmix, as this can deflate the whipped topping and lead to a denser filling.
6. Fill the Muffin Tin: Once your filling is ready, carefully spoon it into the prepared muffin tin, over the crusts. Fill each cup almost to the top, leaving a little room for potential expansion during baking.
By following these detailed steps, you’ll have a solid foundation for your Mini Peanut Butter Cup Cheesecakes. The combination of a rich chocolate crust and a creamy peanut butter filling sets the stage for a delightful dessert that is sure to please. As we move forward, we will cover the final steps of baking and decorating these mini cheesecakes to perfection. Stay tuned for the continuation of this delicious journey!
Instructions for Folding in the Whipped Topping
Once your cream cheese mixture is smooth and creamy, it’s time to fold in the whipped topping. This step is crucial as it adds lightness and a fluffy texture to your mini cheesecakes. To begin, take a spatula and scoop a portion of the whipped topping into the cheesecake mixture. The goal here is to combine the two without deflating the air you’ve incorporated into the whipped topping.
Start by gently cutting through the center of the mixture with the spatula, then lift and fold it over. Rotate the bowl slightly and repeat this process. Work in batches, adding more whipped topping until everything is combined. Be careful not to stir vigorously; instead, use gentle motions to preserve the airiness that gives the cheesecake its light and airy texture.
Incorporating the Mini Peanut Butter Cups Evenly
With the whipped topping folded in, it’s time to add the star ingredient—mini peanut butter cups. For even distribution, first chop the mini peanut butter cups into small pieces. Aim for chunks that are not too small, as you’ll want to maintain that delightful bite of chocolate and peanut butter in each cheesecake.
Add the chopped mini peanut butter cups to the cheesecake mixture and fold them in gently, just as you did with the whipped topping. Ensuring even distribution is important so that every bite of your mini cheesecakes is packed with flavor. Once incorporated, your filling is ready for the crusts!
Filling and Chilling the Mini Cheesecakes
Now that you have your creamy filling prepared, it’s time to fill the crusts. Using a spoon can work, but for a more precise and cleaner method, consider using a piping bag fitted with a large round tip. This will allow you to fill each crust evenly and avoid any spills.
If you’re opting for a spoon, take care to fill each crust to just below the top, leaving a little space for smoothing the tops. If using a piping bag, fill the bags with the cheesecake mixture and gently squeeze to fill each crust. This method not only makes the process quicker but also gives a more professional appearance.
Once filled, take a small offset spatula or the back of a spoon to smooth the tops of each cheesecake. A smooth surface is essential for presentation and will help when it’s time to garnish them later. Ensure they are all uniformly filled and leveled for an appealing final product.
Guidelines for Chilling the Cheesecakes
Chilling is a crucial step in the cheesecake-making process, as it allows the filling to set properly. After filling the crusts, cover the mini cheesecakes with plastic wrap or a lid to prevent any odors from your fridge affecting their flavor. Place them in the refrigerator for at least 4 hours, or overnight if time permits.
To test if the cheesecakes are ready, gently press the surface with a fingertip; it should feel firm to the touch but still have a slight give. If they feel too soft, give them additional chilling time. Properly chilled cheesecakes will hold their shape when removed from their molds, making them easier to serve.
Serving Suggestions
When it comes to serving your mini peanut butter cup cheesecakes, presentation is key. Consider using a decorative platter to arrange the cheesecakes in an eye-catching manner. You can create height by stacking them in tiers or using cake stands. For an elegant touch, place a small dollop of whipped cream on top of each cheesecake and finish with a drizzle of chocolate sauce.
For garnishing, you can either chop more mini peanut butter cups to sprinkle on top or use whole ones for a beautiful visual appeal. A light dusting of cocoa powder or a sprinkle of sea salt can also enhance the chocolate flavor and add a gourmet touch.
Pair your cheesecakes with beverages such as coffee, hot chocolate, or a glass of cold milk for a classic combination. They also pair wonderfully with other desserts; consider serving them alongside fresh fruit or a light sorbet to balance the richness of the cheesecake.
Nutritional Information
These mini peanut butter cup cheesecakes, while indulgent, can also fit into a balanced diet when enjoyed in moderation. Each mini cheesecake offers a rich flavor profile with a satisfying blend of creamy, sweet, and nutty notes.
In terms of portion sizes, each mini cheesecake can be considered a single serving, making it easier to manage your cravings without overindulging. They are also great for sharing, so consider slicing them into halves or quarters for a tasting experience at gatherings.
From a nutritional standpoint, each cheesecake contains a blend of protein from the cream cheese and whipped topping, carbs from the crust, and healthy fats from the peanut butter cups. This balance can help satisfy sweet cravings without leading to a sugar overload, making them a perfect treat for various dietary considerations.
Conclusion
In summary, making mini peanut butter cup cheesecakes is a fun and rewarding baking adventure. The process of blending creamy filling, incorporating delightful chocolate bites, and presenting them beautifully is as enjoyable as the final product itself. These cheesecakes are perfect for family gatherings, parties, or even as a special treat for yourself after a long day.
Encouraging culinary creativity, this recipe allows room for personal touches—whether it’s adding a dash of sea salt, experimenting with different crusts, or incorporating various toppings. The joy of baking lies not just in the finished dessert but also in the experience of creating something delicious to share with friends and family.
Try your hand at these mini peanut butter cup cheesecakes, and relish the delightful combination of flavors in a unique format. Enjoy the process, share your results, and most importantly, savor every bite of this wonderful treat!