Juicy Summer Peach Galette: A Delightful Seasonal Dessert
When the sun shines brightly and the air is filled with the sweet scent of summer, few desserts capture the essence of the season quite like a galette. This rustic tart, with its inviting golden crust and luscious fruit filling, is a celebration of simplicity and elegance. The galette’s charm lies in its unpretentious nature; it’s a dish that can be whipped up without the fuss of traditional pies, making it an ideal choice for both novice bakers and seasoned chefs alike.
Understanding the Galette
Originating from France, the galette has a long-standing history as a versatile pastry. Unlike traditional pies or tarts that require intricate crust designs and specific baking dishes, a galette embraces a more freeform approach. It consists of a single layer of pastry that is folded over the filling, creating a delightful contrast between the flaky crust and the juicy interior. This rustic style allows for creativity in both presentation and ingredients, making it a perfect canvas for seasonal produce.
The benefits of making a galette extend beyond its aesthetic appeal. The process is refreshingly straightforward; there’s no need for blind baking or fancy molds. The galette’s forgiving nature means that even if your crust isn’t perfectly shaped, it will still taste delicious. This ease of preparation also allows for a greater focus on the star ingredient, which in this case is the fresh peaches that embody the sweet, sun-kissed flavor of summer.
The Star Ingredient: Fresh Peaches
Peaches are the quintessential summer fruit, bursting with flavor and juiciness. When it comes to making a peach galette, the importance of using fresh, ripe peaches cannot be overstated. The vibrant sweetness of sun-ripened peaches enhances the overall taste of the galette, creating a mouthwatering filling that complements the buttery crust beautifully.
There are several varieties of peaches to choose from, each offering a unique flavor profile. Clingstone peaches, with their sweet and juicy flesh, are perfect for baking, while freestone peaches, which easily separate from the pit, can be a bit easier to work with. Some popular varieties include the fragrant Yellow Peach, known for its balanced sweetness and acidity, and the sweeter White Peach, which adds a delicate floral note to your dessert.
When selecting peaches for your galette, look for those that yield slightly to pressure, indicating ripeness. A vibrant color, whether it’s a sunny yellow or a rosy blush, often signifies flavor. Avoid any peaches with bruises or blemishes, as these can affect the taste of your filling.
Dough Preparation: The Foundation of Your Galette
The foundation of any great galette is its dough, and achieving the perfect crust is key to a successful dessert. The dough for a galette is typically made from a blend of flour, salt, sugar, butter, and ice water. Using chilled butter is essential; it not only ensures a flaky texture but also prevents the dough from becoming tough. The cold temperature of the butter creates steam during baking, leading to that desirable light and crispy crust.
To begin, combine the dry ingredients—flour, sugar, and salt—in a mixing bowl. Cut the chilled butter into small cubes and add it to the flour mixture. Using a pastry cutter or your fingertips, work the butter into the flour until the mixture resembles coarse crumbs with pea-sized bits of butter remaining. This process is crucial, as it will create those flaky layers we all love.
Next, gradually add ice water, one tablespoon at a time, mixing gently until the dough begins to come together. Be careful not to overwork the dough; it should be slightly shaggy but cohesive. Once achieved, form the dough into a disc, wrap it in plastic wrap, and refrigerate for at least an hour. This chilling step is vital, as it allows the gluten to relax, resulting in a more tender crust.
With the dough resting, you’ll be well on your way to creating a delicious Juicy Summer Peach Galette that showcases the beauty of ripe peaches and the satisfaction of homemade baking. The next steps will involve crafting the perfect peach filling that balances sweetness and tartness, ensuring each bite is a heavenly experience. Stay tuned for the next part, where we’ll dive into creating that delightful filling and assembling your rustic masterpiece.

Step-by-Step Guide to Rolling Out the Dough
Once your dough has chilled sufficiently in the refrigerator, it’s time to roll it out and prepare for your Juicy Summer Peach Galette. Begin by lightly flouring your work surface to prevent sticking. Take the chilled dough and place it in the center of your floured surface. Using a rolling pin, gently flatten the dough into a disc shape.
Rolling Techniques
1. Start from the Center: Roll from the center outwards, applying even pressure to create a uniform thickness. Rotate the dough a quarter turn after each roll to maintain a circular shape.
2. Aim for Thickness: Roll the dough into a circle about 12-14 inches in diameter and around 1/8 inch thick. This thickness will ensure the crust is sturdy enough to hold the juicy peach filling while remaining flaky and tender.
Transferring the Dough
Once the dough is rolled out, carefully transfer it to a baking sheet lined with parchment paper. To do this, you can roll the dough around the rolling pin and gently unroll it onto the baking sheet. Ensure the dough remains centered and adjust as necessary. If any edges crack, simply press them back together.
Techniques for Pleating the Dough
The pleating is what gives your galette its rustic charm. After placing the peach filling in the center of the dough, it’s time to fold the edges.
1. Fold and Crimp: Begin folding the edges of the dough over the filling, allowing some of the peaches to show. The folds should be about 1-2 inches apart and should create a beautiful, wavy border.
2. Ensure Stability: Press the folds gently to secure them in place, ensuring that the filling stays inside as it bakes.
3. Rustic Aesthetic: Remember, the goal is a rustic look, so imperfections are not only acceptable but encouraged. This homemade feel enhances the appeal of your galette.
Tips for Evenly Distributing the Filling
To ensure that your filling is evenly distributed and the dough is properly folded, follow these guidelines:
– Layer Carefully: When placing the peach slices in the center, arrange them in a circular pattern, overlapping slightly but not overcrowding. This allows for even cooking and ensures that every slice is infused with the cinnamon-sugar blend.
– Use a Spoon: If you have any excess juice from the peaches, spoon it over the filling before folding the dough. This will enhance the flavor but be cautious not to overdo it, or the dough may become soggy.
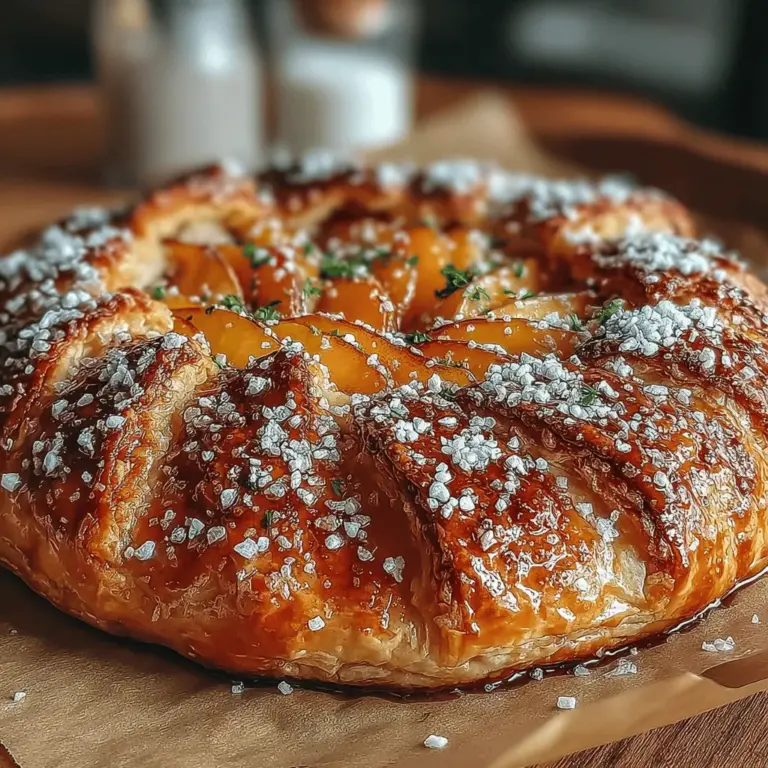
The Art of the Egg Wash
To give your galette a beautiful golden-brown finish, an egg wash is essential. An egg wash consists of beaten egg mixed with a splash of water or milk, brushed over the crust before baking.
Purpose of an Egg Wash
The primary purpose of an egg wash is to create a glossy finish on the crust, elevating the overall presentation of your galette. It also helps the crust to brown evenly, providing a delightful crunch.
Creating the Perfect Egg Wash
1. Ingredients: Whisk together one large egg with a tablespoon of water or milk until fully combined.
2. Application: Using a pastry brush, apply a thin layer of the egg wash over the exposed crust. Take care not to let it drip onto the filling, as it may create a sticky texture.
Enhancing Flavor and Texture
For an added twist, consider incorporating a pinch of salt or sugar into the egg wash. This subtle enhancement can elevate the flavor of the crust and add to its golden hue.
Baking to Perfection
Now that your galette is assembled and brushed with egg wash, it’s time to bake. Preheat your oven to 400°F (205°C) for optimal results.
Baking Temperature and Time
Bake your galette for approximately 35-45 minutes. The baking time may vary based on your oven and the thickness of your crust, so keep a close eye on it.
Signs Your Galette is Done
1. Visual Cues: Look for a golden-brown crust and bubbling juices from the filling.
2. Touch Test: Lightly press the crust; it should feel firm and crisp.
Managing Browning
If you notice that your galette is browning too quickly, particularly around the edges, loosely cover it with aluminum foil. This prevents over-browning while allowing the filling to cook thoroughly.
Serving Suggestions
Your Juicy Summer Peach Galette is best enjoyed warm or at room temperature. Here are some delightful serving suggestions to elevate your dessert experience:
– Pairing Options: Serve with a scoop of vanilla ice cream, a dollop of whipped cream, or a spoonful of tangy yogurt. The contrast of warm fruit and cool toppings is simply irresistible.
– Garnishing Ideas: For added flair, consider garnishing with fresh mint leaves or a light dusting of powdered sugar. A drizzle of honey or caramel sauce can also enhance sweetness and visual appeal.
Nutritional Information
Understanding the nutritional benefits of your ingredients can help you enjoy your galette mindfully.
Overview of Nutritional Benefits
Peaches are a great source of vitamins A and C, fiber, and antioxidants. The crust, made from flour and butter, offers carbohydrates and a small amount of protein.
Portion Sizes
A typical slice of galette is generous, so consider sharing it among friends or family to enjoy it without overindulgence. A single slice can be a satisfying treat when paired with a healthy topping.
Conclusion
Creating a Juicy Summer Peach Galette is not just about baking; it’s about embracing the joy of using fresh, seasonal ingredients. The process—from rolling the dough to enjoying the final product—offers a rewarding experience that brings the taste of summer to your table.
This galette, with its flaky crust and sweet, fragrant peach filling, is the perfect dessert for gatherings or a simple family dinner. The satisfaction of crafting a homemade dessert using fresh peaches is unmatched. Gather your loved ones, slice up this delicious galette, and relish the fruits of your labor together. Enjoy the warmth, flavor, and memories created around this delightful summer treat.
