Introduction
Samoa Rice Krispies Treats combine the nostalgic crunch of Rice Krispies with the gooey goodness of caramel, rich chocolate, and toasted coconut. This delightful recipe offers a creative twist on the traditional Rice Krispies treats, making them perfect for parties, school events, or a sweet snack at home. In this article, we will delve into the journey of creating these scrumptious treats, highlighting each step with detailed instructions and tips for achieving the best results.
Understanding the Appeal of Samoa Rice Krispies Treats
Exploring the Rich Flavor Profile
The appeal of Samoa Rice Krispies Treats lies in their unique combination of flavors and textures. At the heart of this recipe are key ingredients that work in harmony to create a truly indulgent experience.
– The Combination of Caramel, Chocolate, and Coconut: The sweetness of the caramel sauce melds beautifully with the rich, semi-sweet chocolate, while the toasted coconut adds a delightful crunch and a hint of tropical flavor. This trifecta of taste transports you to a sunny beach with every bite, making it an irresistible treat for those who love the classic Samoa cookie flavor profile.
– Nostalgic Qualities of Classic Rice Krispies Treats: Rice Krispies Treats have been a beloved staple in many households since their invention in the 1930s. They evoke memories of childhood, school bake sales, and family gatherings. By incorporating the elements of Samoa cookies, these treats elevate the nostalgia to new heights, appealing to both kids and adults alike.
Highlighting Occasions for Serving
Samoa Rice Krispies Treats are incredibly versatile, making them suitable for a variety of occasions:
– Perfect for Celebrations and Gatherings: Whether it’s a birthday party, holiday gathering, or a casual get-together, these treats are sure to impress your guests. Their eye-catching appearance, with layers of chocolate and coconut, makes them a festive addition to any dessert table.
– Ideal for Lunchboxes or as After-School Snacks: Parents will appreciate the ease of making these treats as a quick snack for their kids. They are easy to pack, portable, and provide a satisfying sweet treat after a long day at school.
Essential Ingredients for Samoa Rice Krispies Treats
To create the perfect Samoa Rice Krispies Treats, it’s important to gather all the essential ingredients. Each component plays a crucial role in achieving the desired flavor and texture.
– Rice Krispies Cereal: The base of the treats, this crispy cereal provides that signature crunch that we all know and love. It’s light and airy, making it the perfect foundation for the gooey marshmallow mixture.
– Shredded Sweetened Coconut: Adding texture and flavor, shredded coconut gives the treats a chewy bite and a hint of tropical sweetness. Opt for sweetened coconut for the best balance of flavors.
– Semi-Sweet Chocolate Chips: This is what adds that indulgent topping. The semi-sweet chocolate complements the sweetness of the caramel and coconut, creating a deliciously balanced flavor profile.
– Unsalted Butter: The essential fat for richness, butter provides a smooth, creamy texture to the marshmallow mixture while enhancing the overall flavor of the treats.
– Mini Marshmallows: The binding agent for gooeyness, mini marshmallows melt down beautifully and create that signature sticky texture that holds the Rice Krispies and coconut together.
– Caramel Sauce: The star ingredient for sweetness, caramel sauce adds depth and richness to the treats. You can use store-bought or homemade caramel sauce, depending on your preference.
– Vanilla Extract and Salt: These ingredients enhance the flavors, elevating the overall taste of the treats. A dash of vanilla adds warmth, while a pinch of salt balances out the sweetness.
Step-by-Step Guide to Making Samoa Rice Krispies Treats
Preparing the Toasted Coconut
Toasting the coconut is a crucial step in the preparation process, as it significantly enhances the flavor of the treats. Here’s how to do it perfectly:
1. Preheat Your Oven: Start by preheating your oven to 350°F (175°C). This temperature is ideal for evenly toasting the coconut without burning it.
2. Spread the Coconut: On a baking sheet lined with parchment paper, spread the shredded coconut in an even layer. This step is important to ensure that the coconut toasts evenly.
3. Toast the Coconut: Place the baking sheet in the preheated oven. Toast the coconut for about 5-7 minutes, stirring every couple of minutes to prevent burning. Keep a close eye on it, as coconut can go from golden to burnt very quickly. The goal is to achieve a light golden brown color.
4. Cool the Coconut: Once toasted, remove the coconut from the oven and let it cool completely. This will prevent it from clumping together when mixed with the other ingredients.
Creating the Marshmallow Base
The marshmallow mixture is the heart of the Samoa Rice Krispies Treats, creating the gooey, sweet binding that holds all the flavors together. Here’s how to create the perfect marshmallow base:
1. Melt the Butter: In a large saucepan over low heat, melt the unsalted butter. It’s important to use low heat to avoid browning the butter, which can change the flavor of the treats.
2. Add the Marshmallows: Once the butter is melted, add the mini marshmallows to the saucepan. Stir continuously until the marshmallows are completely melted and combined with the butter. This should take about 3-5 minutes.
3. Achieve a Smooth Consistency: To ensure a smooth finish, remove the saucepan from heat and stir in the vanilla extract and a pinch of salt. This will enhance the flavors and provide a delectable aroma to the mixture.
Mixing the Rice Krispies and Coconut
Once your marshmallow base is ready, it’s time to combine it with the Rice Krispies and toasted coconut:
1. Combine the Rice Krispies and Coconut: In a large mixing bowl, add the Rice Krispies cereal and the toasted coconut. Gently toss them together until they are evenly distributed.
2. Pour in the Marshmallow Mixture: Carefully pour the melted marshmallow mixture over the Rice Krispies and coconut. Using a spatula, gently fold the mixture together, ensuring that all the Rice Krispies are coated with the marshmallow.
3. Press into a Pan: Once everything is well combined, transfer the mixture to a greased 9×13-inch baking dish. Using a piece of parchment paper or your hands (lightly greased), press the mixture evenly into the pan. Ensure it’s packed tightly, as this will help the treats hold their shape once cooled.
4. Let It Set: Allow the mixture to cool at room temperature for about 30 minutes. This will help firm up the treats, making them easier to cut into squares later.
By following these initial steps, you will be well on your way to creating delectable Samoa Rice Krispies Treats that are sure to delight your friends and family. Stay tuned for the next section, where we’ll cover the final touches and topping your treats with chocolate and caramel!
Proper Mixing Techniques for Even Coating
When preparing Samoa Rice Krispies Treats, achieving an even coating of the marshmallow mixture is essential. Start by melting the butter and marshmallows over low heat, stirring frequently. Once the marshmallows are fully melted, it’s crucial to incorporate the Rice Krispies cereal evenly.
As you add the cereal, use a large rubber spatula to fold the mixture gently. This technique prevents the Rice Krispies from becoming crushed and ensures they are evenly coated in the sticky marshmallow mixture. The key here is to mix just until the cereal is coated; overmixing can lead to a gummy texture.
Importance of Timing in the Mixing Process
Timing is everything in the mixing process. Once your marshmallow mixture is ready, it’s important to work quickly. The mixture will begin to set as it cools, so you’ll want to add the Rice Krispies and mix them in swiftly. Aim to have the cereal fully incorporated within a minute or two of adding it to the melted marshmallows. This ensures that the treats maintain that perfect chewy texture without becoming overly dense.
Incorporating Caramel Sauce
To elevate your Samoa Rice Krispies Treats, incorporating caramel sauce is a game-changer. After mixing the Rice Krispies with the marshmallow blend, it’s time to fold in the caramel.
How to Fold in Caramel Without Losing Texture
Gently drizzle your prepared caramel sauce over the Rice Krispies mixture. Using the same rubber spatula, fold the caramel into the mixture. Be careful to maintain the texture of the treats; the goal is to incorporate the caramel without overmixing. Aim for a marbled effect, where streaks of caramel are visible throughout the mixture, enhancing both flavor and visual appeal.
Tips for Reserving Sauce for Drizzling
If you wish to have extra caramel for drizzling on top of your finished treats, reserve about a quarter of your caramel sauce before folding it into the mixture. Store this reserved caramel in a small bowl, covered, at room temperature until you’re ready to drizzle it on top of your treats.
Shaping the Treats
Now that your mixture is ready, it’s time to shape the treats.
Best Practices for Pressing the Mixture into the Pan
Transfer the mixture into a greased 9×13-inch baking dish. To achieve a uniform thickness, use your spatula to spread the mixture evenly across the bottom of the pan. Once spread, use a piece of parchment paper or wax paper to press down firmly on the mixture. This step helps to compact the treats, ensuring they hold together well once cooled.
Importance of Packing Down Firmly for Uniformity
Packing down firmly is critical. If you don’t press the mixture tightly enough, the treats may crumble when you cut them. Aim for an even layer, pressing down as you go to eliminate any air pockets. You want the treats to be cohesive and easy to slice into perfect squares or rectangles once set.
Melting the Chocolate Topping
The chocolate topping is what makes your Samoa Rice Krispies Treats truly irresistible. Here’s how to melt the chocolate smoothly.
Step-by-Step Guide for Achieving a Smooth Melt
1. Choose Your Chocolate: Opt for high-quality chocolate chips or bars. Semi-sweet chocolate complements the sweetness of the treats beautifully.
2. Use a Double Boiler: Fill a small pot with a few inches of water and place it on the stove over medium heat. Set a heatproof bowl on top of the pot, ensuring it doesn’t touch the water. Add the chocolate to the bowl.
3. Stir Constantly: As the water heats, stir the chocolate continuously until it’s fully melted and silky smooth. This method prevents the chocolate from burning or seizing.
Tips for Spreading the Chocolate Evenly
Once melted, remove the bowl from the heat and let it cool slightly. Pour the melted chocolate over the Rice Krispies mixture in the baking dish. Use an offset spatula to spread the chocolate evenly over the surface. Work quickly before the chocolate begins to set, ensuring a smooth, glossy finish.
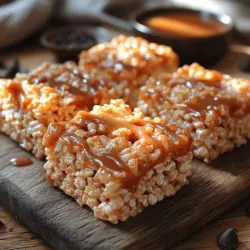
Drizzling with Caramel
To add an extra touch of decadence, drizzle the reserved caramel sauce over the chocolate topping.
Creative Patterns for Aesthetic Appeal
Using a spoon or a squeeze bottle, create beautiful drizzles across the surface of the chocolate. You can make straight lines, zigzags, or even circular patterns for a visually appealing design that will impress anyone who sees it.
How to Achieve a Professional-Looking Finish
For a professional-looking finish, drizzle the caramel in a controlled manner. Keep your hand steady and use the edges of the spoon to guide the flow of caramel. The contrast between the chocolate and caramel will enhance the overall presentation.
Cooling and Setting the Treats
Once you’ve completed the assembly, it’s crucial to allow the treats to set properly.
Understanding the Cooling Process
Cooling allows the chocolate and caramel to harden, which is essential for achieving the right texture. If you cut the treats before they are fully set, they may crumble or fall apart.
Why It’s Crucial to Allow the Treats to Set Properly
Allowing the treats to cool at room temperature for at least 30 minutes is recommended. If you’re in a hurry, you can place the dish in the refrigerator to speed up the cooling process. Just be sure to cover it loosely with plastic wrap to prevent condensation from forming.
Tips for Quick Cooling in the Refrigerator
If you opt for the refrigerator method, check the treats after 15-20 minutes. Depending on the temperature of your refrigerator, they may set faster than expected. Once set, you can remove them from the pan and cut them into squares or rectangles.
Serving Suggestions for Samoa Rice Krispies Treats
Once your Samoa Rice Krispies Treats are ready, it’s time to present them in a delightful way.
Creative Ways to Present the Treats
Consider arranging the treats on a decorative platter or cutting board to make an eye-catching display. You can use parchment paper or cupcake liners to separate individual servings, adding a charming touch.
Serving Sizes and Cutting Techniques
To achieve uniform servings, use a sharp knife to cut the treats. For bite-sized options, cut them into smaller squares. If you’re serving them as a dessert, larger rectangles might be more appropriate.
Pairing with Beverages or Other Snacks
These treats pair wonderfully with a variety of beverages. Consider serving them alongside a cold glass of milk, hot chocolate, or even a cup of coffee. They’re also a great companion to fresh fruit, providing a delightful contrast of flavors.
Nutritional Information
Understanding the nutritional value of your Samoa Rice Krispies Treats is important, especially if you’re mindful of dietary restrictions.
Breakdown of the Nutritional Value per Serving
Each serving of Samoa Rice Krispies Treats typically contains approximately:
– Calories: 200-250
– Total Fat: 8-12 grams
– Saturated Fat: 4-6 grams
– Sugars: 15-20 grams
– Protein: 1-2 grams
These values may vary based on the specific ingredients and portion sizes used.
Considerations for Dietary Restrictions
For those with dietary restrictions, consider using gluten-free Rice Krispies or vegan marshmallows to accommodate different dietary needs. Always check ingredient labels to ensure they meet your requirements.
Conclusion
Samoa Rice Krispies Treats are a delightful way to enjoy a sweet treat that combines the familiar with the innovative. With their delicious layers of flavor and textures, they are sure to impress anyone who tries them. By following this comprehensive guide, you can successfully create your own batch of these irresistible treats, perfect for any occasion. Enjoy the satisfaction of baking while indulging in a delightful dessert that is as fun to make as it is to eat!