Finger-Lickin’ One-Skillet BBQ Chicken & Rice Dinner
 Save
Save
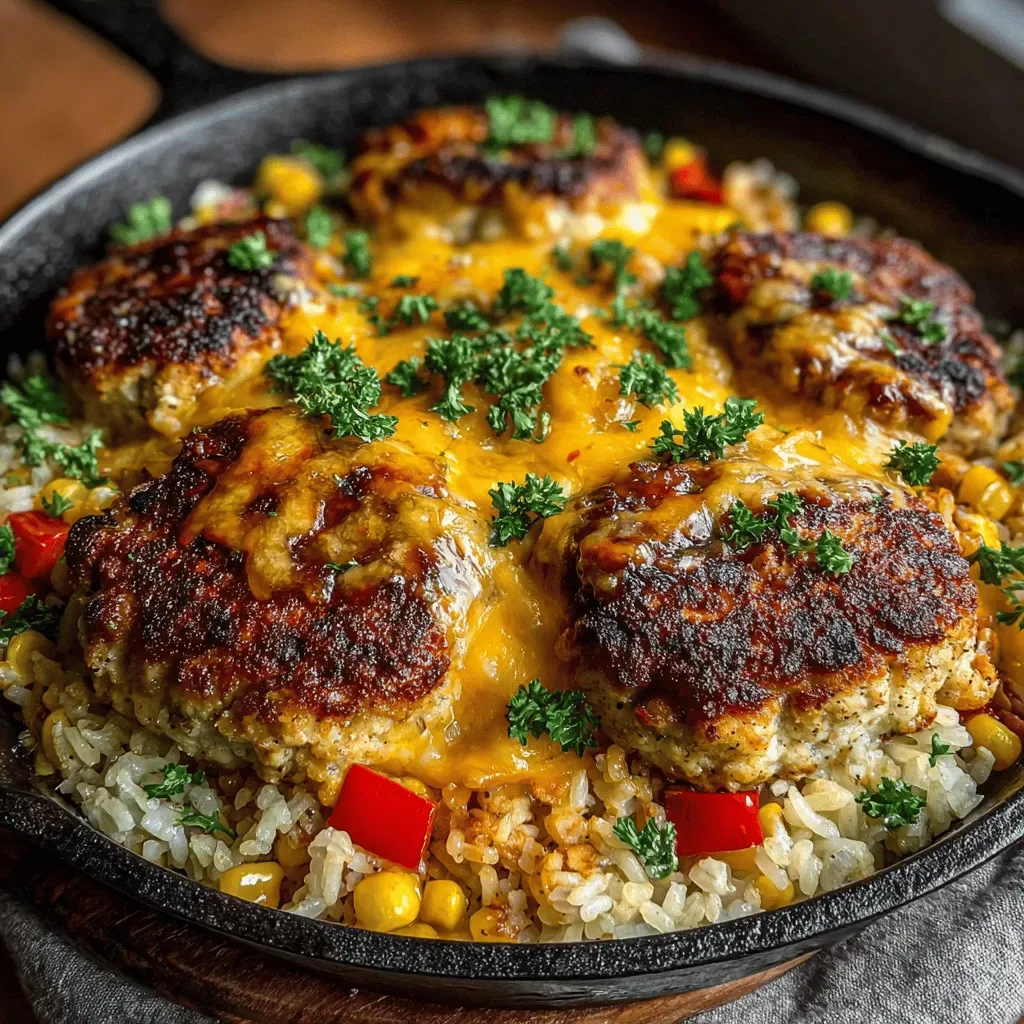
Imagine a single skillet delivering the smoky depth of barbecue, the juicy tenderness of chicken, and the comforting heart‑iness of perfectly cooked rice—all in one pan. That’s the promise of the Finger‑Lickin’ One‑Skillet BBQ Chicken & Rice Dinner, a dish that turns a busy weeknight into a celebration of flavor.
What makes this recipe truly special is the harmony between a caramelized BBQ glaze and fluffy, buttery rice that soaks up every drop of sauce. The quick sear locks in juices, while the oven finish ensures even cooking without fuss.
This dinner will win over barbecue lovers, rice enthusiasts, and anyone craving a hearty, no‑mess meal. It’s ideal for family dinners, casual gatherings, or a satisfying solo feast after a long day.
From seasoning the chicken to simmering the rice, the process flows smoothly: sear the chicken, build a sweet‑savory sauce, add the rice and broth, then finish everything together in the oven for a golden, glossy finish that’s ready to serve straight from the skillet.
Why You'll Love This Recipe
One‑Pan Wonder: All the components cook together, so cleanup is a breeze and flavors meld beautifully without juggling multiple pots.
Bold BBQ Flavor: A balanced blend of smoky, sweet, and tangy notes creates a taste that feels like a backyard grill, even indoors.
Comforting Rice Base: The rice absorbs the sauce, staying moist and fluffy, turning a side into a star ingredient.
Family‑Friendly Speed: With a total time under an hour, it fits perfectly into a hectic schedule while still feeling special.
Tips & Tricks
Perfecting the Recipe
Room‑Temperature Chicken: Let the thighs sit out for 10‑15 minutes before searing. This promotes even cooking and a better crust.
Don’t Overcrowd the Pan: Cook in batches if necessary. Overcrowding traps steam, preventing the caramelization that gives the dish its signature flavor.
Use a Heavy‑Bottom Skillet: Cast iron or enameled steel distributes heat evenly, ensuring the rice cooks uniformly and the chicken browns nicely.
Flavor Enhancements
Add a squeeze of fresh lemon juice just before serving to brighten the glaze. For a subtle heat, sprinkle in a pinch of red‑pepper flakes while the sauce simmers. Finish with a tablespoon of cold butter stirred into the sauce for a silkier texture.
Common Mistakes to Avoid
Skipping the resting period lets the juices run out onto the plate, leaving the chicken dry. Also, avoid turning the heat up too high during the simmer; a gentle bubble prevents the sauce from scorching and keeps the rice from sticking.
Pro Tips
Toast the Rice: Before adding broth, let the rice sit in the pan for 1‑2 minutes. Lightly toasting adds a nutty depth that pairs beautifully with the BBQ glaze.
Check Doneness Early: Insert a thermometer into the thickest part of the thigh at 12 minutes; if it’s close to 160°F, you can reduce oven time slightly to avoid over‑cooking.
Reserve Extra Sauce: Keep a small bowl of the pan sauce aside before baking. Drizzle it over the finished dish for an extra burst of flavor.
Variations
Ingredient Swaps
Feel free to replace chicken thighs with bone‑in drumsticks, pork tenderloin cubes, or firm tofu for a vegetarian twist. Swap the red bell pepper for orange or yellow for a sweeter flavor, or add sliced mushrooms for an earthy note. If you prefer a different sweetness, maple syrup or agave nectar can stand in for honey.
Dietary Adjustments
For gluten‑free diners, ensure the BBQ sauce is certified gluten‑free and use tamari instead of soy sauce. To keep it dairy‑free, simply omit the butter finish. Keto lovers can replace the rice with cauliflower rice and swap honey for a low‑carb sweetener like erythritol.
Serving Suggestions
Serve the skillet straight to the table with a side of coleslaw for crunch, or a simple cucumber‑mint salad to cut through the richness. A warm cornbread muffin or crusty baguette is perfect for sopping up any extra glaze, turning the meal into a comforting feast.
Storage Info
Leftover Storage
Allow leftovers to cool to room temperature (no more than two hours), then transfer the entire skillet content into an airtight container. Refrigerate for up to four days. For longer keeping, portion the dish into freezer‑safe bags, squeeze out excess air, and freeze for up to three months. Label with date for easy reference.
Reheating Instructions
Reheat gently to preserve moisture. Place the skillet (or a microwave‑safe dish) in a 350°F oven, covered with foil, for 12‑15 minutes until heated through. If using a microwave, add a splash of broth or water, cover, and heat on medium power for 2‑3 minutes, stirring halfway. Finish with a quick drizzle of fresh BBQ sauce for revived flavor.
Frequently Asked Questions
Can I make this recipe in advance?
Can I use frozen chicken for this dish?
What side dishes pair best with this skillet?
How do I know when the rice is perfectly cooked?
This one‑skillet wonder delivers smoky BBQ flavor, juicy chicken, and fluffy rice with minimal cleanup and maximum satisfaction. By following the step‑by‑step guide, using the tips for perfect caramelization, and customizing the dish to your taste, you’ll create a reliable go‑to dinner that feels both comforting and special. Feel free to experiment with proteins, veggies, or sauces—cooking is an adventure, and this recipe is your perfect launchpad. Enjoy every bite of your finger‑lickin’ masterpiece!
Finger-Lickin’ One-Skillet BBQ Chicken & Rice Dinner
Delicious Finger-Lickin’ One-Skillet BBQ Chicken & Rice Dinner
Ingredients
Main Ingredients
- 4 boneless, skinless chicken thighs
- 1 cup long‑grain white rice
- 1 ½ cups low‑sodium chicken broth
Sauce Components
- ½ cup BBQ sauce (store‑bought or homemade)
- ¼ cup ketchup
- 2 tablespoons honey
- 1 tablespoon soy sauce
Seasonings & Garnish
- 1 medium onion, diced
- 2 cloves garlic, minced
- 1 red bell pepper, sliced
- 1 teaspoon smoked paprika
- ½ teaspoon ground cumin
- Salt and freshly ground black pepper, to taste
- 2 tablespoons olive oil
- 2 green onions, sliced for garnish
Instructions
Create the BBQ Glaze
- Combine wet ingredients. In a small bowl whisk together ½ cup BBQ sauce, ¼ cup ketchup, 2 tablespoons honey, and 1 tablespoon soy sauce. This mixture balances sweet, salty, and tangy notes, ensuring the final glaze is glossy and thick.
- Deglaze the pan. Pour the whisked sauce over the sautéed vegetables and chicken. Use a wooden spoon to scrape up the browned bits (fond) from the bottom of the skillet—these are flavor powerhouses that will melt into the sauce.
- Simmer briefly. Allow the sauce to come to a gentle simmer, stirring occasionally. Let it reduce for 3‑4 minutes; the sauce should thicken enough to coat the back of a spoon.
Similar Recipes
 Dinner
Savory Grilled Cheese BLT: A Delicious Twist on a Classic Favorite
Delicious Savory Grilled Cheese BLT: A Delicious Twist on a Classic Favorite
 Dinner
budget friendly slow cooker lentil and root vegetable soup for january suppers
Learn how to make delicious budget friendly slow cooker lentil and root vegetable soup for january…
 Dinner
Ultimate Greek Chicken Alfredo Recipe with Crispy Parmesan Broccoli
Learn how to make delicious Ultimate Greek Chicken Alfredo Recipe with Crispy Parmesan Broccoli. Easy recipe…
 Dinner
Colorful Tofu Veggie Stir-Fry: A Delicious and Nutritious Meal
Delicious Colorful Tofu Veggie Stir-Fry: A Delicious and Nutritious Meal
 Dinner
Luscious Lobster Chowder: A Creamy Delight for Seafood Lovers
Delicious Luscious Lobster Chowder: A Creamy Delight for Seafood Lovers
 Dinner
one pot lentil stew with cabbage and carrots for meal prep
Learn how to make delicious one pot lentil stew with cabbage and carrots for meal prep.…
 Dinner
Köstliche geröstete Wintergemüsesuppe – 3 magische Zutaten
Learn how to make delicious Köstliche geröstete Wintergemüsesuppe – 3 magische Zutaten. Easy recipe with step-by-step…
 Dinner
comforting slow cooker turkey soup with winter root vegetables
Learn how to make delicious comforting slow cooker turkey soup with winter root vegetables. Easy recipe…

Eva
I cook these recipes at home before they ever land here — simple ingredients, clear steps.