Extra Crispy Homemade Onion Rings – A Crunchy Delight!
 Save
Save
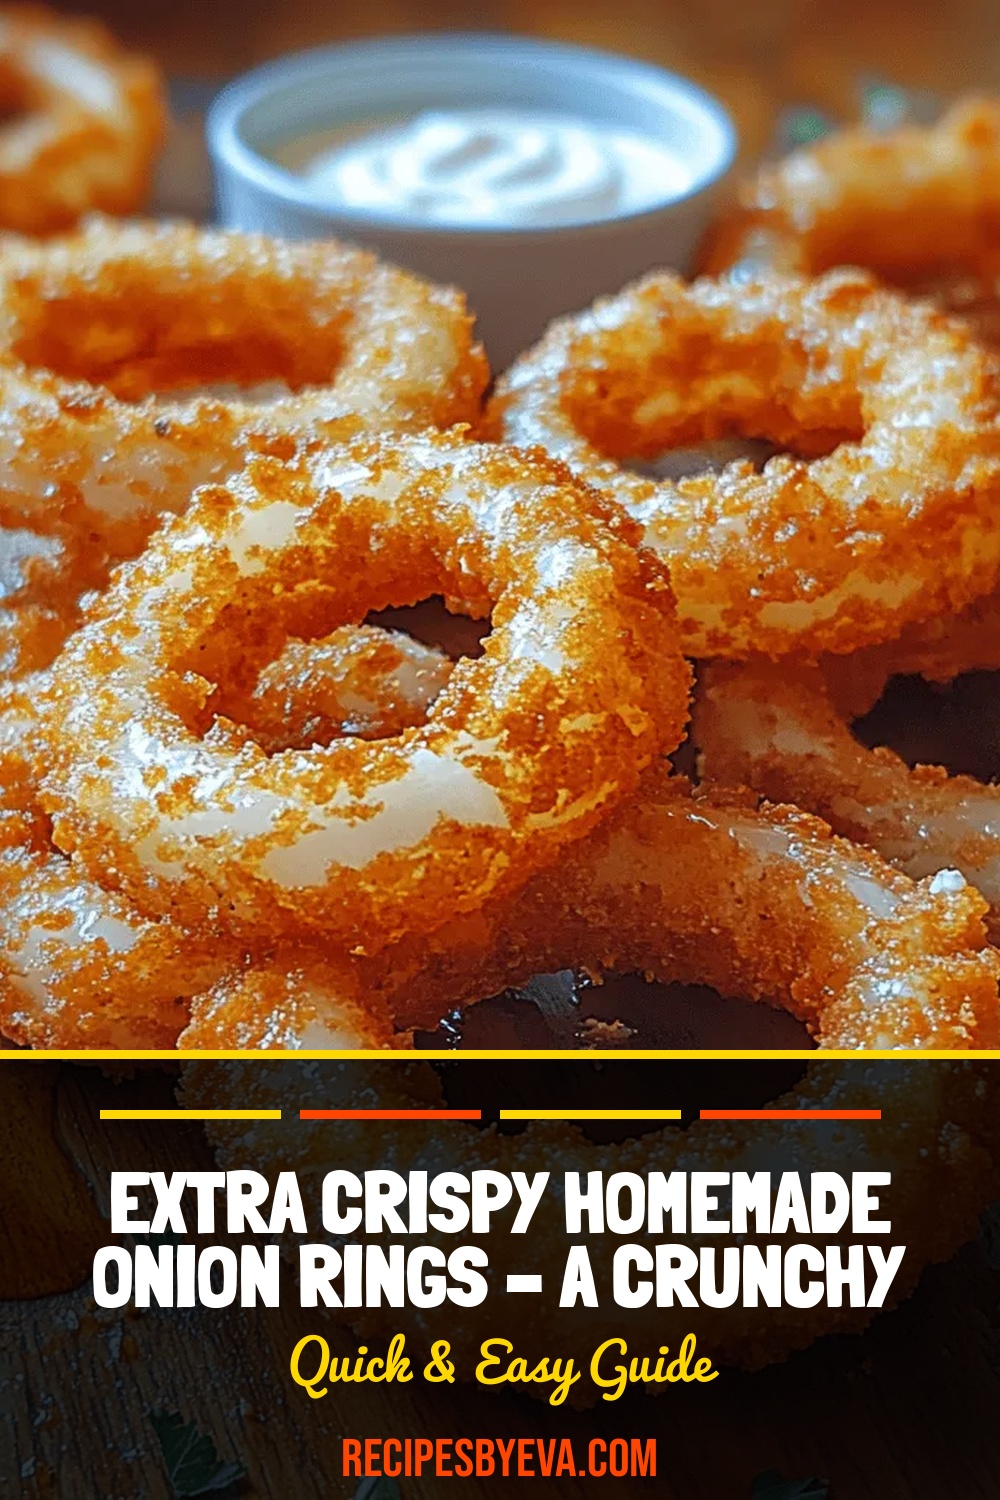
There’s something magical about the first bite of a perfectly fried onion ring – a crackle that sings, a golden crust that shatters, and a sweet, tender center that melts in your mouth. My Extra Crispy Homemade Onion Rings capture that magic in every bite, turning a classic comfort food into a brunch‑worthy masterpiece.
What makes this recipe stand out is the double‑dip technique: a light flour coating followed by a seasoned batter that creates a cloud‑like crunch without any artificial additives. A quick dip in cold milk before the batter ensures the coating adheres flawlessly, giving you that restaurant‑level snap.
These rings are ideal for anyone who loves a hearty, indulgent treat – from kids demanding snack‑time fun to adults craving a savory side for a weekend brunch. Serve them alongside eggs, avocado toast, or a fresh fruit salad for a balanced, crowd‑pleasing spread.
The process is straightforward: slice, soak, coat, and fry. In just 35 minutes you’ll have a tray of golden rings that stay crisp even after a brief rest, making them perfect for serving hot or reheating later.
Why You'll Love This Recipe
Ultimate Crunch Factor: The double‑dip method creates a light, airy crust that stays crispy longer than typical onion rings, delivering that satisfying snap every time.
Simple Ingredients: All components are pantry staples – flour, milk, and spices – so you won’t need a specialty store run to whip up a gourmet‑level snack.
Versatile Pairings: Whether you serve them with a tangy dipping sauce, atop a salad, or as a side to eggs benedict, they adapt beautifully to any brunch menu.
Kid‑Approved Fun: Kids love the crunchy texture and sweet onion flavor, making these rings a wholesome alternative to processed snack foods.
Tips & Tricks
Perfecting the Recipe
Cold Ingredients. Keep the milk and batter mixture chilled; cold batter hits hot oil instantly, creating a puffier, crisper crust.
Rest the Batter. Let the seasoned flour sit for 5 minutes before the first batch; this hydrates the spices and prevents clumping.
Use a Wire Rack. Draining on a rack instead of paper towels keeps the underside from steaming, preserving that all‑around crunch.
Flavor Enhancements
Add a teaspoon of dried thyme or rosemary to the seasoned flour for an herbaceous note. For a sweet‑savory twist, fold a tablespoon of grated Parmesan into the batter. Finish each batch with a light drizzle of truffle oil for an upscale brunch feel.
Common Mistakes to Avoid
Skipping the dry‑pat step leaves excess moisture, resulting in soggy rings. Also, never lower the oil temperature below 325°F; too low a heat yields a greasy, pale coating instead of a golden crunch.
Pro Tips
Thermometer Accuracy. Use a deep‑fat thermometer; a 5‑degree swing can change texture dramatically.
Season Immediately. Salt the rings right after they leave the oil so the crystals adhere before the coating cools.
Batch Timing. Fry only a few rings at a time; this maintains oil temperature and ensures each ring is uniformly golden.
Serve Promptly. The crunch fades after 10 minutes, so plate the rings while still steaming hot for maximum texture.
Variations
Ingredient Swaps
Try using sweet yellow onions for a milder flavor, or red onions for a slightly sharper bite. Substitute the all‑purpose flour with a gluten‑free blend for a wheat‑free version, and replace cornstarch with rice flour to keep the crunch intact.
Dietary Adjustments
For a dairy‑free take, swap milk with almond or oat milk; the batter will still set. Vegans can replace the egg with a tablespoon of aquafaba or a flax‑egg mixture. Use avocado oil for a heart‑healthier frying medium without sacrificing crispness.
Serving Suggestions
Pair the rings with a tangy chipotle mayo, a classic ketchup, or a honey‑mustard dip. They also shine as a side to eggs benedict, smoked salmon toast, or a bright citrus salad. For a brunch buffet, arrange them on a platter with assorted dips for guests to customize.
Storage Info
Leftover Storage
Allow the rings to cool completely, then spread them in a single layer inside an airtight container. Refrigerate for up to 3 days. For longer keeping, freeze on a parchment‑lined tray, then transfer to a zip‑top bag; they’ll hold up to 2 months.
Reheating Instructions
Reheat in a preheated 375°F oven on a wire rack for 8‑10 minutes, turning once, until the exterior regains its crunch. Microwaving will soften the coating, so avoid it unless you’re in a pinch; instead, use a skillet over medium heat for 2‑3 minutes per side.
Frequently Asked Questions
Can I make these onion rings ahead of time?
What oil works best for frying?
How do I keep the rings from getting soggy after frying?
This recipe delivers the ultimate crunchy onion ring experience with simple pantry staples and a few pro‑level techniques. By mastering the double‑dip batter, temperature control, and quick draining, you’ll consistently achieve golden, melt‑in‑your‑mouth rings that wow any brunch crowd. Feel free to experiment with spices, dips, or gluten‑free swaps—cooking is your playground. Serve them hot, share them widely, and enjoy every satisfying crunch.
Extra Crispy Homemade Onion Rings – A Crunchy Delight!
Delicious Extra Crispy Homemade Onion Rings – A Crunchy Delight!
Ingredients
Main Ingredients
- 2 large sweet onions (preferably Vidalia)
- 1 cup all‑purpose flour
- ¼ cup cornstarch
Batter & Soak
- 1 cup cold whole‑milk (or buttermilk for extra tang)
- 1 large egg, lightly beaten
Seasonings
- 1 tsp smoked paprika
- ½ tsp garlic powder
- ¼ tsp cayenne pepper (optional)
- Salt and freshly ground black pepper, to taste
Dipping Sauce (Optional)
- ½ cup mayonnaise
- 1 tbsp Dijon mustard
- 1 tsp lemon juice
Instructions
Coating & Frying
- Dry the Rings. Drain the onion rings and pat them completely dry with paper towels. Moisture on the surface creates steam, which can prevent a crisp crust.
- First Dip – Flour. Lightly toss the dried rings in a shallow plate of plain flour, shaking off any excess. This thin layer acts as a “glue” for the batter.
- Second Dip – Batter. Submerge each floured ring into the milk‑egg mixture, then immediately transfer to the seasoned flour mixture. Coat both sides thoroughly, pressing gently so the batter adheres without clumping.
- Heat the Oil. Fill a deep, heavy‑bottomed pot with enough vegetable oil to reach 2 inches deep. Heat to 350°F (175°C); a small drop of batter should sizzle and turn golden within 30 seconds.
- Fry in Batches. Carefully lower 4‑6 rings at a time using a slotted spoon. Fry for 2‑3 minutes, turning once, until the coating is deep golden and crisp. Avoid crowding the pot, which drops the oil temperature.
- Drain & Season. Remove the rings with a slotted spoon, place on a wire rack set over a baking sheet, and immediately sprinkle with a pinch of sea salt. This keeps the crust from becoming soggy.
Similar Recipes
 Dinner
Slow Cooked Maple Apple Pork Chops Recipe
Delicious Slow Cooked Maple Apple Pork Chops Recipe
 Dinner
Hearty Pumpkin Chili Delight – A Comforting Recipe for Every Season
Delicious Hearty Pumpkin Chili Delight – A Comforting Recipe for Every Season
 Dinner
Fall-Off-The-Bone Brown Sugar Bourbon BBQ Ribs
Delicious Fall-Off-The-Bone Brown Sugar Bourbon BBQ Ribs
 Dinner
Creamy Tomato Garlic Pasta: A Comforting Classic for Beginner Cooks
Learn how to make delicious Creamy Tomato Garlic Pasta: A Comforting Classic for Beginner Cooks. Easy…
 Dinner
Cheesy Beef Stuffed Peppers
Juicy bell peppers packed with seasoned beef, rice, and melty cheddar deliver comfort in every bite.
 Dinner
Lemon Zest Creamy Avocado Pasta Recipe
Delicious Lemon Zest Creamy Avocado Pasta Recipe
 Dinner
Zucchini Lasagna Cupcakes Delight
Delicious Zucchini Lasagna Cupcakes Delight
 Dinner
Freezer-Friendly Meatloaf Muffins with Glaze for Easy Lunch
Learn how to make delicious Freezer-Friendly Meatloaf Muffins with Glaze for Easy Lunch. Easy recipe with…

Eva
I cook these recipes at home before they ever land here — simple ingredients, clear steps.