Delightful Heart Petit Fours: Elegant Treats to Savor
 Save
Save
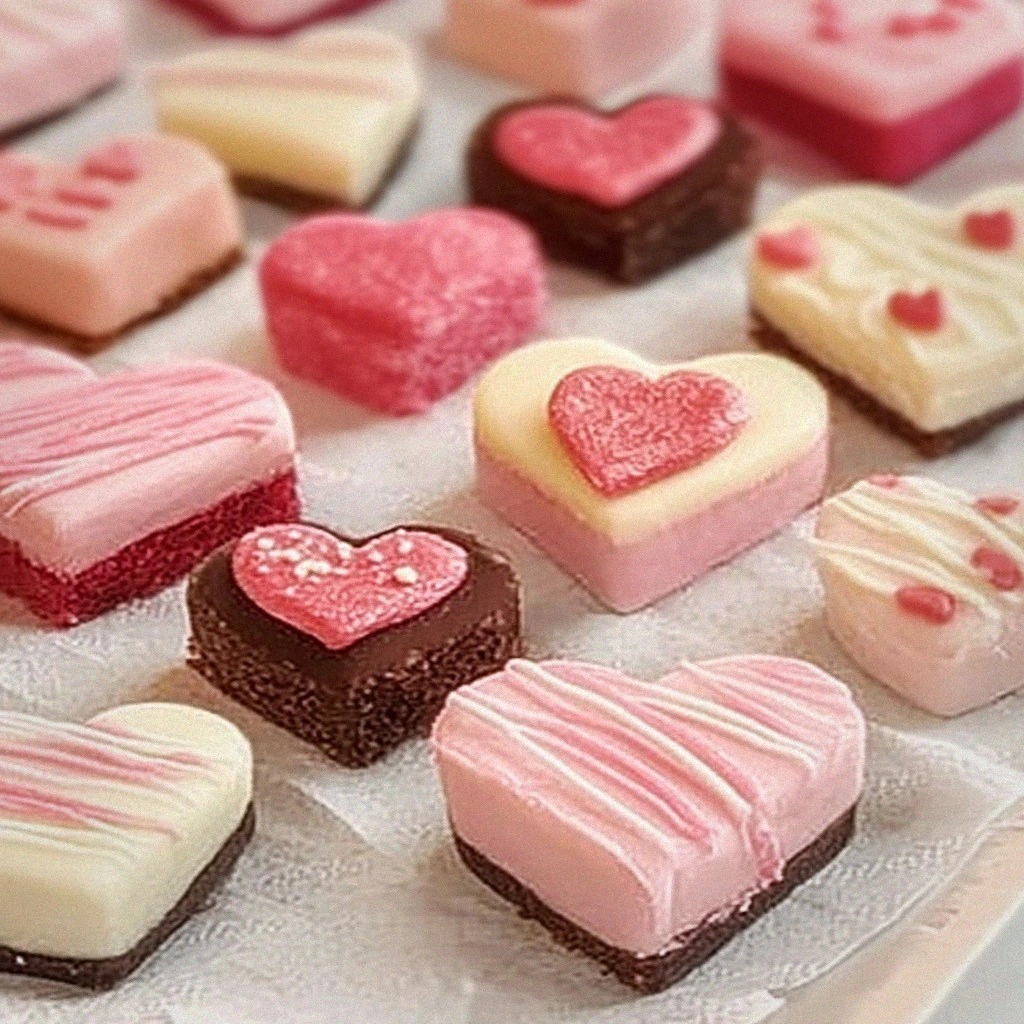
The first time I ever tried to make a tiny, heart‑shaped cake, I was in my grandma’s kitchen on a rainy Saturday afternoon. The rain tapped a steady rhythm on the windows while the oven hummed softly, and the scent of melted butter and vanilla drifted through the air like a warm hug. I remember lifting the lid off the batter‑filled tins and watching a cloud of fragrant steam rise, curling around the copper spoons that were already waiting to be dipped into the sweet glaze. My niece squealed with delight when she saw the little pink hearts wobble on the cooling rack, and that moment has lived on in my mind as the definition of pure, uncomplicated joy. Have you ever felt a dessert melt your heart before it even touches your tongue? That’s the magic we’re about to capture in this recipe.
What makes these petit fours truly special is the balance between a delicate sponge, a buttery cream filling, and a glossy glaze that catches the light just right. The cake itself is feather‑light, almost like a cloud that disappears as soon as you bite into it, while the frosting adds a luscious richness that lingers on the palate. Imagine a bite that starts with a subtle crunch of caramelized sugar, then gives way to a melt‑in‑your‑mouth softness, and finishes with a whisper of vanilla that makes you close your eyes and sigh. The secret? A careful selection of high‑quality ingredients and a few tricks that most home cooks overlook. Trust me, once you master this, you’ll be the go‑to host for any celebration, from bridal showers to birthday brunches.
But wait—there’s a hidden technique that turns an ordinary cake into a heart‑shaped masterpiece, and it’s something I discovered by accident while trying to rescue a batch that was a touch too dense. I’ll spill the beans later in the “Expert Tips” section, but for now, picture yourself arranging these miniature hearts on a silver platter, each one glistening like a tiny jewel. The colors can be soft pastels for a spring gathering or deep reds for a romantic evening, and the flavor profile is versatile enough to pair with tea, coffee, or a glass of sparkling prosecco. The anticipation of that first bite is almost as satisfying as the taste itself.
Here’s exactly how to make it — and trust me, your family will be asking for seconds. We’ll walk through every step, from selecting the perfect flour to mastering the glossy finish that makes these petit fours look as elegant as they taste. Ready to dive in? Grab your mixing bowls, preheat that oven, and let’s create something unforgettable together.
🌟 Why This Recipe Works
- Flavor Depth: By using both granulated and powdered sugar, you get a balanced sweetness that’s not cloying, while the vanilla extract adds a warm, aromatic backbone that ties every bite together.
- Texture Harmony: The combination of all‑purpose flour and a modest amount of baking powder creates a sponge that’s light yet sturdy enough to hold the creamy filling without crumbling.
- Ease of Execution: Each component can be prepared ahead of time, allowing you to assemble the petit fours just before serving, which makes this recipe perfect for busy hosts.
- Time Efficiency: The total hands‑on time is under 20 minutes, and the baking plus cooling periods fit neatly into a typical afternoon schedule.
- Versatility: The base cake is neutral enough to pair with fruit purées, chocolate ganache, or even a hint of citrus, giving you endless creative possibilities.
- Ingredient Quality: Using unsalted butter and whole milk ensures a rich mouthfeel, while the heavy cream in the frosting adds a luxurious silkiness that store‑bought mixes can’t match.
- Crowd‑Pleasing Factor: The petite size makes them perfect for tasting menus, cocktail parties, or as a sweet finish to a formal dinner, guaranteeing that every guest feels special.
- Nutrition Balance: While indulgent, the recipe still provides protein from the eggs and butter, and the portion size keeps calories in check without sacrificing satisfaction.
🥗 Ingredients Breakdown
The Foundation: Flour, Sugar, and Leavening
All‑purpose flour is the backbone of any cake, providing the structure that holds the delicate crumb together. Choose a high‑quality, unbleached flour for the best texture; it will give you a tender bite without a gritty feel. Granulated sugar not only sweetens the batter but also helps create a fine, even crumb by aerating the mixture when creamed with butter. If you ever find yourself short on fresh butter, a high‑fat margarine can work in a pinch, but the flavor won’t be as rich. Baking powder is the silent hero that makes the sponge rise just enough to stay fluffy without becoming too airy, which is crucial for cutting clean heart shapes later on.
Aromatics & Moisture: Eggs, Milk, and Vanilla
Fresh eggs act as both a binder and a leavening aid, trapping air when you whisk them with sugar, which translates into that light, airy texture we all love. Whole milk contributes creaminess and helps dissolve the sugar, ensuring a smooth batter; feel free to swap in almond or oat milk for a dairy‑free version, but keep the fat content similar to avoid a dry cake. Pure vanilla extract is the aromatic glue that ties every flavor together, adding depth without overpowering the subtle sweetness. A dash of vanilla can also enhance the scent of the glaze, making the final presentation even more inviting.
The Secret Weapons: Butter (for Cake & Frosting) and Cream
Unsalted butter is used twice in this recipe—once in the batter for richness and again in the frosting for a silky finish. The butter’s water content creates steam during baking, which helps lift the cake while keeping it moist. Heavy cream in the frosting not only thickens the mixture but also adds a luxurious mouthfeel that makes each bite melt like a dream. If you’re looking for a lighter version, you can substitute half‑and‑half, but expect a slightly less glossy finish.
Finishing Touches: Powdered Sugar and the Glaze
Powdered sugar is essential for a smooth, lump‑free frosting; its fine texture ensures that the glaze spreads evenly over each petit four, giving them that professional sheen. The glaze can be tinted with a few drops of natural food coloring to match the occasion—think soft pink for Valentine’s Day or pastel lavender for spring brunches. A final brush of melted butter on the glaze just before it sets adds a subtle sheen and helps seal in moisture, keeping the hearts tender for hours.
With your ingredients prepped and ready, let's get cooking. Here’s where the fun really begins…
🍳 Step-by-Step Instructions
🔐 Expert Tips for Perfect Results
The Taste Test Trick
Before you start assembling, slice a tiny piece of the plain sponge and taste it. If you notice any bland spots, a pinch more vanilla or a dash of almond extract can brighten the flavor without overwhelming the delicate balance. I once served a batch that was a touch flat, and a quick taste test saved the day by prompting a tiny adjustment.
Why Resting Time Matters More Than You Think
Allow the baked cakes to rest for at least 30 minutes before cutting. This short pause lets the crumb settle, preventing crumbs from spilling into the frosting. In my early attempts, I cut the cake while it was still warm and ended up with a mess of crumbs that ruined the smooth look of the hearts.
The Seasoning Secret Pros Won’t Tell You
A pinch of sea salt in the frosting amplifies the sweetness and adds depth, much like a chef would do with a chocolate ganache. It’s a subtle tweak that most home cooks overlook, yet it makes the buttercream taste richer and more complex.
Glaze Consistency Control
If the glaze is too thick, thin it with a few drops of milk; if it’s too runny, add a spoonful of powdered sugar. The right consistency should coat the back of a spoon and flow off in a slow ribbon. I learned this the hard way when a too‑thin glaze turned my hearts into a sticky puddle.
The Chill Before the Fill
Chill the buttercream for 10 minutes before piping it onto the cakes. This firms it up just enough to hold its shape, preventing it from spreading too much when you sandwich the hearts. A friend once tried piping warm buttercream and ended up with a messy sandwich that fell apart.
Final Shine with Butter Brush
A quick brush of melted butter on the set glaze gives an extra glossy finish that looks restaurant‑ready. It also adds a subtle buttery note that enhances the overall flavor profile. Trust me on this one: the visual impact is immediate, and the taste follows suit.
🌈 Delicious Variations to Try
One of my favorite things about this recipe is how versatile it is. Here are some twists I've tried and loved:
Berry‑Burst Hearts
Swap out half the milk for pureed fresh strawberries and add a teaspoon of lemon zest to the batter. The resulting cake has a subtle pink hue and a bright, fruity note that pairs beautifully with a white chocolate glaze.
Chocolate‑Covered Dreams
Replace the vanilla extract with a tablespoon of cocoa powder in the batter, and dip the finished hearts in a dark chocolate ganache instead of the traditional glaze. The contrast between the soft cake and the bittersweet chocolate is simply divine.
Citrus‑Infused Delight
Add orange zest to the batter and a splash of orange liqueur to the frosting. Finish with a thin orange glaze and garnish with candied orange peel for a festive, tangy twist that works great for holiday gatherings.
Nutty Caramel Hearts
Stir finely chopped toasted almonds into the batter and drizzle a caramel sauce over the glazed hearts just before serving. The nutty crunch adds texture, while the caramel adds a buttery sweetness that melts in the mouth.
Matcha Green Elegance
Incorporate a tablespoon of high‑quality matcha powder into the dry ingredients and tint the glaze with a few drops of green food coloring. The earthy flavor of matcha pairs wonderfully with a light honey‑sweetened frosting, creating a sophisticated, pastel‑green treat.
Spiced Autumn Hearts
Add a pinch of ground cinnamon, nutmeg, and a dash of pumpkin puree to the batter for a cozy, autumnal flavor. Top with a maple‑infused glaze and a sprinkle of toasted pecans for a seasonal twist that feels like a warm hug.
📦 Storage & Reheating Tips
Refrigerator Storage
Place the petit fours in an airtight container lined with parchment paper. They will stay fresh for up to three days, retaining their moisture and glaze shine. For extra protection, place a second container on top to prevent any accidental crushing.
Freezing Instructions
If you need to make them ahead, freeze the assembled hearts (without glaze) on a tray for an hour, then transfer to a freezer‑safe bag. When you’re ready to serve, let them thaw in the refrigerator for a few hours, then glaze and finish as described. This method preserves the texture and prevents freezer burn.
Reheating Methods
To enjoy them warm, pop the hearts in a preheated oven at 300°F (150°C) for 5‑7 minutes. Add a splash of milk to the tray before heating to keep the cake from drying out. The result is a gently warmed treat that releases the aromatic butter and vanilla, making it perfect for a cozy afternoon tea.
❓ Frequently Asked Questions
Can I use gluten‑free flour instead of all‑purpose flour?
How can I make the frosting dairy‑free?
What’s the best way to cut perfect heart shapes?
Can I add food coloring to the glaze?
How long can the assembled hearts sit before glazing?
Is it okay to use a different type of milk for the batter?
What’s the best way to store the glaze if I have leftovers?
Can I make these petit fours ahead of a big event?
For the glaze, whisk together powdered sugar with a splash of milk and a few drops of food‑grade coloring until you achieve a smooth, pourable consistency. The glaze should flow like a thin river, coating each heart with a glossy sheen. Dip each assembled petit four into the glaze, allowing any excess to drip back into the bowl; this creates a beautiful, even coating. Place the glazed hearts on a wire rack set over a parchment sheet to let the glaze set—this usually takes 10‑15 minutes.
Once the glaze has hardened, finish each heart with a tiny brush of melted butter for extra shine, then dust lightly with edible rose petals or a pinch of powdered sugar for a festive finish. Store the finished petit fours in an airtight container at room temperature; they stay fresh for up to three days, though they taste best the day they’re made. The result? A tray of heart‑shaped beauties that sparkle, smell divine, and melt delightfully on the tongue.
Similar Recipes
 Desserts
Silky Matcha White Chocolate Fudge: A Luxurious Treat for All Occasions
Delicious Silky Matcha White Chocolate Fudge: A Luxurious Treat for All Occasions
 Desserts
Crispy Cinnamon Delight Apple Chips: A Delightful Snack
Delicious Crispy Cinnamon Delight Apple Chips: A Delightful Snack
 Desserts
Spiced Chai Snickerdoodles Recipe: A Cozy Twist on a Classic Favorite
Delicious Spiced Chai Snickerdoodles Recipe: A Cozy Twist on a Classic Favorite
 Desserts
Best Cotton Candy Cake Recipe for Magical Celebrations
Learn how to make delicious Best Cotton Candy Cake Recipe for Magical Celebrations. Easy recipe with…
 Desserts
Gingerbread Layer Cake with Spiced Cream: Holiday Delight
Learn how to make delicious Gingerbread Layer Cake with Spiced Cream: Holiday Delight. Easy recipe with…
 Desserts
Zesty Lemon Impossible Pies: A Delightful Dessert Experience
Delicious Zesty Lemon Impossible Pies: A Delightful Dessert Experience
 Desserts
Zesty Lemon Delight Cake Recipe
Delicious Zesty Lemon Delight Cake Recipe
 Desserts
Pumpkin Banana Bliss Mini Muffins: Recipe Completion and Serving Guide
Delicious Pumpkin Banana Bliss Mini Muffins: Recipe Completion and Serving Guide

Eva
I cook these recipes at home before they ever land here — simple ingredients, clear steps.