Decadent Chocolate Dipped Strawberry Brownie Cups
 Save
Save
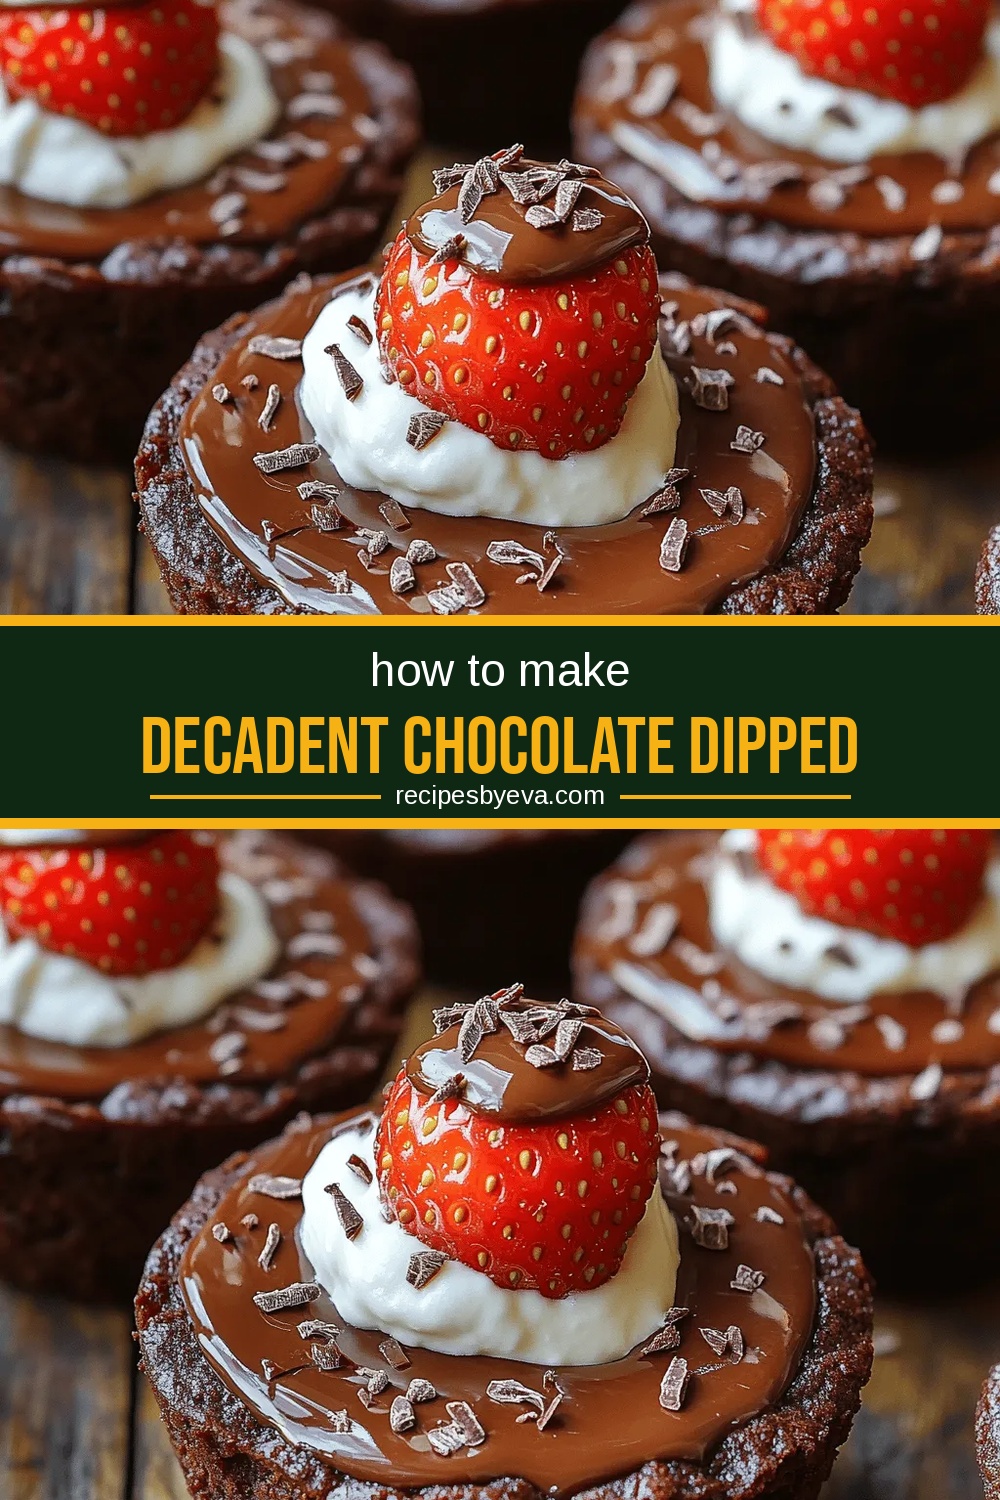
Imagine a bite‑size treat that marries the fudgy richness of a brownie with the fresh sparkle of ripe strawberries, all cloaked in a glossy ribbon of melted chocolate. That’s exactly what the Decadent Chocolate Dipped Strawberry Brownie Cups deliver—an indulgent dessert that feels luxurious yet is surprisingly simple to assemble.
What makes this recipe stand out is the layered texture: a soft, slightly crisp‑topped brownie base, a juicy strawberry heart, and a silky chocolate coating that hardens just enough to give a satisfying snap.
This dessert is perfect for anyone with a sweet tooth—kids, teens, or adults looking for a party‑worthy bite. Serve them at birthdays, holiday gatherings, or as an elegant finish to a dinner party.
The process involves baking a mini‑brownie layer, topping each cup with a halved strawberry, then dipping the whole cup in melted chocolate and letting it set. With only a handful of steps, you’ll have a show‑stopping treat ready in under an hour.
Why You'll Love This Recipe
All‑In‑One Flavor Explosion: Each bite delivers brownie, strawberry, and chocolate in perfect harmony, satisfying every craving in a single mouthful.
Miniature Elegance: The cup size makes them easy to handle, ideal for cocktail parties or elegant dessert tables without the mess of a full‑size cake.
Quick & Easy Prep: With just a few pantry staples and fresh strawberries, you can whip up a gourmet‑looking dessert in under an hour.
Customizable Touches: Swap chocolate types, add a sprinkle of sea salt, or drizzle caramel for endless variations that keep the recipe fresh.
Tips & Tricks
Perfecting the Recipe
Don’t over‑mix the batter. Stir just until flour disappears; a few lumps are fine and keep the brownies tender.
Use room‑temperature strawberries. Cold berries can crack the warm brownie; let them sit out for 15 minutes before inserting.
Flavor Enhancements
Add a teaspoon of espresso powder to the brownie batter for a subtle coffee note that deepens chocolate flavor. Finish each cup with a drizzle of white chocolate or a sprinkle of toasted almond slivers for texture contrast.
Common Mistakes to Avoid
Avoid baking the brownies too long; over‑baked bases become crumbly and can’t hold the strawberry. Also, don’t dip the cups while the chocolate is too hot, as it can melt the strawberry flesh and create a soggy spot.
Pro Tips
Use a silicone muffin pan. It releases the cups cleanly and eliminates the need for paper liners, making cleanup easier.
Chill the chocolate before dipping. Cool the melted chocolate to about 85°F (29°C) for a thicker coat that sets faster.
Season the strawberries. Lightly toss the halved berries with a pinch of sugar and a splash of lemon juice before inserting; this brightens their flavor.
Store the chocolate‑dipped cups upright. Place them on a wire rack while the coating sets to prevent smudging.
Variations
Ingredient Swaps
Replace dark chocolate with white chocolate for a sweeter, milder coating, or try milk chocolate for a creamier texture. Swap fresh strawberries for raspberries or blueberries if you prefer a tart bite. For a nutty twist, fold finely chopped hazelnuts into the brownie batter.
Dietary Adjustments
Make the brownies gluten‑free by using a 1‑to‑1 gluten‑free flour blend. For a vegan version, substitute butter with coconut oil, use flax‑egg replacer (1 tbsp ground flaxseed + 3 tbsp water per egg), and choose dairy‑free chocolate. Keto lovers can replace sugar with erythritol and use almond flour in place of all‑purpose flour.
Serving Suggestions
Serve the cups on a decorative platter with a side of lightly sweetened whipped cream or a dollop of vanilla Greek yogurt. Pair them with a glass of chilled rosé or a rich espresso for an elegant dessert experience. For a kid‑friendly twist, drizzle caramel sauce and sprinkle colorful sprinkles.
Storage Info
Leftover Storage
Allow the cups to cool completely, then place them in an airtight container. Store in the refrigerator for up to 3 days; the chocolate coating will stay firm, and the brownies remain moist. For longer keeping, freeze individual cups wrapped tightly in plastic wrap and a layer of foil; they’ll retain flavor for up to 2 months.
Reheating Instructions
To enjoy warm brownies again, preheat the oven to 300°F (150°C), place the cups on a parchment sheet, and heat for 8‑10 minutes. The chocolate coating will soften slightly without melting away. If you’re in a hurry, microwave a single cup on medium power for 20‑30 seconds, adding a splash of milk to the brownie side for extra softness.
Frequently Asked Questions
Can I make these cups ahead of time?
What if I don’t have a silicone muffin pan?
How do I keep the chocolate coating from cracking?
Can I use frozen strawberries?
This Decadent Chocolate Dipped Strawberry Brownie Cup blends rich cocoa, juicy fruit, and a glossy chocolate shell into a bite‑size masterpiece that’s as beautiful as it is tasty. By following the detailed steps, using quality ingredients, and applying a few pro tips, you’ll achieve consistent, restaurant‑level results every time. Feel free to experiment with swaps or add a dash of sea salt for extra depth. Serve them proudly and enjoy the delighted smiles around the table!
Decadent Chocolate Dipped Strawberry Brownie Cups
Delicious Decadent Chocolate Dipped Strawberry Brownie Cups
Ingredients
Brownie Base
- 1/2 cup unsalted butter, melted
- 1 cup granulated sugar
- 2 large eggs, lightly beaten
- 1 tsp pure vanilla extract
- 1/3 cup unsweetened cocoa powder
- 1/2 cup all‑purpose flour
- 1/4 tsp baking powder
- Pinch of salt
Fruit & Chocolate
- 12 fresh strawberries, hulled and halved
- 8 oz dark chocolate (70% cacao), chopped
- 1 tbsp coconut oil (optional, for shine)
- Coarse sea salt, for sprinkling
Instructions
Baking & Adding Strawberries
- Bake the base. Place the tin in the oven and bake for 12‑15 minutes, or until a toothpick inserted near the edge comes out with a few moist crumbs. The centers should still be soft—they’ll continue cooking when you add the strawberries.
- Cool slightly. Remove the tin and let the brownies rest for 5 minutes. This makes them sturdy enough to hold a strawberry without breaking.
- Insert strawberries. Gently press a halved strawberry, cut side down, into the center of each brownie cup. The warm brownie will slightly melt the strawberry’s surface, creating a natural glaze.
- Final bake. Return the tin to the oven for an additional 5‑7 minutes. This step sets the strawberry in place and finishes cooking the brownie interior.
Similar Recipes
 Desserts
Blueberry Dream Crumble Bars: A Delightful Dessert Experience
Delicious Blueberry Dream Crumble Bars: A Delightful Dessert Experience
 Desserts
Autumn Bliss Pumpkin Spice Mini Bundt Cakes
Delicious Autumn Bliss Pumpkin Spice Mini Bundt Cakes
 Desserts
Sweet Apple Nachos Recipe
Delicious Sweet Apple Nachos Recipe
 Desserts
Blueberry Bliss Muffins: A Delightful Treat for Any Time of Day
Delicious Blueberry Bliss Muffins: A Delightful Treat for Any Time of Day
 Desserts
Depression Era Water Pie
Learn how to make delicious Depression Era Water Pie. Easy recipe with step-by-step instructions.
 Desserts
Irresistible Vanilla Bean Pistachio Cake Recipe Delight
Learn how to make delicious Irresistible Vanilla Bean Pistachio Cake Recipe Delight. Easy recipe with step-by-step…
 Desserts
Zesty Lemon Impossible Pies: A Delightful Dessert Experience
Delicious Zesty Lemon Impossible Pies: A Delightful Dessert Experience
 Desserts
Tropical Bliss Pineapple Cake: A Slice of Paradise
Delicious Tropical Bliss Pineapple Cake: A Slice of Paradise

Eva
I cook these recipes at home before they ever land here — simple ingredients, clear steps.