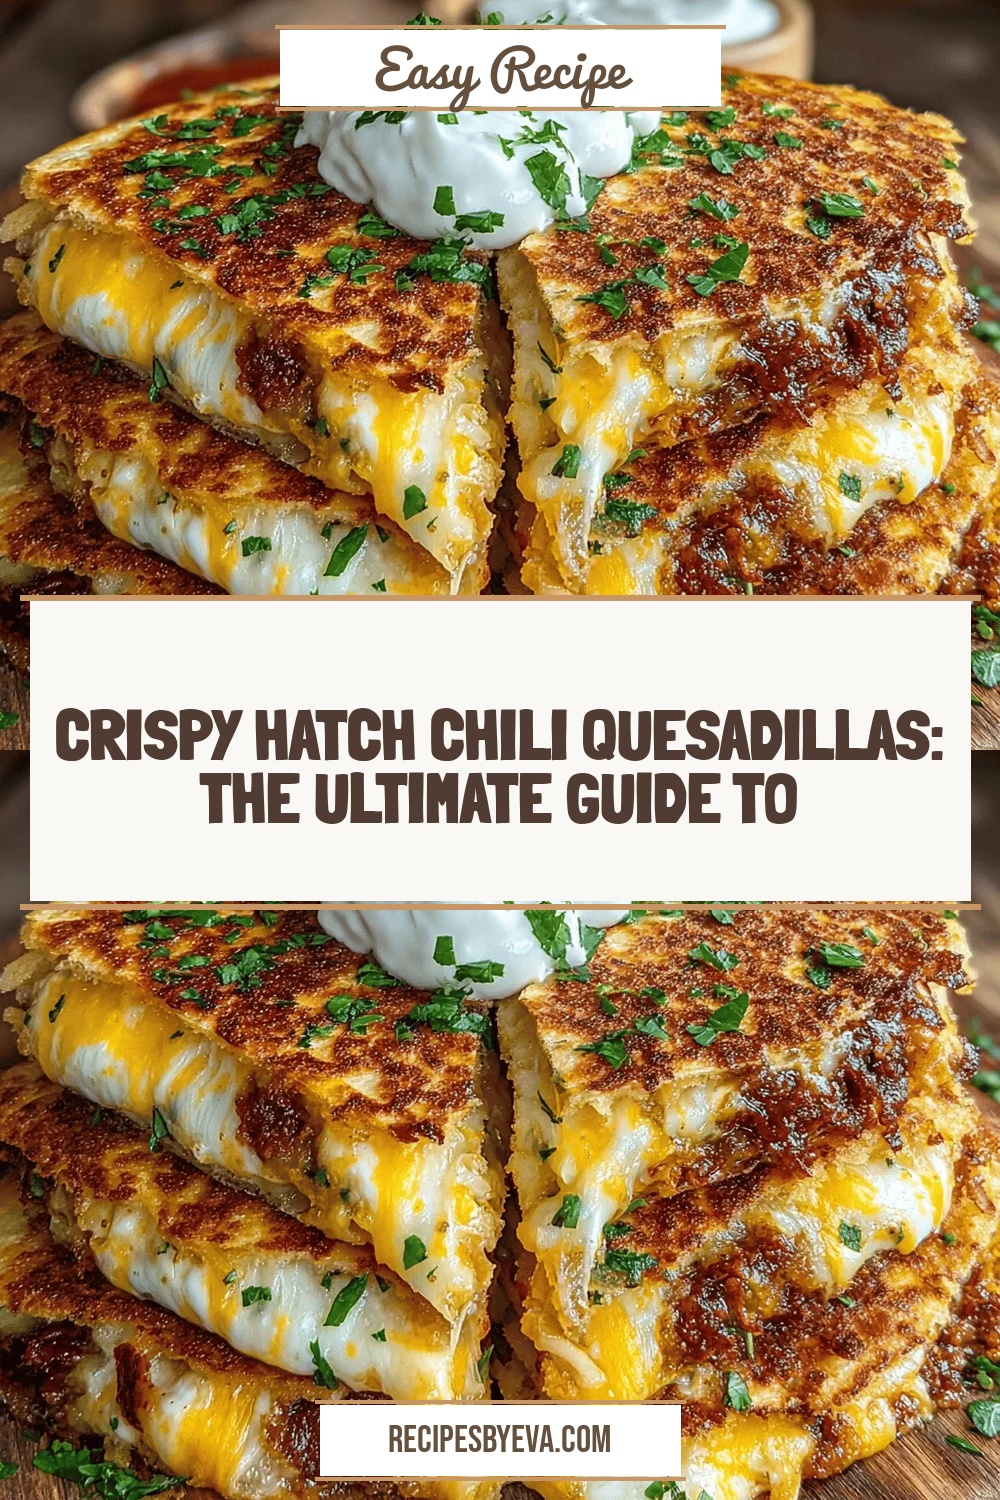
Crispy Hatch Chili Quesadillas: The Ultimate Guide to Perfection
 Save
Save
Imagine the satisfying crunch of a golden tortilla paired with the smoky heat of Hatch chilies, all wrapped around a melty blend of cheeses and tender chicken. That’s exactly what Crispy Hatch Chili Quesadillas deliver—an irresistible snack that feels both indulgent and comforting.
What sets this recipe apart is the balance between spice and creaminess. Fresh Hatch chilies provide a bright, lingering heat, while the cheese melt creates a silky backdrop that keeps every bite smooth and satisfying.
This dish is perfect for game‑day gatherings, casual brunches, or a quick weeknight treat. Kids love the cheesy pull, and spice lovers will appreciate the authentic New Mexican kick.
The process is straightforward: grill the chicken with chilies, assemble the quesadilla with a seasoned cheese blend, then pan‑fry until the edges are blistered and the interior is ooey‑gooey. Follow the guide below for foolproof results every time.
Why You'll Love This Recipe
Bold, Authentic Flavor: Hatch chilies bring a genuine New Mexican heat that’s bright, fruity, and perfectly balanced with the mellow cheese.
Quick & Easy Assembly: From marinating to pan‑frying, the whole recipe can be completed in under 45 minutes, ideal for busy evenings.
Crisp Meets Creamy: The tortilla achieves a satisfying crunch while the interior stays luxuriously gooey, creating a delightful texture contrast.
Customizable for All Diets: Swap proteins, cheeses, or even make a vegan version—this base is a versatile canvas for creativity.
Tips & Tricks
Perfecting the Recipe
Dry the Chicken. Pat the chicken strips dry before marinating; excess moisture hinders browning and can make the tortilla soggy.
Pre‑heat the Skillet. A properly heated pan creates an instant sear, locking in juices and giving the tortilla its signature crunch.
Use Fresh Hatch Chilies. Fresh chilies retain their bright flavor better than dried; if unavailable, substitute with fresh jalapeño plus a pinch of smoked paprika.
Don’t Overload. Keep the filling to a thin, even layer; too much stuffing can cause the tortilla to tear during flipping.
Flavor Enhancements
Add a splash of chipotle adobo sauce to the marinade for smoky depth, or stir in a tablespoon of creamy cotija cheese after cooking for extra umami. A quick drizzle of lime-infused olive oil right before serving brightens the entire plate.
Common Mistakes to Avoid
Avoid cooking on high heat for the entire time; the tortilla will burn before the cheese melts. Also, never use wet tortillas—dry them with a paper towel to prevent steam from making the crust soggy. Finally, resist the urge to cut the quesadilla while it’s still hot; waiting a couple of minutes keeps the cheese intact.
Pro Tips
Press with a Weight. While the quesadilla cooks, place a small cast‑iron press or another skillet on top to ensure even contact and a uniform crisp.
Temperature Check. Use a meat thermometer; chicken should reach 165 °F (74 °C) for safety without overcooking.
Serve Immediately. Quesadillas lose their crunch as they sit; plate them right away for the best texture.
Make Ahead of Time. Prepare the chicken‑chili mixture a day ahead and refrigerate; assemble and fry fresh when you’re ready to eat.
Variations
Ingredient Swaps
Swap chicken for shredded pork shoulder, shrimp, or firm tofu for a vegetarian twist. Replace Monterey Jack with pepper jack for extra heat, or use a Mexican blend for a richer flavor profile. If corn tortillas aren’t your favorite, try flour tortillas—just be mindful of the slightly softer texture.
Dietary Adjustments
For gluten‑free diners, ensure the tortillas are certified gluten‑free. Use dairy‑free cheese alternatives (such as almond‑based shreds) to make the dish vegan, and substitute the chicken with marinated jackfruit or tempeh. A low‑carb version can be achieved by using low‑carb tortillas or lettuce wraps.
Serving Suggestions
Pair these quesadillas with a side of cilantro‑lime rice, black bean salad, or a simple pico de gallo. A dollop of cool sour cream or Greek yogurt balances the heat, while a fresh mango salsa adds a sweet contrast. For a festive spread, include a bowl of guacamole and a selection of pickled jalapeños.
Storage Info
Leftover Storage
Allow any leftover quesadillas to cool completely, then wrap each tightly in parchment paper and place them in an airtight container. Store in the refrigerator for up to 3 days. For longer preservation, freeze the wrapped quesadillas in a freezer‑grade bag for up to 2 months; label with the date for easy reference.
Reheating Instructions
Reheat frozen or refrigerated quesadillas in a preheated 375 °F (190 °C) oven for 10‑12 minutes, flipping halfway through to restore crispness. For a faster method, use a hot skillet over medium heat, pressing gently for 2‑3 minutes per side. Microwaving is possible but will soften the tortilla; follow with a quick pan‑sear to regain crunch.
Frequently Asked Questions
Can I make these quesadillas ahead of time?
What if I can’t find Hatch chilies?
How do I keep the tortillas from getting soggy?
These Crispy Hatch Chili Quesadillas deliver a perfect marriage of heat, cheese, and crunch, all while staying quick enough for any busy schedule. By following the step‑by‑step guide, mastering the tips, and experimenting with the suggested variations, you’ll create a snack that’s both crowd‑pleasing and endlessly adaptable. Feel free to tweak the chilies, cheeses, or proteins to suit your palate—cooking is all about personal expression. Dive in, enjoy the bold flavors, and share the deliciousness with friends and family!
Crispy Hatch Chili Quesadillas: The Ultimate Guide to Perfection
Delicious Crispy Hatch Chili Quesadillas: The Ultimate Guide to Perfection
Ingredients
Main Ingredients
- 2 boneless, skinless chicken breasts (about 1 lb)
- 4 fresh Hatch chilies, stemmed and thinly sliced
- 1 cup shredded Monterey Jack cheese
- ½ cup shredded sharp cheddar cheese
- 8 small corn tortillas (6‑inch)
Marinade & Sauce
- 2 tbsp olive oil
- 1 tbsp lime juice (freshly squeezed)
- 1 tsp ground cumin
- ½ tsp smoked paprika
- ½ tsp garlic powder
- Salt and freshly cracked black pepper to taste
Seasonings & Garnish
- ¼ cup fresh cilantro, chopped
- 1 avocado, sliced (optional)
- Lime wedges for serving
Instructions
Cooking the Chicken & Chilies
- Heat the Skillet. Place a large non‑stick skillet over medium‑high heat for about 2 minutes. Add a drizzle of oil; when it shimmers, you’re ready for the protein.
- Sear the Chicken. Add the marinated chicken strips in a single layer. Cook 3‑4 minutes without moving them, allowing a golden crust to form. Flip and cook another 2‑3 minutes until opaque.
- Introduce the Chilies. Toss the sliced Hatch chilies into the pan, stirring for 1‑2 minutes until they soften and release their smoky aroma. The residual heat will lightly char the edges, enhancing flavor.
- Finish and Rest. Remove the mixture from heat, drizzle a little extra lime juice, and set aside. This brief rest lets the juices redistribute, keeping the chicken moist for the quesadilla.
Pan‑Frying to Perfection
- Oil the Pan Lightly. Wipe the skillet clean, add a thin coat of oil, and heat over medium heat until it glistens.
- Cook One Side. Place a assembled quesadilla in the skillet. Cook 3‑4 minutes, pressing lightly with a spatula, until the bottom tortilla is deep golden and the cheese starts to melt.
- Flip Carefully. Using a wide spatula, turn the quesadilla. Cook another 3‑4 minutes until the opposite side reaches the same crisp darkness and the interior is fully melted.
- Rest & Slice. Transfer the quesadilla to a cutting board, let it rest for 2 minutes (this prevents the cheese from spilling out), then cut into wedges with a sharp knife or pizza cutter.
Similar Recipes
 Appetizers
Baked Cheesy Garlic Breadsticks: A Comforting Delight
Delicious Baked Cheesy Garlic Breadsticks: A Comforting Delight
 Appetizers
Irresistible Asian Chicken Lettuce Wraps in 30 Minutes
Learn how to make delicious Irresistible Asian Chicken Lettuce Wraps in 30 Minutes. Easy recipe with…
 Appetizers
Pumpkin BBQ Jalapeño Meatballs
Learn how to make delicious Pumpkin BBQ Jalapeño Meatballs. Easy recipe with step-by-step instructions.
 Appetizers
Cauliflower Crunch Tots: A Healthier Twist on Comfort Food
Delicious Cauliflower Crunch Tots: A Healthier Twist on Comfort Food
 Appetizers
cozy roasted beet and orange salad with walnuts for january lunch
Learn how to make delicious cozy roasted beet and orange salad with walnuts for january lunch.…
 Appetizers
Salmon Lettuce Wraps with Watermelon Glaze
Delicious Salmon Lettuce Wraps with Watermelon Glaze
 Appetizers
Air Fryer Crispy Coconut Shrimp – A Tropical Delight
Delicious Air Fryer Crispy Coconut Shrimp – A Tropical Delight
 Appetizers
Crispy Zesty Air-Fried Pickle Chips
Delicious Crispy Zesty Air-Fried Pickle Chips

Eva
I cook these recipes at home before they ever land here — simple ingredients, clear steps.