Introduction
Tater tots, those irresistible little bites of crispy potato goodness, have earned their place as a beloved snack and side dish in homes and restaurants alike. Originating in the United States, these delightful morsels are often associated with childhood memories of school lunches and backyard barbecues. Whether enjoyed as a snack, a side dish, or a fun addition to any meal, tater tots bring a nostalgic charm that few foods can match.
However, while store-bought tater tots offer convenience, nothing quite compares to the satisfaction of making them from scratch. Homemade tater tots provide a unique opportunity to elevate this classic dish, allowing for an unparalleled freshness that store-bought versions simply cannot replicate. With homemade tater tots, you have full control over the ingredients, enabling you to customize flavors and seasonings to suit your palate. The result? A crispy exterior that gives way to a fluffy, tender interior, all seasoned to perfection.
In this article, we will take you through the steps necessary to create your own crispy golden delight at home. From understanding the essential ingredients to mastering the preparation process, this guide will equip you with everything you need to make the perfect homemade tater tots.
Understanding the Ingredients
The foundation of any great recipe lies in its ingredients, and tater tots are no exception. To achieve the ideal texture and flavor, it is crucial to select the right components for your homemade tater tots. Below, we’ll explore the key ingredients that make up this delightful dish.
Potatoes: The Star of the Show
At the core of any tater tot recipe are the potatoes, and russet potatoes are the go-to choice for this dish. Known for their high starch content and low moisture, russets yield the ideal texture for tater tots. Their starchy composition allows for a fluffy interior after frying, while their skins lend a crispy, golden exterior. When selecting russet potatoes, look for firm, blemish-free options to ensure the best flavor and texture.
Spices and Seasonings
Once you have the right potatoes, it’s time to enhance their flavor with a carefully chosen blend of spices and seasonings. Common additions include salt, pepper, garlic powder, onion powder, and paprika, which can elevate the taste of your tater tots to new heights. These seasonings not only provide depth of flavor but also create an appealing aroma that makes your kitchen feel inviting. Feel free to customize the seasoning mix based on your preferences—add a hint of cayenne for heat or fresh herbs for a twist.
Binding Agents: Egg and Flour
To maintain the shape and texture of your tater tots during the frying process, binding agents are essential. In this recipe, egg and flour serve as the critical binders. The egg adds moisture and helps the mixture hold together, while the flour provides structural integrity. Together, they ensure that your tater tots don’t fall apart when they hit the hot oil.
For those with dietary restrictions, alternatives such as ground flaxseed mixed with water can be used as a vegan binder, while gluten-free flour can replace regular flour to accommodate gluten sensitivities.
Frying Oil Choices
The choice of frying oil can significantly impact the final product of your tater tots. Oils with a high smoke point, such as vegetable oil, canola oil, or peanut oil, are ideal for frying, as they can withstand high temperatures without burning. These oils also lend a neutral flavor that allows the taste of the tater tots to shine. For a more flavorful option, you might consider using duck fat or lard, which can add an extra layer of richness to your homemade tater tots.
The Preparation Process
Creating the perfect tater tots starts with proper preparation. This section will guide you through the essential steps involved in getting your potatoes ready for transformation into crispy golden bites.
Preparing the Potatoes
The first step to preparing your potatoes is boiling them. Boiling is crucial as it helps to cook the potatoes evenly and achieve the desired consistency. Here’s how to do it right:
1. Peel and Cut: Begin by peeling your russet potatoes and cutting them into even-sized chunks. This ensures that they cook uniformly when boiled.
2. Boil: Place the potato chunks into a large pot of cold, salted water. Bringing the water to a boil gradually allows the potatoes to cook evenly. Once boiling, reduce the heat to a gentle simmer and let the potatoes cook for about 15-20 minutes, or until fork-tender. This means they should be soft enough to easily pierce with a fork but still hold their shape—overcooking can result in mushy potatoes that won’t grate well.
3. Drain and Cool: After boiling, drain the potatoes in a colander and let them cool for a few minutes. It’s essential to allow the steam to escape; this helps prevent excess moisture from making your tater tots soggy.
Grating the Potatoes
Once your potatoes have cooled, it’s time to grate them. Grating creates the texture that makes tater tots so delightful, and there are a couple of methods you can choose from.
1. Box Grater vs. Food Processor: While a box grater is the traditional method, a food processor can save time and effort. If you opt for a box grater, use the large holes to create the perfect shreds. If you choose a food processor, use the grating attachment for quick and efficient results. Either method will yield great results—just be cautious not to over-process the potatoes in the food processor, as this can lead to a gummy texture.
2. Handling the Potatoes: As you grate, handle the potatoes gently to avoid bruising them. If you notice any excess moisture, consider placing the grated potatoes on a clean kitchen towel and gently pressing out some of the liquid. This step is particularly important, as excess moisture can prevent your tater tots from achieving that desired crispy exterior during frying.
Seasoning and Binding the Mixture
Now that your potatoes are grated and ready, it’s time to season and bind the mixture for your tater tots.
1. Seasoning the Grated Potatoes: In a large mixing bowl, combine the grated potatoes with your chosen seasonings. Start with a generous pinch of salt and pepper, then add your preferred spices. Mix thoroughly, ensuring that the seasonings are evenly distributed throughout the grated potatoes. This step is crucial for flavor; you want every bite to be deliciously seasoned.
2. Binding the Mixture: Once the potatoes are well-seasoned, it’s time to add the binding agents. Crack one egg into the bowl and sprinkle in the flour. Using your hands or a spatula, gently mix everything together until the egg and flour are fully incorporated. This mixture should hold together but not be overly wet; if it feels too sticky, add a little more flour to achieve the right consistency.
3. Gluten-Free or Vegan Alternatives: If you’re following a gluten-free diet, substitute the regular flour with a gluten-free blend. For a vegan option, combine ground flaxseed with water to create an egg substitute. Use three tablespoons of water mixed with one tablespoon of ground flaxseed for each egg. This will help bind the ingredients together without compromising flavor or texture.
With your mixture seasoned and bound, you’re well on your way to creating crispy, golden homemade tater tots that will leave everyone craving more. In the next part of this article, we will cover the cooking methods, tips for achieving the perfect fry, and how to store any leftovers. Stay tuned for more delicious insights into mastering this classic comfort food!

Shaping the Tater Tots
Creating the perfect tater tot begins with shaping them correctly. This step is crucial for achieving that ideal texture and ensuring they cook evenly. Here are some techniques and tips to help you shape your tater tots effectively.
Techniques for Shaping the Tater Tots
1. Use a Cookie Scoop: A cookie scoop can help you portion the potato mixture evenly, ensuring each tater tot is the same size. This uniformity is key for even cooking and helps prevent some from being overcooked while others remain undercooked.
2. Roll by Hand: Once you’ve scooped the potato mixture, roll it between your palms to create a cylindrical shape. This method not only helps form a classic tater tot look, but it also compresses the mixture slightly, which aids in achieving a crispy exterior.
3. Press and Shape: For a more traditional look, you can flatten the mixture slightly before rolling it into a log shape. This technique can increase the surface area, giving you more chances for that delightful crunch.
Tips for Achieving Uniform Size and Shape for Even Cooking
– Practice Consistency: Aim for each tater tot to be about 1 inch long and ½ inch wide. Using a measuring spoon or a kitchen scale can help standardize the size.
– Moisten Your Hands: Lightly wetting your hands can prevent the potato mixture from sticking, making it easier to shape the tots without losing bits of the mixture.
– Chill Before Frying: After shaping your tater tots, place them on a parchment-lined tray and refrigerate for at least 30 minutes. Chilling helps the tots hold their shape during frying and enhances crispiness.
Frying Techniques
Once your tater tots are perfectly shaped, it’s time to fry them. Proper frying technique is essential for achieving that coveted golden-brown exterior while keeping the inside fluffy.
Importance of Oil Temperature for Perfect Frying
The oil temperature is critical when frying tater tots. Frying them at the wrong temperature can lead to either soggy or burnt results.
Ideal Frying Temperature
– The ideal frying temperature is between 350°F and 375°F (175°C to 190°C). This heat range allows the tots to develop a crispy outer layer while cooking the insides thoroughly.
How to Test Oil Readiness with a Tater Tot
– To check if the oil is ready for frying, drop a small piece of the potato mixture or a wooden spoon into the oil. If it sizzles and bubbles immediately, the oil is hot enough. Alternatively, you can use a kitchen thermometer for accuracy.
Step-by-Step Guide on Frying
1. Heat the Oil: In a deep skillet or frying pan, pour in enough oil (about 2-3 inches deep) to submerge the tater tots. Heat it over medium-high heat until it reaches the desired temperature.
2. Fry in Batches: Carefully add a few tater tots to the hot oil, being cautious not to overcrowd the pan. Overcrowding can lead to a drop in oil temperature, resulting in greasy tots.
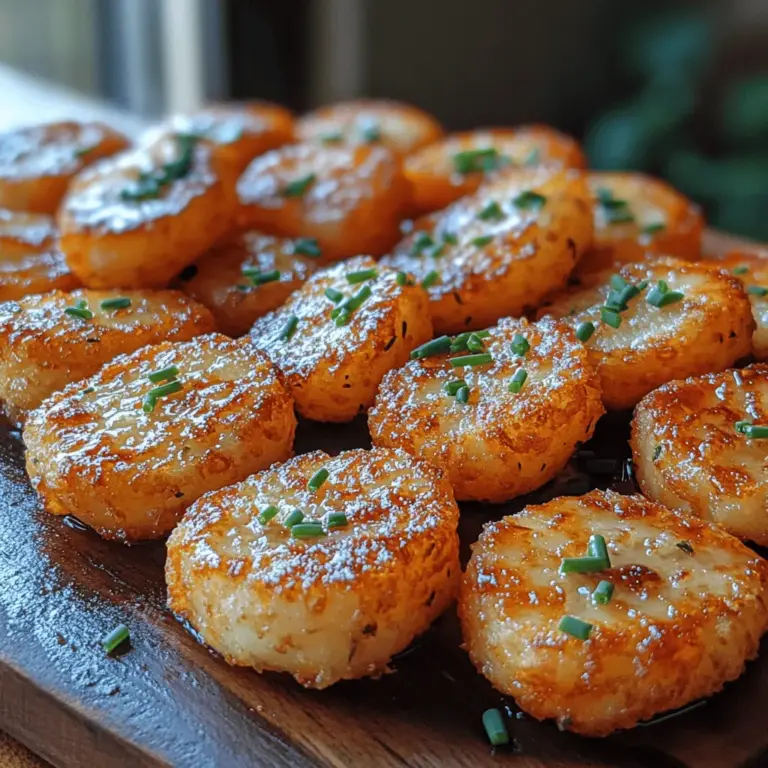
3. Fry Until Golden: Cook the tater tots for about 4-5 minutes, or until they turn a beautiful golden brown. Use a slotted spoon to turn them occasionally for even cooking.
4. Remove and Drain: Once golden, remove the tater tots from the oil and place them on a plate lined with paper towels. This will help absorb excess oil, keeping the tots crispy.
Draining and Serving
Properly draining the oil from your tater tots is just as important as frying them. This ensures a crispy finish and enhances the overall texture.
Best Practices for Draining Excess Oil
– Use Paper Towels: After frying, place the tater tots on paper towels to absorb any excess oil. This step is crucial for achieving that golden crispiness.
Presentation Ideas for Serving Tater Tots
– Garnish for Color: Sprinkle some freshly chopped chives or parsley over the tater tots for a pop of color. Not only does this enhance the visual appeal, but it also adds a touch of freshness.
– Dipping Sauces: Tater tots are incredibly versatile and pair well with a variety of dipping sauces. Consider serving them with:
– Ketchup: A classic choice that never disappoints.
– Ranch Dressing: Creamy and flavorful, ranch adds a nice contrast to the crunch.
– Sriracha Aioli: For a spicy kick, mix sriracha with mayonnaise for a zesty dipping experience.
– Cheese Sauce: Drizzle warm cheese sauce over the tots for an indulgent treat.
Nutritional Information
Understanding the nutritional value of your homemade tater tots can enhance your appreciation for this delicious snack.
Overview of the Nutritional Value of Homemade Tater Tots
– Homemade tater tots are generally healthier than their store-bought counterparts, as you can control the ingredients and avoid preservatives and additives. A standard serving (about 6-8 tots) typically contains:
– Calories: 200-250
– Fat: 10-15g
– Carbohydrates: 30-35g
– Protein: 2-3g
– Fiber: 2g
Comparison of Homemade Versus Store-Bought Options
– Store-bought tater tots often contain more sodium, unhealthy fats, and artificial flavors. By making them at home with fresh ingredients, you can significantly reduce these unwanted elements while enjoying a flavorful treat.
Insight into the Potential Health Benefits of Using Fresh Ingredients
– Using fresh potatoes and seasonings allows you to incorporate more nutrients into your diet. Potatoes are a good source of vitamins C and B6, potassium, and fiber, especially if you leave the skins on.
Conclusion
Making homemade tater tots is a delightful culinary adventure that brings the joys of comfort food right to your kitchen. The satisfaction of creating crispy, golden bites from scratch is unparalleled, making them a perfect snack or side dish for any occasion.
Feel free to experiment with different seasonings, such as garlic powder, paprika, or even grated cheese mixed into the potato mixture for added flavor. The dipping sauces are just as versatile, providing endless options to suit your taste.
Whether served at a party, as a side dish for burgers, or enjoyed as a late-night snack, homemade tater tots are sure to impress. So gather your ingredients, roll up your sleeves, and get ready to enjoy the crispy delight of your very own tater tots!