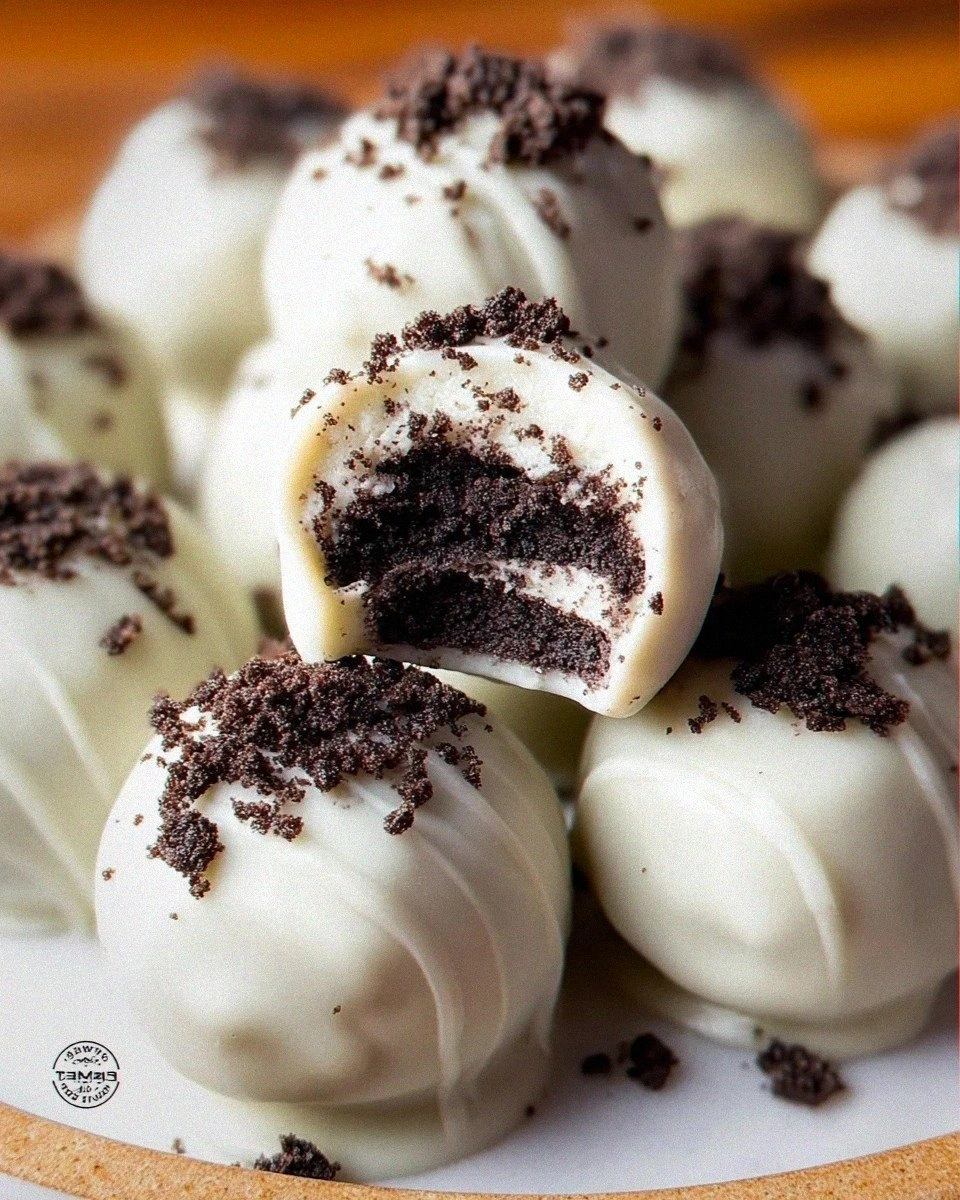
Easy Oreo Truffles (Oreo Balls)
 Save
Save
It was a chilly Saturday night in November, the kind of evening when the house smells like cinnamon and the wind whistles against the windows, and I found myself rummaging through the pantry for something that could turn a simple movie marathon into a celebration. I pulled out a box of Oreo cookies, the familiar black‑and‑white sandwich that has been a childhood staple, and a block of semi‑sweet chocolate that had been waiting patiently in the freezer. As I opened the Oreo package, a cloud of cocoa‑laden perfume rose, and I could already hear the faint crunch of the cookies in my mind, a sound that always promises a sweet surprise. I remembered the first time I tried to make these truffles for a birthday party – the moment the glossy chocolate coating set, the room filled with delighted gasps, and the kids (and adults!) devouring them before I could even count the bites. That memory sparked a fire in me to perfect the recipe once and for all, and now I’m sharing every buttery, creamy, and chocolatey detail with you.
What makes these Oreo truffles so irresistible is the perfect marriage of textures: a crumbly, buttery cookie base that melts in your mouth, a silky cream cheese center that adds a subtle tang, and a glossy chocolate shell that snaps with each bite. Imagine rolling a bite‑size sphere between your palms, feeling the cool, smooth chocolate give way to a soft, velvety interior that releases a burst of familiar Oreo flavor – it’s like a tiny, edible hug. The best part? You don’t need a professional kitchen or a fancy pastry chef’s toolkit; everything can be done with a food processor, a few mixing bowls, and a little patience. Yet, there’s a secret twist in step four that takes these truffles from “good” to “wow‑factor” level, and I’ll reveal it just a little later. Have you ever wondered why the best bakery truffles have that perfect shine? The answer lies in a tiny detail that most home cooks overlook.
I’ve tried countless variations over the years – adding espresso, swapping chocolate for white chocolate, even infusing a hint of orange zest – but the core formula stays the same, and that’s what gives this recipe its reliability. The simplicity of the ingredient list means you can whip up a batch in under an hour, making it an ideal after‑school treat, a quick dessert for unexpected guests, or a festive party favor that looks as impressive as it tastes. And because the recipe is forgiving, you can scale it up for a crowd or shrink it down for an intimate night in without compromising the flavor or texture. Trust me, once you bite into the first truffle, you’ll understand why this recipe has become a family favorite that gets passed down at every holiday gathering.
So, are you ready to dive into the world of melt‑in‑your‑mouth Oreo bliss? Here’s exactly how to make it — and trust me, your family will be asking for seconds, thirds, and maybe even a whole extra batch. Grab your favorite mixing bowl, preheat your imagination, and let’s get started on a journey that will leave your kitchen smelling like a chocolate factory and your heart full of sweet memories.
🌟 Why This Recipe Works
- Flavor Depth: The combination of crushed Oreo cookies and cream cheese creates a layered taste profile where the chocolatey crunch meets a creamy, slightly tangy center, delivering a complex flavor that feels both nostalgic and sophisticated.
- Texture Harmony: Each bite offers a contrast of textures – the crisp crumb of the cookie base, the smooth melt of the cream cheese, and the firm snap of the chocolate coating – which keeps the palate engaged from the first bite to the last.
- Ease of Execution: No special equipment is required beyond a food processor or a zip‑top bag and a microwave; the steps are straightforward, making it accessible for cooks of any skill level.
- Time Efficiency: With only 15 minutes of active prep and 30 minutes of chilling and coating, you can have a show‑stopping dessert ready in under an hour, perfect for last‑minute gatherings.
- Versatility: The base recipe serves as a blank canvas that can be flavored with espresso, caramel, fruit zest, or even a splash of liqueur, allowing you to tailor it to any occasion.
- Ingredient Quality: Using high‑quality Oreo cookies and a good melting chocolate ensures a rich, authentic taste that elevates the truffles beyond the ordinary store‑bought versions.
- Crowd‑Pleaser Factor: The familiar Oreo flavor combined with an elegant presentation makes these truffles a guaranteed hit among kids and adults alike, turning any gathering into a celebration.
- Portion Control: Because they’re bite‑size, you can serve them as a light dessert or a sweet snack without overindulging, which is perfect for health‑conscious guests who still want a treat.
🥗 Ingredients Breakdown
The Foundation: Cookies & Cream Cheese
The base of these truffles starts with classic Oreo cookies – the iconic black‑and‑white sandwich that brings a sweet, chocolatey crunch and a hint of vanilla. When you crush them into fine crumbs, they release a subtle aroma that fills the kitchen with nostalgia. Pairing the crumbs with softened cream cheese adds a velvety richness and a faint tang that balances the sweetness, creating a harmonious flavor profile. If you’re looking for a gluten‑free option, try using gluten‑free chocolate sandwich cookies that mimic the Oreo texture and taste.
The Creamy Core: Cream Cheese
Cream cheese is the secret hero that binds the cookie crumbs together, turning a crumbly mixture into a pliable dough you can roll into perfect spheres. Its mild acidity cuts through the sugary cookie base, preventing the truffles from becoming cloyingly sweet. For a lighter version, you can substitute part of the cream cheese with mascarpone, which adds a buttery note without compromising the structure. Be sure the cream cheese is at room temperature; this ensures a smooth, lump‑free mixture that rolls easily.
The Secret Weapons: Chocolate & Butter
The coating is where the magic truly happens – semi‑sweet chocolate chips melt into a glossy, buttery glaze that encases each ball in a thin, crackly shell. Adding a tablespoon of butter to the melted chocolate not only smooths the texture but also gives the coating a beautiful sheen and a melt‑in‑your‑mouth feel. If you prefer a darker, richer taste, opt for 70% cacao chocolate; for a sweeter, milder coat, milk chocolate works beautifully. Remember, the quality of the chocolate directly influences the final taste, so choose a brand that you would enjoy eating on its own.
Finishing Touches: Sprinkles & Garnishes
While the truffles are already delicious on their own, a final garnish can elevate them to a visual masterpiece. Crushed Oreo crumbs, toasted coconut flakes, or a drizzle of white chocolate add texture and a pop of color that makes them Instagram‑ready. For a festive twist, sprinkle red and green non‑nutty confetti for holiday gatherings, or dust with cocoa powder for a sophisticated, matte finish. The garnish is also an opportunity to experiment with flavors – a pinch of sea salt, a dash of espresso powder, or even finely chopped dried cherries can surprise and delight.
With your ingredients prepped and ready, let's get cooking. Here's where the fun really begins…
🍳 Step-by-Step Instructions
🔐 Expert Tips for Perfect Results
The Taste Test Trick
Before you roll the entire batch, take a tiny piece of the cookie‑cream cheese mixture and taste it. If it feels too sweet, a pinch of sea salt can balance the flavors; if it’s a bit dry, a splash of vanilla extract will add depth. This small step ensures that every truffle is seasoned perfectly, and it’s a habit that seasoned pastry chefs swear by. Trust me, a quick taste test saves you from a batch that’s off‑balance.
Why Resting Time Matters More Than You Think
Allowing the dough to chill isn’t just about firmness – it also lets the flavors meld together, creating a more cohesive taste profile. The cream cheese and cookie crumbs have time to absorb each other's aromas, resulting in a richer, more unified flavor when you bite into the truffle. If you’re in a hurry, a minimum of 15 minutes is essential, but 30 minutes yields a noticeably smoother texture.
The Seasoning Secret Pros Won’t Tell You
A dash of espresso powder or a few drops of coffee liqueur can intensify the chocolate flavor without making the truffle taste like coffee. This subtle enhancement deepens the cocoa notes, giving the truffles a sophisticated edge that impresses even the most discerning palates. I once added a pinch of smoked paprika to a batch for a smoky undertone – it was a hit at a dinner party!
The Perfect Dipping Temperature
Chocolate should be dipped at around 115°F (46°C) for semi‑sweet varieties; this temperature ensures the coating is thin enough to glide smoothly but thick enough to set quickly. Use an instant‑read thermometer to monitor the chocolate, especially if you’re melting it on the stovetop. Overheated chocolate can become grainy, while under‑heated chocolate may not coat evenly.
Storage Savvy: Keeping Them Fresh
Store the finished truffles in an airtight container lined with parchment paper to prevent them from sticking together. They stay fresh for up to five days in the refrigerator, and the texture remains just as delightful. If you need to keep them longer, freeze them in a single layer before transferring to a zip‑top bag – they’ll thaw beautifully without losing their glossy coating.
🌈 Delicious Variations to Try
One of my favorite things about this recipe is how versatile it is. Here are some twists I've tried and loved:
Espresso Oreo Truffles
Add two teaspoons of instant espresso powder to the cream cheese mixture for a subtle coffee kick that pairs beautifully with the chocolate coating. The espresso deepens the cocoa flavor, making these truffles perfect for an after‑dinner pick‑me‑up. Garnish with a dusting of cocoa powder for an elegant finish.
White Chocolate Raspberry Swirl
Swap the semi‑sweet chocolate for white chocolate, and before dipping, swirl in a spoonful of raspberry jam into the melted chocolate. The bright pink ribbons create a visual contrast and a sweet‑tart flavor that balances the rich Oreo base. Top with a few fresh raspberry halves for a pop of color.
Peanut Butter Crunch
Fold a tablespoon of creamy peanut butter into the cookie‑cream cheese mixture, and after coating, roll the truffles in crushed peanuts or peanut butter chips. This adds a salty, nutty crunch that complements the sweet chocolate and Oreo flavors. It’s a crowd‑pleaser for anyone who loves the classic PB&J combo.
Mint Chocolate Delight
Add a few drops of peppermint extract to the melted chocolate and sprinkle crushed peppermint candies on top before the coating sets. The cool mint flavor cuts through the richness, creating a refreshing bite that’s perfect for holiday parties. A touch of green food coloring in the chocolate can make them look even more festive.
Salted Caramel Drizzle
After the chocolate coating has set, drizzle a homemade salted caramel sauce over each truffle and sprinkle a pinch of flaky sea salt. The sweet‑salty combination adds a luxurious layer of flavor that feels indulgent without being overwhelming. This variation shines when paired with a cup of black coffee.
Matcha Green Tea Twist
Incorporate a teaspoon of high‑quality matcha powder into the cream cheese mixture for an earthy, slightly bitter note that balances the sweetness. Coat the balls in white chocolate and dust lightly with additional matcha for a sophisticated, pastel‑colored treat. This version is a hit at tea parties and brunches.
📦 Storage & Reheating Tips
Refrigerator Storage
Place the truffles in an airtight container lined with parchment paper, ensuring they don’t touch each other directly. Store them in the refrigerator for up to five days; the chocolate coating will stay firm, and the interior will remain soft and creamy. If you notice condensation forming, simply pat the tops with a paper towel before resealing the container.
Freezing Instructions
For longer‑term storage, arrange the truffles in a single layer on a baking sheet and freeze for two hours. Once solid, transfer them to a zip‑top freezer bag, placing a sheet of wax paper between each layer to prevent sticking. Frozen truffles maintain their flavor and texture for up to three months; when you’re ready to serve, let them thaw in the refrigerator for an hour.
Reheating Methods
If you prefer a warm, melty center, gently warm the truffles in a microwave at 50% power for 10‑15 seconds, or place them in a preheated oven at 300°F (150°C) for five minutes. The trick to reheating without drying out the chocolate is to place a small ramekin of water in the oven, which creates a humid environment. A quick dip in warm milk before serving can also add a luscious sheen and a comforting warmth.
❓ Frequently Asked Questions
Can I use a different type of cookie instead of Oreos?
Do I need to soften the cream cheese, or can I melt it?
How can I make the chocolate coating smoother?
Can I make these truffles vegan?
How long do the truffles stay good at room temperature?
Can I add a liqueur for an adult version?
What’s the best way to roll the truffles uniformly?
Can I skip the chocolate coating and serve them as bite‑size cookies?
Now comes the fun part: garnish! While the chocolate is still tacky, sprinkle crushed Oreo crumbs, colorful sprinkles, or a dusting of cocoa powder over each truffle. If you love a salty contrast, a pinch of flaky sea salt adds a sophisticated edge that makes the chocolate pop. For an extra layer of flavor, drizzle a thin line of white chocolate over the top using a piping bag or a spoon.
Allow the truffles to set at room temperature for about 15 minutes, or place them back in the refrigerator for a quicker set. As the chocolate hardens, you’ll see the surface become glossy and firm, ready to be lifted without breaking. Once fully set, gently pop the truffles off the parchment and arrange them on a serving platter. The final result should be a glossy, chocolate‑coated sphere that yields a soft, creamy center when bitten into.
Similar Recipes
 Desserts
Frozen Yogurt Strawberry Shortcake Bars: A Refreshing Delight for Summer
Delicious Frozen Yogurt Strawberry Shortcake Bars: A Refreshing Delight for Summer
 Desserts
Almond Bars
Learn how to make delicious Almond Bars. Easy recipe with step-by-step instructions.
 Desserts
Homemade Oatmeal Cream Pies: 8 Foolproof Steps to Perfect Chew
Learn how to make delicious Homemade Oatmeal Cream Pies: 8 Foolproof Steps to Perfect Chew. Easy…
 Desserts
Irresistible Pinwheel Cookies: A Colorful Delight
Learn how to make delicious Irresistible Pinwheel Cookies: A Colorful Delight. Easy recipe with step-by-step instructions.
 Desserts
Chocolate Marshmallow Swirl Cookies Recipe for Cozy Nights
Learn how to make delicious Chocolate Marshmallow Swirl Cookies Recipe for Cozy Nights. Easy recipe with…
 Desserts
Caramel Apple Bread Pudding
Indulge in a cozy caramel apple bread pudding, blending sweet caramel, juicy apples, and buttery bread.…
 Desserts
Best Hummingbird Cake Ever: A Tropical Delight Recipe
Learn how to make delicious Best Hummingbird Cake Ever: A Tropical Delight Recipe. Easy recipe with…
 Desserts
Blueberry Cheesecake Swirl Rolls: Your New Sweet Addiction
Learn how to make delicious Blueberry Cheesecake Swirl Rolls: Your New Sweet Addiction. Easy recipe with…

Eva
I cook these recipes at home before they ever land here — simple ingredients, clear steps.