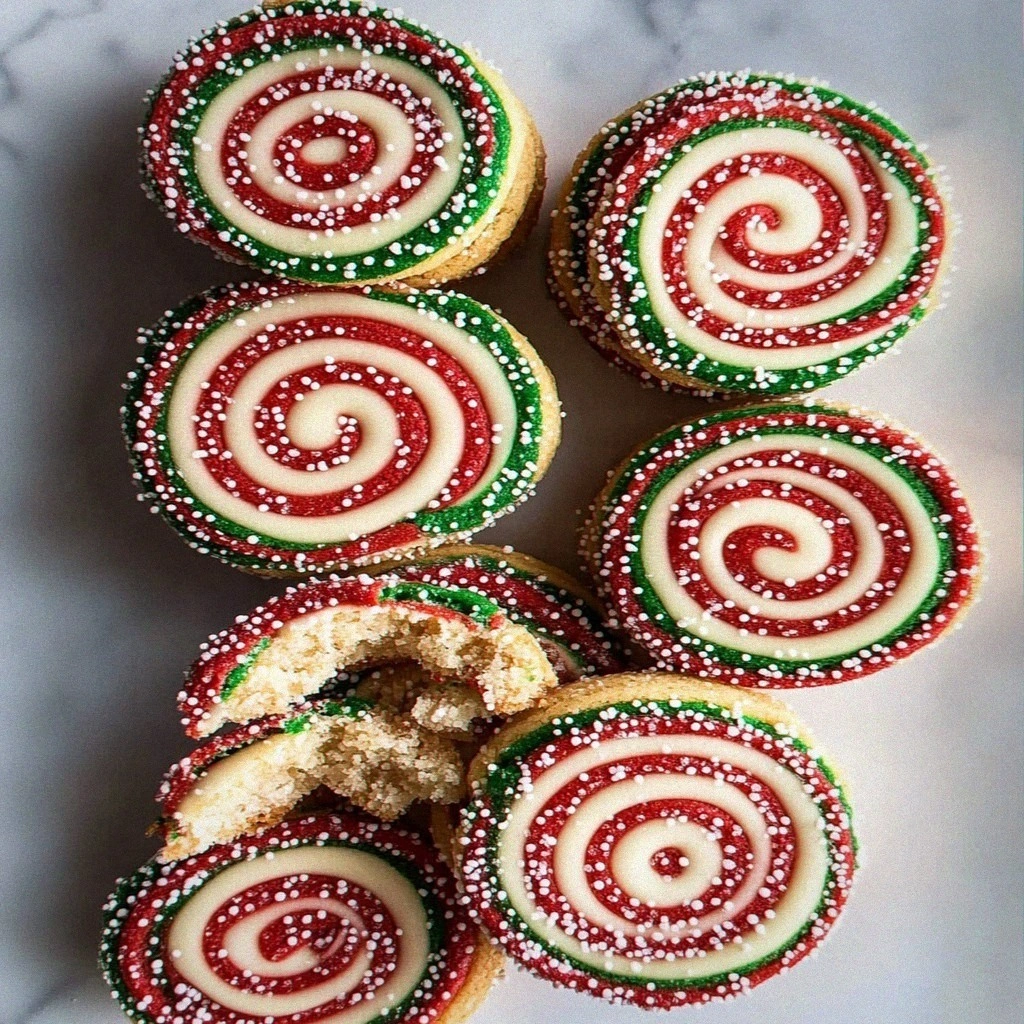
Irresistible Pinwheel Cookies: A Colorful Delight
 Save
Save
It was a rainy Saturday afternoon, the kind where the world outside feels muffled and the kitchen becomes the coziest sanctuary. I was pulling a tray of fresh‑baked chocolate chip cookies from the oven when my niece burst in, eyes wide, demanding something that looked as bright as a summer garden and tasted like a hug. That’s when the idea for Pinwheel Cookies was born – a swirl of buttery dough, a splash of cocoa, and a rainbow of colors that dance on the plate. The moment you lift the lid, a cloud of fragrant steam hits you, carrying whispers of vanilla, melted butter, and a faint hint of chocolate that makes your stomach do a little happy jig.
What makes these cookies truly irresistible is the way each bite offers a different visual and flavor surprise. Imagine a crisp, golden edge giving way to a soft, melt‑in‑your‑mouth center, all while the colors spin like a tiny carnival on your tongue. The secret isn’t just in the swirl; it’s in the balance of high‑quality ingredients, the gentle folding technique, and a few pro tricks that turn a simple dough into a masterpiece. You’ll hear the faint crackle of the butter as it melts, the subtle sigh of the cocoa powder waking up, and the sweet sigh of sugar dissolving – each sound a promise of the delight to come.
But wait – there’s a hidden ingredient most bakers skip, and it makes all the difference in achieving that flawless, glossy finish. I’ll reveal that in step four, where a tiny tweak can turn a good cookie into a show‑stopping one. And if you’ve ever wondered why the bakery version of pinwheel cookies looks so perfect, the answer lies in a few minute‑long pauses that let the dough rest and the flavors marry. Trust me, these pauses are the unsung heroes of any great bake.
Here’s exactly how to make it – and trust me, your family will be asking for seconds, thirds, and maybe even a midnight snack run. Grab your mixing bowls, preheat that oven, and let’s spin some magic together. The best part? You don’t need any fancy equipment; just a few everyday tools and a dash of enthusiasm. Ready? Let’s dive in and create a colorful delight that will become a beloved tradition in your home.
🌟 Why This Recipe Works
- Flavor Depth: The combination of unsweetened cocoa powder and pure vanilla extract creates a layered taste that’s both rich and aromatic. Each bite delivers a subtle chocolate undertone balanced by the sweet kiss of sugar, making the cookies unforgettable.
- Texture Harmony: The butter is softened just enough to coat the flour, resulting in a tender crumb that stays soft inside while the edges turn delightfully crisp. This contrast keeps the palate interested from the first bite to the last.
- Ease of Preparation: The method uses a single bowl for mixing, minimizing cleanup and allowing even beginners to feel confident. You’ll be amazed at how quickly you can go from raw dough to a gorgeous batch of pinwheels.
- Time Efficiency: With a prep time of only fifteen minutes and a bake time of thirty, you can have a fresh batch ready before the kids finish their homework. It’s perfect for spontaneous gatherings or last‑minute dessert cravings.
- Versatility: The base dough is a blank canvas that welcomes endless color and flavor variations, from citrus zest to toasted nuts, making it adaptable for holidays, birthdays, or everyday treats.
- Ingredient Quality: Using high‑quality all‑purpose flour and cocoa ensures a consistent structure and deep chocolate flavor, while unsalted butter lets you control the salt level for perfect balance.
- Crowd‑Pleasing Factor: The vibrant swirls are as eye‑catching as they are tasty, drawing kids and adults alike to the plate. It’s a conversation starter that turns any snack time into a celebration.
🥗 Ingredients Breakdown
The Foundation
All‑Purpose Flour is the backbone of any cookie, providing structure and a tender crumb when combined with butter. Choose a brand that feels powdery to the touch; this indicates a finer grind that will absorb the butter evenly, resulting in a smoother dough. If you’re gluten‑sensitive, a 1‑to‑1 gluten‑free flour blend works surprisingly well, though the texture may be a touch more crumbly. The flour’s role is to create a matrix that holds the air pockets formed during creaming, which later expands into those delicate, airy interiors we love.
Sweetness & Moisture
Granulated Sugar does more than sweeten; it also contributes to the cookie’s spread and crispness. When creamed with butter, sugar creates tiny air pockets that lift the dough, giving the final cookie a light, melt‑in‑your‑mouth feel. Adjust the amount if you prefer a less sweet bite – but remember, sugar also caramelizes, adding that irresistible golden edge. For a deeper flavor, you could substitute half of the granulated sugar with brown sugar, which introduces a subtle molasses note.
The Rich Base
Butter, preferably unsalted and at room temperature, is the flavor engine of these cookies. Its fat coats the flour particles, limiting gluten formation and ensuring a tender crumb. The butter also carries the cocoa and vanilla, spreading their aromas throughout the dough. If you’re looking for a dairy‑free alternative, a high‑quality plant‑based butter works, though the flavor profile will shift slightly toward a nutty undertone.
Binding & Lift
Eggs act as the glue that holds everything together while also adding richness. Two large eggs provide enough protein to give the dough structure without making it dense. Fresh eggs are key – they bring a bright, airy quality that older eggs can’t match. If you’re vegan, a flax‑egg (1 tablespoon ground flaxseed mixed with 3 tablespoons water) can mimic the binding properties, though the texture will be a tad more crumbly.
Chocolate Whisper
Cocoa Powder, unsweetened, introduces a deep chocolate flavor without adding extra sugar. High‑quality cocoa, like Dutch‑processed, gives a smoother, richer taste and a darker hue that contrasts beautifully with the colorful swirls. If you want a lighter chocolate note, you can use natural cocoa, but expect a slightly more bitter edge. A pinch of salt can amplify the cocoa’s depth, turning a simple chocolate taste into a sophisticated one.
Aromatic Finish
Vanilla Extract is the final aromatic flourish that ties all the flavors together. A splash of pure vanilla adds a warm, sweet perfume that lingers long after the cookies have cooled. Always use a high‑quality extract; imitation vanilla can taste flat and may mask the delicate cocoa notes. For an adventurous twist, try almond extract or a hint of citrus zest to brighten the flavor profile.
With your ingredients prepped and ready, let's get cooking. Here’s where the fun really begins…
🍳 Step-by-Step Instructions
🔐 Expert Tips for Perfect Results
The Taste Test Trick
Before you bake the full batch, bake a single pinwheel as a test. This lets you gauge the exact moment the edges turn golden without over‑baking the centers. I once baked a full tray and ended up with slightly over‑cooked edges; the test bite saved me from that mistake. The test cookie also reveals if you need a touch more salt or a splash of vanilla, allowing you to adjust before the big bake.
Why Resting Time Matters More Than You Think
After mixing, let the dough rest in the refrigerator for at least 30 minutes. This chilling period firms up the butter, making it easier to slice cleanly and preventing the colors from bleeding. The rest also gives the flour time to fully hydrate, resulting in a softer interior. I once skipped this step in a rush, and the pinwheels turned out flat and color‑smudged – a lesson learned the hard way.
The Seasoning Secret Pros Won’t Tell You
A pinch of sea salt sprinkled on top just before baking can elevate the flavor dramatically. The salt creates a subtle contrast that makes the sweetness pop and the chocolate notes shine. Professionals often finish their pastries with flaky salt for texture and taste, and you can easily replicate that magic at home. Trust me on this one – it’s a game‑changer.
The Color Lock Technique
To keep the colors vivid, use gel food coloring instead of liquid. Gel colors have a higher pigment concentration, meaning you need fewer drops, which reduces the amount of liquid added to the dough. Too much liquid can make the dough sticky and cause the swirls to merge. The result is crisp, bright spirals that stay distinct even after baking.
The Perfect Baking Surface
A silicone baking mat can be a better alternative to parchment paper because it distributes heat evenly and prevents the cookies from spreading too much. I love the gentle release it offers – the pinwheels slide off without breaking. If you don’t have a mat, a lightly greased baking sheet works, but keep an eye on the edges to avoid over‑spreading.
🌈 Delicious Variations to Try
One of my favorite things about this recipe is how versatile it is. Here are some twists I've tried and loved:
Citrus Zest Burst
Add a teaspoon of finely grated lemon or orange zest to the dough for a bright, aromatic lift. The citrus pairs beautifully with the chocolate, creating a sophisticated flavor that feels both fresh and indulgent. This variation works especially well for spring gatherings.
Nutty Crunch Delight
Fold in a quarter cup of toasted chopped almonds or hazelnuts just before shaping the pinwheels. The nuts add a pleasant crunch that contrasts the soft interior, while their buttery flavor complements the cocoa. I love sprinkling a few extra nuts on top before baking for extra visual appeal.
Matcha Green Dream
Replace one of the colored portions with a matcha‑infused dough. Dissolve a teaspoon of high‑quality matcha powder into a tablespoon of warm water, then blend it into the butter‑sugar mixture before adding the flour. The earthy green hue pairs surprisingly well with chocolate, delivering a subtle tea flavor.
Spiced Holiday Twist
Incorporate a pinch of ground cinnamon, nutmeg, and a dash of clove into the dry ingredients for a warm, festive profile. This variation is perfect for winter holidays, especially when paired with a dusting of powdered sugar shaped into snowflakes.
Double‑Chocolate Decadence
Swap half of the cocoa powder for melted dark chocolate, and add a tablespoon of cocoa nibs to the dough. The result is an ultra‑rich chocolate experience with a slight crunch from the nibs. It’s a dream for any true chocolate lover.
📦 Storage & Reheating Tips
Refrigerator Storage
Place the cooled pinwheels in an airtight container lined with parchment paper. They will stay fresh for up to five days, maintaining their softness thanks to the butter’s natural moisture. If you notice any condensation, simply open the container for a few minutes to let excess humidity escape.
Freezing Instructions
For longer‑term storage, arrange the cookies in a single layer on a baking sheet and freeze them for an hour. Once solid, transfer them to a zip‑top freezer bag, removing as much air as possible. Frozen pinwheels keep their flavor and texture for up to three months. When you’re ready to enjoy them, let them thaw at room temperature for 15 minutes before serving.
Reheating Methods
To revive a day‑old cookie, pop it in a preheated oven at 300°F (150°C) for about five minutes. The gentle heat restores the crisp edge while keeping the center soft. The trick to reheating without drying it out? Place a small oven‑safe dish of water on the lower rack; the steam keeps the cookies moist.
❓ Frequently Asked Questions
Can I use whole wheat flour instead of all‑purpose?
Why are my colors bleeding together?
Can I make these gluten‑free?
Do I need to use a stand mixer?
How can I make the cookies extra crunchy?
Can I add frosting or glaze?
Why do my cookies spread too much?
Can I use natural sweeteners instead of granulated sugar?
Similar Recipes
 Desserts
Berry Delight Banana Bark Recipe
Delicious Berry Delight Banana Bark Recipe
 Desserts
Warm Cinnamon Apple Oatmeal Cookies
Delicious Warm Cinnamon Apple Oatmeal Cookies
 Desserts
Mini Banana Pudding Cheesecakes: A Delightful Dessert Experience
Delicious Mini Banana Pudding Cheesecakes: A Delightful Dessert Experience
 Desserts
Strawberry Earthquake Cake: A Deliciously Unique Dessert Recipe
Learn how to make delicious Strawberry Earthquake Cake: A Deliciously Unique Dessert Recipe. Easy recipe with…
 Desserts
Autumn Harvest Fruit Pizza Recipe
Delicious Autumn Harvest Fruit Pizza Recipe
 Desserts
Blackberry Lavender Ice Cream Sandwiches: A Delightful Summer Treat
Delicious Blackberry Lavender Ice Cream Sandwiches: A Delightful Summer Treat
 Desserts
Delightful Baby Lemon Impossible Pies: A Zesty Treat for Every Occasion
Delicious Delightful Baby Lemon Impossible Pies: A Zesty Treat for Every Occasion
 Desserts
Delightful Blueberry Cream Cheese Bites Recipe
Delicious Delightful Blueberry Cream Cheese Bites Recipe

Eva
I cook these recipes at home before they ever land here — simple ingredients, clear steps.
Other Reader Favorites
 Appetizers
Spicy Buffalo Cauliflower Tostadas
Delicious Spicy Buffalo Cauliflower Tostadas
 Dinner
Cheesy Broccoli Bliss Quinoa Casserole: Step-by-Step Instructions and More
Delicious Cheesy Broccoli Bliss Quinoa Casserole: Step-by-Step Instructions and More
 Desserts
Triple Layer Fudgy Mint Oreo Brownies
Delicious Triple Layer Fudgy Mint Oreo Brownies
 Dinner
Spicy Korean BBQ Cauliflower Bites: A Flavorful Plant-Based Delight
Delicious Spicy Korean BBQ Cauliflower Bites: A Flavorful Plant-Based Delight