Introduction
Crème brûlée, often lauded as the epitome of French dessert mastery, has enchanted dessert lovers across the globe with its perfect marriage of simplicity and sophistication. This classic dish features a rich and creamy custard base, made luscious by the natural flavors of vanilla bean, topped with a contrasting layer of brittle caramelized sugar. The moment a spoon breaks through the glossy, burnt sugar crust to reveal the velvety custard beneath is nothing short of magical.
Whether you’re hosting an elegant dinner party, celebrating a special occasion, or simply indulging in a sweet treat at home, crème brûlée is a versatile and timeless choice that never fails to impress. Its appeal lies not only in its exquisite taste but also in the artful presentation, making it a show-stopping finale to any meal. With just a handful of high-quality ingredients and a few essential techniques, you too can create this restaurant-quality dessert in your own kitchen.
Understanding Crème Brûlée
The history of crème brûlée is as rich and layered as the dessert itself. While its exact origins are often debated, it is widely accepted that this delectable treat hails from France, with its roots tracing back to the 17th century. The earliest mention of a similar dessert appears in the 1691 cookbook “Cuisinier royal et bourgeois” by François Massialot, who referred to it as “crème brûlée,” a term that translates to “burnt cream.”
Over the years, crème brûlée evolved into the dessert we recognize today, gaining popularity not only in France but around the world. Its smooth custard base and caramelized top have made it a favorite among pastry chefs and home bakers alike. The allure of crème brûlée lies in its elegance, which allows it to adapt to various culinary trends and flavor profiles. Today, you can find countless variations, from chocolate and coffee to fruit-infused versions, but the classic vanilla bean remains a beloved favorite.
In modern culinary culture, crème brûlée holds a special place in the hearts of dessert enthusiasts. Its iconic status is celebrated in restaurants and homes alike, often served in elegant ramekins that showcase the beautiful contrast between the creamy custard and the shiny caramel top. The dessert’s enduring popularity is a testament to its timeless appeal and the skill required to master its preparation.
Key Ingredients for a Perfect Crème Brûlée
Creating the perfect crème brûlée relies on selecting high-quality ingredients that contribute to its signature texture and flavor. Below are the primary components of this decadent dessert, along with their roles in achieving that sought-after creamy custard.
Heavy Cream
The foundation of any crème brûlée is heavy cream. Its high fat content, typically around 36%, is crucial for creating the dessert’s silky and rich texture. The cream provides a luxurious mouthfeel, ensuring that each spoonful glides effortlessly across the palate. Using heavy cream rather than lighter alternatives is essential to achieving the authentic crème brûlée experience.
Vanilla Bean vs. Vanilla Extract
When it comes to flavoring crème brûlée, vanilla bean is the gold standard. The tiny black specks from the seeds of the vanilla pod not only provide visual appeal but also deliver a depth of flavor that vanilla extract simply cannot replicate. The complex notes of the fresh vanilla bean elevate the custard, making it a standout feature of the dessert. While vanilla extract can be used in a pinch, for an authentic and truly heavenly crème brûlée, opt for whole vanilla beans whenever possible.
Egg Yolks
Egg yolks are the secret ingredient that transforms the heavy cream into a creamy custard. They act as a natural thickening agent, providing body and richness to the mixture. The emulsification properties of the yolks ensure that the fat from the cream is evenly distributed throughout the custard, resulting in a smooth and cohesive texture. The yolks also contribute to the beautiful golden hue of the finished dessert.
Granulated Sugar
Granulated sugar plays a dual role in crème brûlée. First, it sweetens the custard, balancing the richness of the cream and the depth of the vanilla. Second, sugar is essential for creating the iconic caramelized top. After the custard has set and chilled, a sprinkle of sugar is torched until it melts and forms a crisp, glass-like layer that contrasts beautifully with the creamy custard beneath.
Salt
While it may seem like a small addition, a pinch of salt is crucial in elevating the overall flavor profile of crème brûlée. Salt enhances the sweetness of the sugar and the richness of the cream, creating a well-rounded and satisfying dessert. It helps to balance the flavors, ensuring that no single element overpowers the others.
Step-by-Step Instructions for Heavenly Vanilla Bean Crème Brûlée
Now that we’ve covered the essential ingredients, let’s dive into the step-by-step process for crafting your own heavenly vanilla bean crème brûlée. Follow these instructions carefully to achieve the perfect custard and caramelized top.
Preheating the Oven
Before you begin preparing the custard, it’s important to preheat your oven to 325°F (163°C). Proper temperature control is vital for even baking, ensuring that the custard sets gently without curdling. An oven thermometer can be a handy tool to confirm that your oven is at the correct temperature.
Infusing the Cream
To infuse maximum flavor into your crème brûlée, start by combining the heavy cream and the split vanilla bean in a saucepan. Heat the mixture over medium heat until it just begins to simmer. Be careful not to let it boil, as boiling can cause the cream to scorch. Once the cream is heated, remove it from the heat and allow the vanilla to steep for about 15 to 20 minutes. This step allows the vanilla bean to release its aromatic oils, imparting a rich and complex flavor to the cream.
Whisking the Yolks
While the cream is infusing, it’s time to prepare the egg yolks. In a mixing bowl, combine the egg yolks and granulated sugar. Using a whisk or electric mixer, beat the mixture until it becomes pale and slightly thickened. This process not only incorporates air into the yolks but also helps dissolve the sugar, resulting in a smoother custard. Aim for a consistency that is thick enough to leave a trail when you lift the whisk from the mixture.
Combining Mixtures
Once the cream has finished steeping, it’s time to combine the two mixtures. First, remove the vanilla bean pod from the cream, scraping any remaining seeds back into the liquid. To ensure that the egg yolks do not curdle, you will need to temper them by slowly adding the warm cream to the yolk mixture. Begin by adding a small amount of the hot cream to the yolks while whisking continuously. This gradual process raises the temperature of the yolks without cooking them. Once the yolks are warmed, slowly pour in the remaining cream while whisking until fully combined.
These initial steps set the stage for the creamy custard that defines crème brûlée. Following this method will ensure that you achieve the desired texture and flavor profile, making your dessert truly unforgettable.
Stay tuned for the next section, where we will explore the remaining steps to complete your heavenly vanilla bean crème brûlée, along with tips to ensure your success in creating this decadent dessert.
Straining the Mixture
Once you have combined your egg yolks, sugar, and vanilla bean-infused cream, it’s crucial to strain the mixture before pouring it into your ramekins. This step significantly impacts both the texture and presentation of your crème brûlée. Straining removes any cooked egg bits that may have formed during mixing, ensuring a silky-smooth custard. Use a fine mesh sieve placed over a bowl, and pour the mixture slowly through it. You’ll be left with a refined, creamy liquid that will set beautifully in the oven. This technique not only enhances the mouthfeel but also gives your dessert a professional finish, devoid of any unsightly lumps.
Preparing the Ramekins
Choosing the right ramekins is essential for portioning and presentation. Opt for 6-ounce ramekins if you want a traditional serving size that is easy to handle. Before you fill them, make sure to place them in a roasting pan or a larger baking dish, as this will facilitate the water bath cooking method. Lightly grease the inside of the ramekins with butter, which adds a subtle flavor and helps with the easy release of the custard after baking. Additionally, using a shallow pan allows for better heat distribution during baking, which is key for achieving that perfectly creamy texture.
Water Bath Technique
The water bath, or bain-marie, is a technique that involves placing your ramekins in a larger pan filled with hot water. This method ensures gentle and even cooking, preventing the custard from curdling and promoting a creamy final product. To set up your water bath, simply fill the roasting pan with hot water until it reaches halfway up the sides of the ramekins. This indirect heat allows the custard to cook slowly and uniformly, which is essential for that delicate texture crème brûlée is known for. It’s important to preheat your oven before placing the pan inside, as this will create a consistent temperature environment for your custards.
Baking Process
When it comes to the baking process, timing and temperature are everything. Preheat your oven to 325°F (160°C) and bake the crème brûlée for about 30 to 40 minutes. The custard is done when the edges are set, but the center still has a slight jiggle. This slight jiggle indicates that the custard will continue to firm up as it cools, achieving that perfect creamy consistency without becoming rubbery. Once baked, remove the ramekins from the water bath carefully to avoid any water from splashing into your custards. Allow them to cool first at room temperature and then refrigerate for at least two hours, or up to two days, before serving.
Caramelizing the Sugar
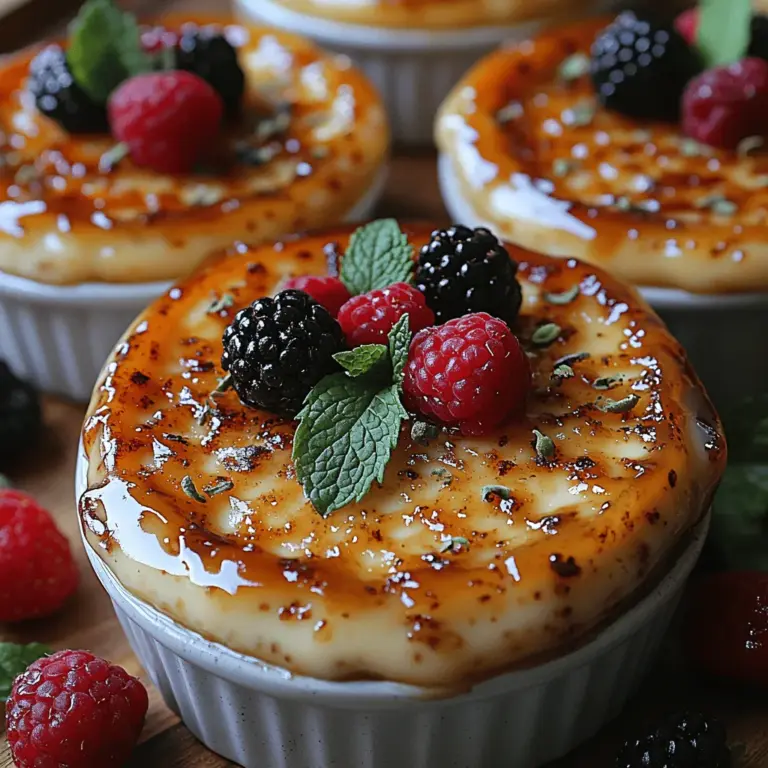
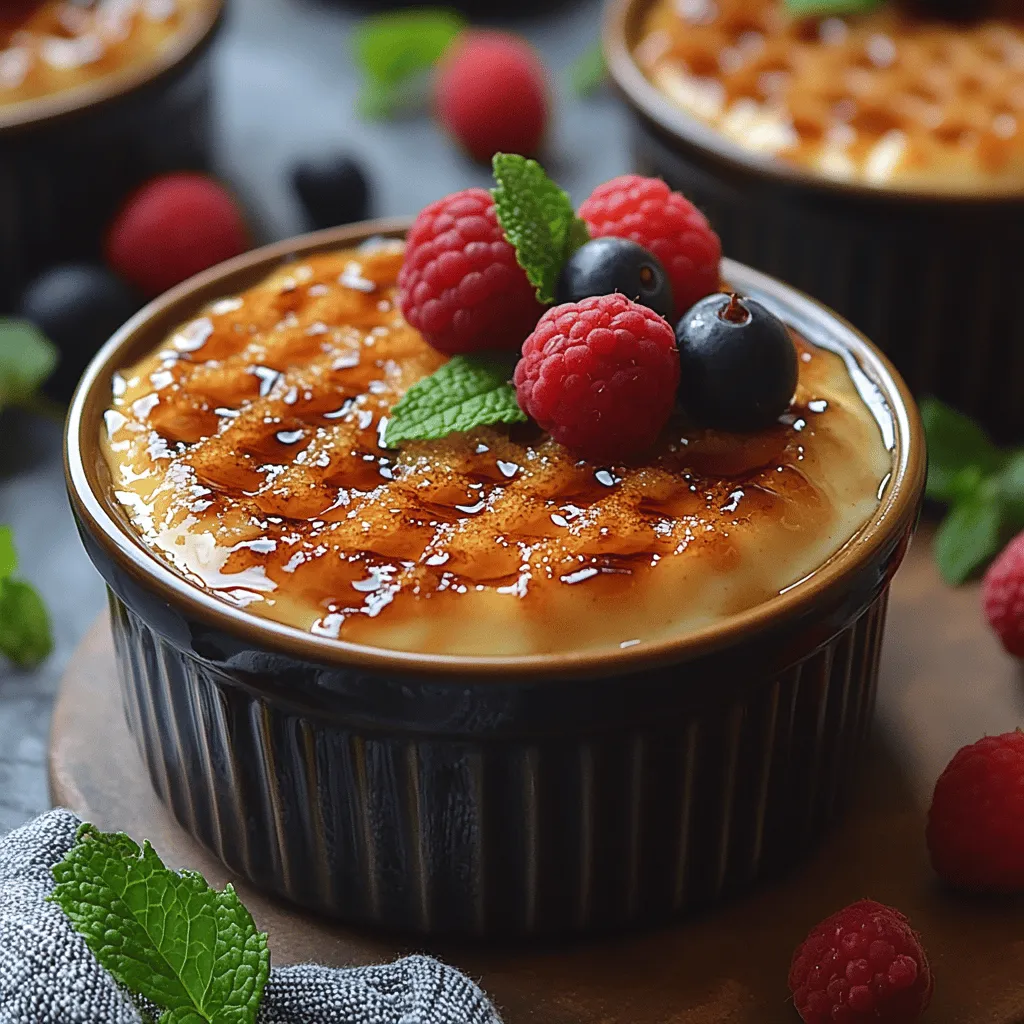
Achieving the perfect hard caramel crust is one of the most rewarding aspects of making crème brûlée. Once your custards have chilled, sprinkle an even layer of granulated sugar over the surface of each ramekin. Using a kitchen torch is the most effective way to caramelize the sugar, as it allows for precise control. Move the flame in a circular motion until the sugar melts and bubbles, eventually turning a golden brown. If you don’t have a kitchen torch, you can use the broiler method instead. Place the ramekins on a baking sheet and broil them in the oven, watching closely to avoid burning. Once the sugar has caramelized and hardened, let the crème brûlées sit for a minute to allow the crust to cool and harden completely, creating that satisfying crack when you dive in with a spoon.
Garnishing and Serving Suggestions
Presentation is key when serving crème brûlée, as it is a dish that should impress both the eyes and the palate. Consider garnishing each ramekin with fresh berries—such as raspberries or strawberries—alongside a few mint leaves for a pop of color that contrasts beautifully with the golden crust. These additions not only elevate the visual appeal but also bring a refreshing balance to the rich custard.
Pair your crème brûlée with a dessert wine, such as a late-harvest Riesling or a sweet Moscato, which complements the sweetness of the dish. Alternatively, a rich cup of coffee or espresso makes for a delightful pairing, creating a perfect end to a meal. For the best tasting experience, serve your crème brûlée slightly chilled, ideally after allowing it to set in the refrigerator. The contrast between the cool custard and the warm caramelized sugar crust is what makes this dessert truly heavenly.
Common FAQs About Crème Brûlée
Can I make crème brûlée in advance?
Absolutely! Crème brûlée can be made in advance, making it an excellent choice for dinner parties or special occasions. Prepare the custards up to two days ahead of time, storing them covered in the refrigerator. Just remember to caramelize the sugar right before serving to ensure that the crust remains crisp and fresh.
What if I don’t have a kitchen torch?
If you don’t own a kitchen torch, don’t worry! You can achieve similar results using your oven’s broiler. Simply sprinkle sugar on top of the custard and place the ramekins under the broiler for a few minutes, watching closely to prevent burning. Rotate them as needed for even caramelization.
How can I ensure my custard is perfectly smooth?
To ensure a smooth custard, be sure to strain your mixture through a fine mesh sieve before pouring it into the ramekins. Additionally, avoid cooking the custard at too high a temperature, as this can lead to curdling. The water bath technique also significantly contributes to a creamy texture.
Are there variations of crème brûlée to try?
Yes, crème brûlée can be customized in numerous ways! Consider infusing the cream with flavors like coffee, chocolate, or citrus zest for a twist on the classic recipe. You can also experiment by incorporating spices like cinnamon or cardamom for an extra layer of flavor. The possibilities are endless, allowing you to create a version that suits your taste.
Conclusion
Making crème brûlée at home is an incredibly rewarding experience that allows you to showcase your culinary skills while delighting your friends and family with an indulgent dessert. The combination of creamy custard and a perfectly caramelized sugar crust creates a luxurious treat that is sure to impress. Embrace the process of creating this classic French dessert, and celebrate your achievements in the kitchen. Whether you savor it on a quiet evening or serve it at a special gathering, crème brûlée is a dessert that will always leave a lasting impression. Enjoy the sweet rewards of your labor and the joy of sharing this heavenly creation with loved ones!