Power-Packed Peanut Butter Oatmeal Protein Bars
 Save
Save
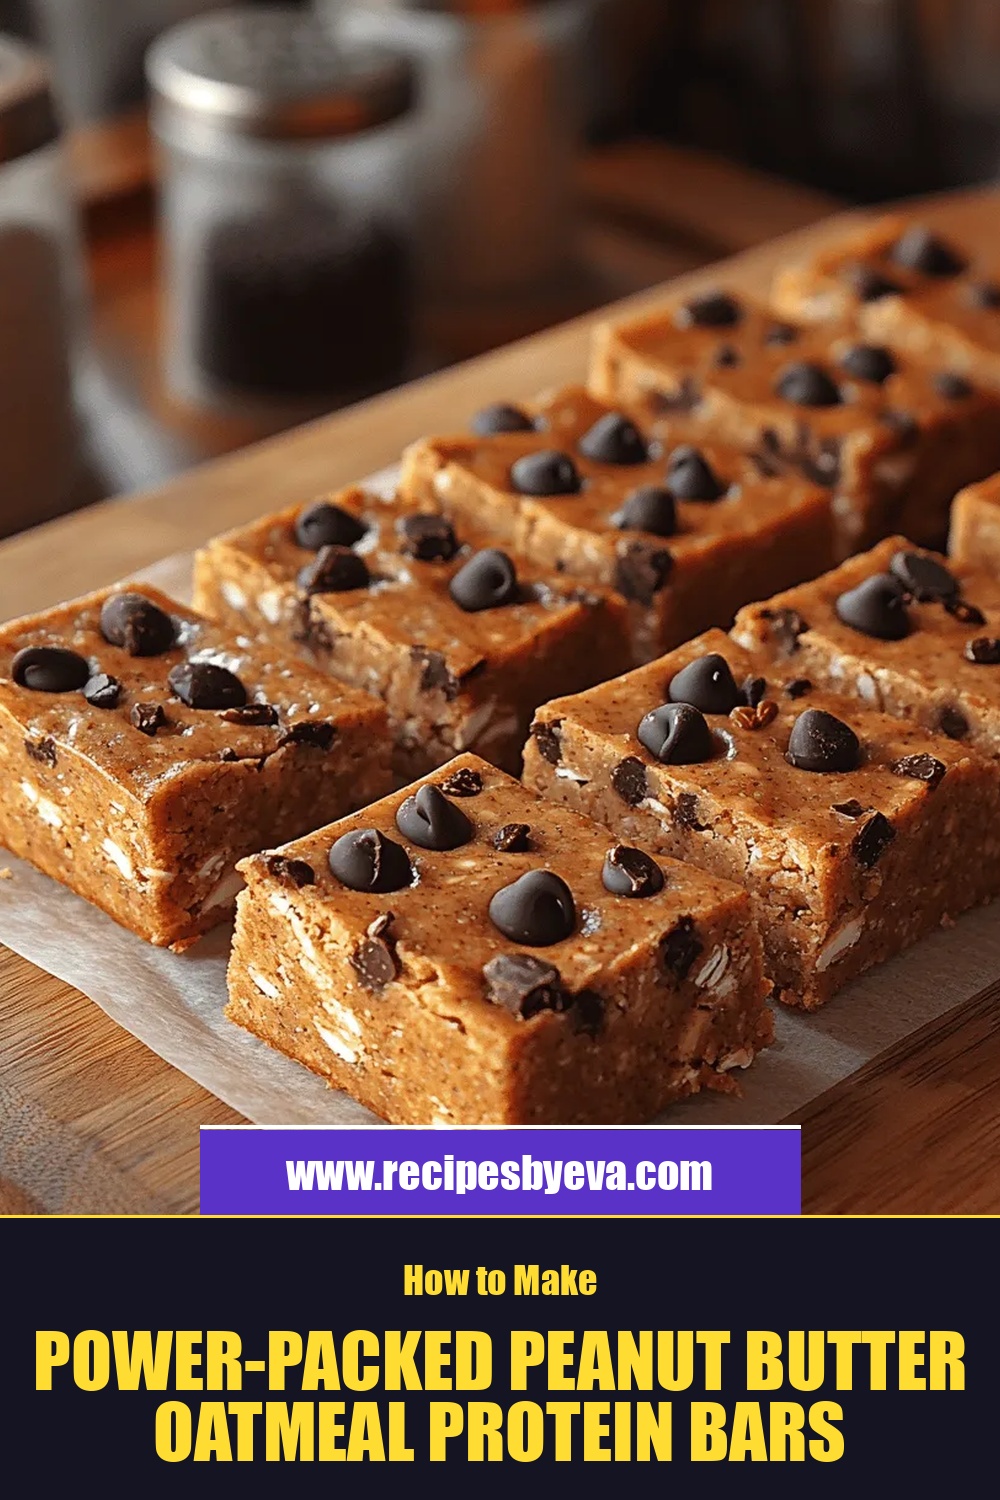
Imagine biting into a bar that feels like a post‑workout celebration—chewy, nutty, and brimming with protein. That’s exactly what the Power‑Packed Peanut Butter Oatmeal Protein Bars deliver, turning a simple snack into a nutritional powerhouse.
What sets these bars apart is the harmonious blend of creamy peanut butter, hearty rolled oats, and a protein‑rich whey boost, all lightly sweetened with natural honey. The result is a bar that’s dense enough to satisfy hunger yet soft enough to melt in your mouth.
Whether you’re a busy professional, a dedicated athlete, or a parent looking for a wholesome after‑school treat, these bars fit any lifestyle. They’re perfect for pre‑gym fuel, an on‑the‑go breakfast, or a guilt‑free dessert.
The process is straightforward: combine dry and wet components, press the mixture into a pan, and bake until golden. A quick cool, slice, and you have a batch of bars ready to power your day.
Why You'll Love This Recipe
Protein‑Rich Energy: Each bar packs over 15 g of high‑quality protein, keeping you full and fueling muscle recovery without a sugar crash.
Whole‑Food Ingredients: Rolled oats, natural peanut butter, and honey provide fiber, healthy fats, and antioxidants for sustained vitality.
Simple Prep: Minimal equipment and a single‑pan method mean you can whip up a batch in under 40 minutes, even on a hectic schedule.
Customizable Flavors: Add chocolate chips, dried fruit, or a dash of cinnamon to tailor each batch to your personal cravings.
Tips & Tricks
Perfecting the Recipe
Measure Ingredients Accurately. Use a kitchen scale for oats and protein powder; a slight deviation can affect texture dramatically.
Press Firmly. A well‑packed base prevents the bars from falling apart when sliced.
Cool Completely Before Cutting. Warm bars are soft and can crumble; full cooling firms them up.
Flavor Enhancements
Add a pinch of cinnamon or espresso powder to the dry mix for a subtle warmth. Swirl in a tablespoon of almond butter for a deeper nutty note. Finish each bar with a light drizzle of melted dark chocolate for an indulgent contrast.
Common Mistakes to Avoid
Avoid over‑baking; the bars will become dry and lose chewiness. Also, don’t skip the resting period—cutting too early releases moisture and creates crumbs.
Pro Tips
Use a Lightly Oiled Knife. Dip the blade in a little oil before slicing to achieve clean cuts without sticking.
Swap Whey for Plant Protein. A pea‑protein isolate works equally well for vegans while keeping the protein content high.
Freeze for a Firmer Texture. After the bars have cooled, wrap them individually and freeze for 30 minutes; they’ll be easier to handle for on‑the‑go snacks.
Variations
Ingredient Swaps
Replace rolled oats with puffed quinoa for a lighter crunch, or swap peanut butter for almond or cashew butter to change the nut profile. For extra antioxidants, fold in a handful of dried blueberries or goji berries. Each swap alters flavor and texture while maintaining the bar’s nutritional core.
Dietary Adjustments
For a gluten‑free version, ensure the oats are certified gluten‑free. To make the bars vegan, use a plant‑based protein powder and substitute honey with maple syrup or agave nectar. Keto lovers can lower the carb count by using almond flour in place of half the oats and opting for a sugar‑free sweetener.
Serving Suggestions
Pair a bar with a glass of cold almond milk for a balanced snack, or crumble it over Greek yogurt and fresh berries for a protein‑rich parfait. For athletes, combine two bars with a banana and a scoop of whey in a post‑workout shake.
Storage Info
Leftover Storage
Allow the bars to reach room temperature, then place them in an airtight container. Store in the refrigerator for up to 5 days; the cool environment preserves moisture and keeps the texture chewy. For longer keeping, freeze individual bars wrapped in parchment and sealed in a zip‑top bag for up to 3 months.
Reheating Instructions
To enjoy a warm bar, microwave a single piece for 15‑20 seconds, or place a stack in a 300°F oven for 5‑7 minutes, covered with foil. This restores softness without drying out the edges. Add a drizzle of extra peanut butter or honey after reheating for an extra burst of flavor.
Frequently Asked Questions
Can I make these bars ahead of time?
Can I use a different protein powder?
How do I keep the bars from getting too dry?
What’s the best way to slice the bars evenly?
These Power‑Packed Peanut Butter Oatmeal Protein Bars bring together wholesome ingredients, a simple bake‑and‑press method, and a generous protein punch—all in a portable, tasty form. By following the step‑by‑step guide, you’ll consistently create bars that stay moist, chewy, and energizing. Feel free to experiment with swaps, add‑ins, or dietary tweaks to make the recipe truly yours. Grab a bar, enjoy the boost, and let each bite fuel your next adventure.
Power-Packed Peanut Butter Oatmeal Protein Bars
Delicious Power-Packed Peanut Butter Oatmeal Protein Bars
Ingredients
Dry Base
- 2 cups rolled oats
- 1 cup vanilla whey protein powder
- ½ cup ground flaxseed
Wet Mix
- ¾ cup natural peanut butter (smooth)
- ¼ cup honey
- ¼ cup unsweetened almond milk
Add‑Ins & Flavor
- 1 teaspoon pure vanilla extract
- ¼ teaspoon sea salt
- Optional: ½ cup dark chocolate chips
Instructions
Merging Dry and Wet
- Combine. Pour the wet blend over the dry mixture. Using a sturdy spatula, fold the ingredients together until a thick, cohesive dough forms. The mixture should stick together when pressed; if it feels crumbly, add a splash of almond milk, one tablespoon at a time.
- Incorporate Add‑Ins. If you’re using chocolate chips or dried fruit, fold them in now. Distribute evenly so each bar receives a burst of flavor and texture.
- Press into Pan. Line a 9‑inch square baking pan with parchment paper. Transfer the dough into the pan and use the back of a spoon or a piece of parchment to press it down firmly and evenly. A compact surface ensures clean cuts after baking.
- Bake. Preheat your oven to 350°F (175°C). Place the pan on the middle rack and bake for 18‑20 minutes, or until the edges turn a light golden brown and a toothpick inserted in the center comes out clean. The heat sets the bars without drying them out.
- Cool & Slice. Remove the pan from the oven and let the bars cool in the pan for 10 minutes, then transfer the parchment to a wire rack. Once completely cool (about 20‑30 minutes), lift the slab out and cut into 12 equal squares using a sharp knife. Clean cuts prevent crumbling.
Similar Recipes
 Breakfast
Mini French Toast Cereal Sliders
Delicious Mini French Toast Cereal Sliders
 Breakfast
Blueberry Bliss Protein Muffins: A Comprehensive Guide to Preparation and Enjoyment
Delicious Blueberry Bliss Protein Muffins: A Comprehensive Guide to Preparation and Enjoyment
 Breakfast
Decadently Healthy Chocolate Zucchini Muffins
Delicious Decadently Healthy Chocolate Zucchini Muffins
 Breakfast
Healthy Apple Cinnamon Muffins
Delicious Healthy Apple Cinnamon Muffins
 Breakfast
Nutty Paradise Chewy Granola Bars Recipe: A Healthier Snack Option
Delicious Nutty Paradise Chewy Granola Bars Recipe: A Healthier Snack Option
 Breakfast
Spicy Hatch Chili Breakfast Taquitos: The Ultimate Recipe Guide
Delicious Spicy Hatch Chili Breakfast Taquitos: The Ultimate Recipe Guide
 Breakfast
Savory Eggs Benedict Casserole: A Delicious and Convenient Twist on a Classic
Delicious Savory Eggs Benedict Casserole: A Delicious and Convenient Twist on a Classic
 Breakfast
Baked Cinnamon Cream Cheese Roll-Ups: A Sweet Indulgence
Delicious Baked Cinnamon Cream Cheese Roll-Ups: A Sweet Indulgence

Eva
I cook these recipes at home before they ever land here — simple ingredients, clear steps.